

Your new Logitech G733 wireless headset sits unboxed on your desk, promising immersive audio and RGB lighting—but that blinking light on the USB receiver makes you wonder exactly how to setup Logitech G733 properly. Don’t worry, this isn’t another complicated tech setup that requires hours of troubleshooting. With its 20-meter wireless range, 29-hour battery life, and Blue VO!CE microphone technology, the G733 is designed for quick connection right out of the box.
Many users get stuck at the first hurdle: getting Windows to recognize the headset or G Hub software freezing on “Setting Up.” You’ve probably already plugged in the USB receiver only to see that frustrating blinking light with no sound. This guide cuts through the confusion with precise, tested steps that work whether you’re using Windows 10 or 11. By the time you finish reading, you’ll have your G733 connected, customized, and performing at its full potential—no tech support call needed.
Connect Your Logitech G733 to PC in 30 Seconds
Insert the Logi Bolt Receiver for Instant Wireless Connection
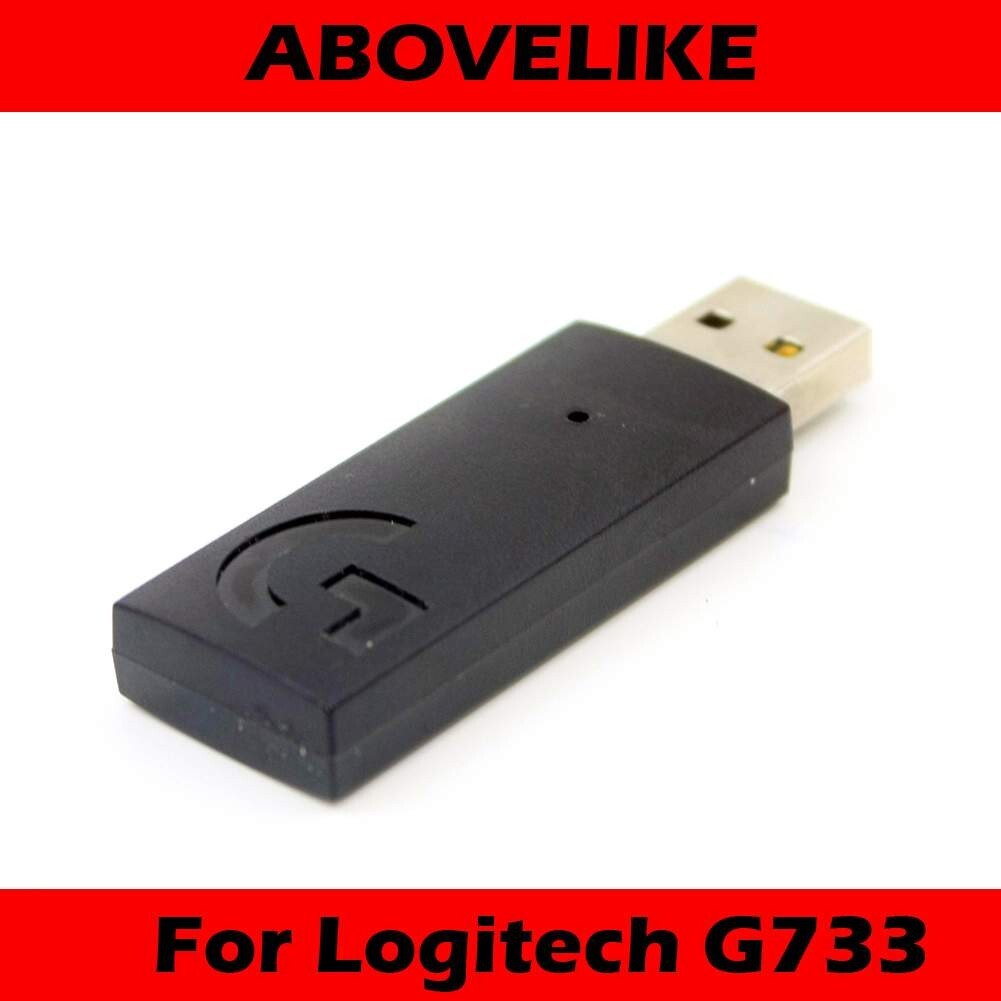
Grab the small Logi Bolt USB receiver (model C-U0012) from the box and plug it directly into your computer’s USB port—never use a hub or extension cable for the initial setup. The receiver needs direct power to establish a stable 2.4GHz connection with your headset. When properly connected, the receiver’s indicator light will either glow solid green (ready and connected) or blink slowly (in pairing mode). If you see a red light, try a different USB port as your current one may not provide enough power.
Power On Your G733 and Verify Connection Status Lights
Press and hold the power button on the left ear cup for 2 seconds until you hear the power-on chime. The LED on the headset will flash white during pairing and turn solid white when successfully connected to the receiver. Check both devices: if the receiver shows solid green while the headset LED is solid white, your connection is perfect. If the headset LED keeps flashing white after 10 seconds, press the pairing button on the back of the receiver (tiny hole) with a paperclip for 3 seconds to reset the connection.
Troubleshoot USB Port Issues with the Wireless Dongle
If your G733 still won’t connect, move the receiver to a USB 2.0 port (usually black inside) instead of USB 3.0 (usually blue)—many users report better compatibility with older ports. Try plugging it into the rear ports on your desktop tower rather than front panel ports, which often have weaker power delivery. For laptops, avoid USB-C to USB-A adapters during initial setup as they can cause signal interference with the wireless connection.
Download and Install G Hub Without Connection Errors

Get the Correct G Hub Version for Windows 10/11
Visit the official Logitech G Hub download page (logitechg.com/innovation/g-hub.html) and download the installer—never use third-party download sites that bundle unwanted software. Before installing, close all other applications, especially competing RGB software like iCUE or Razer Synapse that can conflict with G Hub. The installation process takes about 2 minutes, but disable your antivirus temporarily as some security suites mistakenly flag G Hub as suspicious during installation.
Avoid Common Installation Mistakes That Cause Setup Failures
During installation, when prompted to “Install additional components,” select all optional features including the Logitech Gaming Software compatibility layer. Many users skip this step only to find their G733 isn’t recognized later. After installation completes, restart your computer before launching G Hub—this ensures Windows properly registers all the necessary drivers. When G Hub opens, check the bottom-left corner for your G733’s name rather than a generic “USB Audio Device” listing.
Verify G733 Detection After Successful G Hub Installation
In G Hub, click the “Devices” tab and look for your G733 in the list. If it shows as “Connected” with full customization options, you’ve succeeded! If it says “Setting Up” for more than 30 seconds, unplug the receiver, wait 10 seconds, then plug it into a different USB port. Critical check: go to Windows Sound Settings (right-click speaker icon) and confirm “Logitech G733” appears as both your input and output device—this verifies Windows recognizes your headset at the system level.
Fix G Hub Stuck on “Setting Up” Error in 4 Steps
Why G Hub Gets Stuck on “Setting Up” After Windows Updates
This frustrating issue typically occurs after a Windows update changes audio drivers—your keyboard and mouse might still work in G Hub while the headset hangs on “Setting Up.” The culprit is usually a driver conflict where Windows installs its generic audio driver instead of Logitech’s optimized version. You’ll notice the G733 appears as “USB Audio Device” in Windows Sound Settings rather than by its proper name.
Quick Fixes for G Hub Connection Problems (No Reinstall Needed)
First, unplug the Logi Bolt receiver for 15 seconds then reconnect it—this often resets the communication channel. Next, in Windows Sound Settings, right-click your G733 and select “Set as Default Device” for both playback and recording. Then, in G Hub, go to Settings (gear icon) > Account > “Clean up old G Hubs” to remove conflicting configuration files. Restart G Hub—85% of “Setting Up” errors resolve with these simple steps.
Complete G Hub Reset Procedure for Persistent Connection Issues
For stubborn cases, fully uninstall G Hub using the official removal tool from Logitech’s support page. After uninstalling, manually delete these folders:
– C:\Program Files\Logitech Gaming Software
– C:\ProgramData\Logishrd
– C:\Users[YourName]\AppData\Local\Logishrd
Then reinstall the latest G Hub version and connect your G733 before launching the software—this allows Windows to properly assign drivers during the first detection.
Customize G733 Lighting and Audio Settings Like a Pro
Set Up RGB Lighting Effects with LIGHTSYNC Technology
In G Hub, select your G733 then click “LIGHTSYNC.” Choose “Screen Sampler” to have your headset lighting dynamically match your screen colors during gameplay. For competitive gaming, select “Wave” or “Pulse” in a single color (like blue or green) to minimize visual distraction. You can even sync lighting with your other Logitech G devices by clicking “Sync” at the top-right corner of the LIGHTSYNC interface.
Configure DTS Headphone:X 2.0 for Immersive 3D Audio
Click the “Sound” tab and toggle on “DTS Headphone:X 2.0.” For FPS games, set the “Game” slider to 70% and “Chat” to 30% to hear enemy footsteps clearly while maintaining team communication. For single-player games, increase the “Bass” slider to 60% for cinematic explosions. Test the settings with the built-in audio sample before saving—this spatial audio makes directional sounds feel like they’re coming from specific points around you.
Fine-Tune EQ Settings for Competitive Gaming Advantage
Under “EQ Presets,” select “FPS Boost” for enhanced high-frequency sounds like footsteps and reloads. Create a custom profile by boosting 2,000-4,000 Hz frequencies (where most game audio cues live) by +3dB while slightly cutting 250-500 Hz to reduce muddy bass. Save this as “Competitive Gaming” so you can quickly switch profiles between casual play and serious matches.
Blue VO!CE Microphone Setup for Crystal Clear Communication

Install and Position the Removable Boom Mic Properly
Insert the boom mic into the left ear cup until it clicks—position it 2-3 cm from the corner of your mouth (not directly in front) for optimal voice pickup. The mic automatically activates when inserted and shows a red LED when muted. Test the mute function by pressing the dedicated mute button on the right ear cup—your voice should cut out instantly with a clear visual indicator.
Configure Blue VO!CE Filters for Noise Reduction
In G Hub’s “Voice” tab, enable “Noise Removal” set to “High” to eliminate keyboard clicks and background noise. Activate “DeEsser” to reduce harsh “s” sounds that make streams sound unprofessional. For streaming, add a subtle “Compressor” effect to maintain consistent volume whether you’re whispering or yelling. Always test your mic using the built-in waveform monitor before going live—adjust settings until your voice sounds clear without robotic artifacts.
Troubleshoot Common Microphone Issues
If teammates can’t hear you, check Windows privacy settings: go to Settings > Privacy > Microphone and ensure “Allow apps to access your microphone” is ON. In Discord or other communication apps, set the input device to “Logitech G733” not “Default Device.” If you hear echo, increase the “Mic Monitoring” slider in G Hub to 30% so you can hear yourself and naturally adjust your volume.
Optimize G733 Battery Life: 29-Hour Charging Strategy
Charge While Gaming Without Interrupting Your Session
Use the included USB-C to USB-A cable to connect your headset directly to your PC while gaming—this bypasses the wireless receiver but keeps you playing while charging. The LED on the headset turns solid green when fully charged (about 3 hours from empty). Pro tip: charge overnight before tournaments to ensure maximum battery for long sessions.
Monitor Battery Level Using LED Indicators
The G733 uses a simple color-coded system: solid green = 100-50%, flashing green = 50-25%, solid red = 25-10%, flashing red = <10%. At 10% battery, you’ll get a voice warning every 5 minutes. For marathon sessions, keep the RGB lighting off to extend from 16 to 29 hours of playtime—this is the single biggest battery saver.
Extend Battery Life by Managing RGB Lighting Effects
In G Hub, set lighting to “Battery Saver” mode which only activates effects during audio peaks. Reduce brightness to 50% in the LIGHTSYNC settings—higher brightness consumes significantly more power. If you’re on a long flight or extended session, turn off lighting completely via the G Hub toggle; you’ll barely notice the difference in immersion but gain nearly 13 extra hours of battery.


