
Your gaming mouse feels limited when you’re constantly reaching for keyboard shortcuts during intense gameplay. What if you could double your available commands without adding extra hardware? That’s exactly what G-Shift delivers for Logitech G Series mice. This powerful feature acts as a “shift key” for your mouse, unlocking a secondary layer of functionality from the same physical buttons. Learning how to use G-Shift on Logitech devices transforms your mouse from a basic pointing tool into a command center that adapts to your specific needs.
G-Shift creates a temporary function layer that activates when you hold your designated clutch button. While engaged, all other mouse buttons assume new functions until you release it. This clever programming trick effectively doubles your programmable inputs—turning a standard 6-button mouse into an 11-command powerhouse. Whether you’re battling in competitive games or streamlining your workflow, mastering how to use G shift Logitech mice will revolutionize your computing experience.
You’ll discover practical configuration steps, creative use cases across gaming and productivity scenarios, and solutions to common issues. By the end of this guide, you’ll confidently implement G-Shift to create custom button mappings that respond precisely to your needs, putting maximum control at your fingertips.
Essential Setup: Software and Hardware Requirements
Before configuring G-Shift, ensure you have the proper foundation. You’ll need a compatible Logitech G Series mouse (like the G502, G604, or G Pro Wireless) connected via USB, along with the latest version of Logitech G Hub software installed on Windows 10/11 or macOS. The mouse must be properly detected in G Hub for G-Shift functionality to appear in your settings menu.
Check your system meets these minimum requirements:
– Logitech G Series gaming mouse with programmable buttons
– Logitech G Hub application running (not minimized to system tray)
– USB connection (wired or wireless dongle)
– Administrative privileges to install software updates
Without these essentials, you won’t see G-Shift options in your button assignment menu. If your mouse isn’t detected, try different USB ports, restart G Hub as administrator, or check for firmware updates through the software’s device settings.
Configure G-Shift in Logitech G Hub
Designate Your Primary G-Shift Activation Button
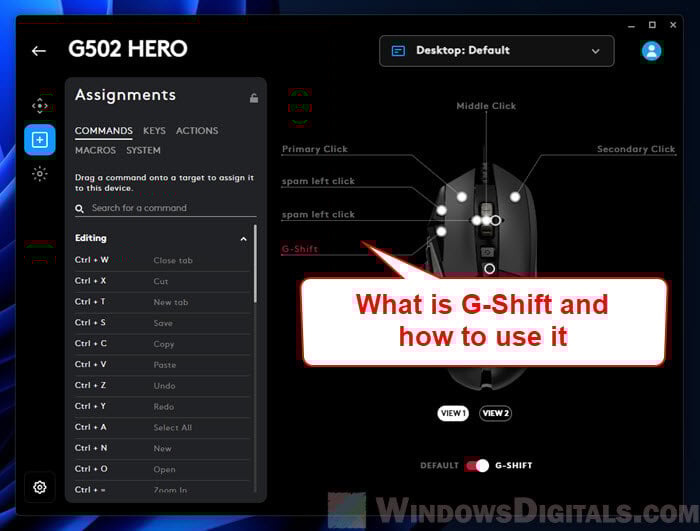
Your first step in learning how to use G-Shift on Logitech mice is selecting the perfect clutch button. This should be a conveniently positioned button you can press without disrupting your grip—typically a side thumb button or top-mounted button.
Follow these steps to activate G-Shift:
1. Open Logitech G Hub and select your connected mouse
2. Navigate to the “Button Assignment” section
3. Click the dropdown menu for your chosen activation button
4. Select “G-Shift” from the command list (not “Shift” or similar options)
5. Confirm the assignment shows “G-Shift” in your button layout
Critical tip: Avoid using your primary click buttons (LMB/RMB) as your G-Shift activator since this will interfere with core functionality. Most gamers prefer thumb buttons for quick access while maintaining WASD positioning.
Program Your Secondary Function Layer
With your G-Shift button activated, you’re ready to create the secondary command set that triggers when you hold it. This is where how to use G shift Logitech functionality truly shines—transforming simple mice into versatile command centers.
In G Hub’s interface:
1. Look for the “Layer” or “Alternate Functions” section after assigning G-Shift
2. Select the “G-Shift” layer to customize secondary functions
3. Click each button to assign its alternate purpose
4. Choose from keypresses, macros, media controls, or system commands
Pro configurations to try immediately:
– G-Shift + Scroll Wheel = Horizontal scrolling (essential for spreadsheets and timelines)
– G-Shift + Side Button = Ctrl+Z (undo) for quick corrections
– G-Shift + Top Button = Print Screen for instant captures
– G-Shift + Middle Button = Alt+Tab for seamless application switching
Remember that all secondary functions only activate while holding your G-Shift button—releasing returns to normal operation. Test each assignment thoroughly before saving your profile.
Create Application-Specific G-Shift Profiles
The real power of how to use G-Shift on Logitech devices emerges when you customize different layers for specific applications. G Hub’s profile system automatically switches your button mappings when you launch particular programs.
To set this up:
1. Create a new profile for your target application (e.g., “Fortnite” or “Photoshop”)
2. Configure your primary and G-Shift button mappings for that specific use case
3. Enable “Auto-switch” for the application in G Hub’s profile settings
4. Save your configuration to onboard memory for portability
For example, your Fortnite profile might use G-Shift for quick emotes and inventory management, while your Photoshop profile maps G-Shift to brush size adjustments and layer navigation. This context-aware customization ensures you always have the right tools available without manual switching.
Advanced G-Shift Implementation Strategies
Visual Feedback with RGB Lighting
Mice with RGB capabilities (like the G502 or G903) can provide instant visual confirmation when G-Shift is active. This prevents accidental activations and builds muscle memory faster.
In G Hub’s LIGHTSYNC tab:
– Create a distinct lighting profile for G-Shift mode
– Use color changes (e.g., blue to red) to indicate layer activation
– Program breathing effects that only appear during G-Shift
Expert note: Brighter, contrasting colors work best for quick visual recognition during intense gaming sessions where peripheral vision matters.
Multi-Layer G-Shift Techniques
High-end Logitech mice support chaining G-Shift layers for triple the functionality. While advanced, this technique unlocks incredible customization:
- Assign Button 4 as your primary G-Shift activator
- Program Button 5 to activate a secondary G-Shift layer
- While holding Button 4, press Button 5 to access third-level commands
This creates three distinct command sets from just two additional buttons. Ideal for MMO players needing rapid access to multiple ability bars or video editors requiring extensive tool access.
Onboard Memory Configuration
For true portability, save your G-Shift profiles directly to your mouse’s onboard memory:
1. Complete your G-Shift configuration in G Hub
2. Click the “Save to On-Board Memory” option
3. Select which profile to store (most mice hold 3-5 profiles)
4. Verify the memory icon appears next to your active profile
This allows your G-Shift settings to work on any computer—even those without G Hub installed. Essential for tournament gamers or professionals using multiple workstations.
Problem-Solving Common G-Shift Issues
G-Shift Activation Failures
When your G-Shift button doesn’t trigger secondary functions:
– Check profile assignment: Ensure you’re using the correct profile for your current application
– Verify G Hub status: The software must be running (not just installed)
– Reassign the clutch button: Sometimes reassigning “G-Shift” to the same button fixes glitches
– Test with different USB ports: Faulty ports can cause intermittent input issues
Critical warning: If G-Shift works in some applications but not others, check for software conflicts—programs like Discord or Steam sometimes intercept mouse inputs.
Sticky G-Shift Behavior
When G-Shift remains active after releasing the button:
– Reset your macro settings (overly complex macros can cause this)
– Disable “Toggle” mode if accidentally enabled
– Update mouse firmware through G Hub’s device settings
– Try a different physical button as your G-Shift activator
This frustrating issue usually stems from macro conflicts or outdated firmware rather than hardware problems.
G-Shift Applications Beyond Gaming
Productivity Powerhouse
Transform your workday with these G-Shift implementations:
– Document editing: G-Shift + scroll wheel = zoom control; side button = paste special
– Spreadsheet navigation: G-Shift + directional buttons = jump to cell extremes
– Presentation control: G-Shift layer = laser pointer, black screen, slide navigation
Content Creation Enhancements
Video editors and designers gain tremendous efficiency:
– Premiere Pro: G-Shift + buttons = ripple delete, blade tool, add transition
– Photoshop: G-Shift = brush size adjustment, layer visibility toggles
– Streaming: G-Shift + top button = mute mic; side button = scene switch
Final Implementation Tips
Start simple when learning how to use G shift Logitech functionality—assign just 2-3 critical secondary functions initially. Build muscle memory before expanding to more complex configurations. Always save your profiles to onboard memory, and back up your G Hub configurations regularly through the cloud sync feature.
The true power of G-Shift lies not in its technical implementation but in how it adapts to your unique workflow. Whether you’re executing complex in-game combos or streamlining professional tasks, this feature transforms your Logitech mouse from a passive tool into an active extension of your intentions. Within days of proper configuration, you’ll wonder how you ever managed with a standard mouse setup.


