
You’ve just plugged your Logitech C270 into your MacBook, but instead of crisp widescreen video, you’re staring at a square-ish image with black bars on the sides during Zoom calls. This frustrating limitation affects thousands of Mac users who expect their plug-and-play webcam to work seamlessly. The Logitech C270 HD Webcam functions differently on macOS than Windows due to a fundamental compatibility issue: your Mac can only access the webcam’s native 4:3 aspect ratio feed, not the widescreen 16:9 format. This isn’t a defect with your specific camera—it’s a confirmed limitation of how macOS interacts with the C270 hardware. You’re not alone; countless remote workers and students struggle with this exact problem every day. In this guide, you’ll learn exactly how to bypass this limitation and get proper widescreen video from your C270 on any Mac, whether you’re using an older Intel model or the latest M3 MacBook.
Why Your Logitech C270 Shows Black Bars on Mac Screens
When you plug your C270 into a Mac and open Photo Booth or FaceTime, you’ll immediately notice the distorted aspect ratio. Unlike Windows systems that can access the C270’s widescreen capabilities, macOS locks into the camera’s native 4:3 feed as a square-ish image with black bars on the sides. This happens because macOS doesn’t provide native settings to force the 16:9 output that video conferencing platforms expect.
The Technical Reason Behind the 4:3 Limitation
Apple’s camera framework on macOS processes video differently than Windows. The C270 technically captures video in 16:9 format, but macOS only accesses the full sensor output in 4:3 mode without providing software controls to crop to widescreen. Logitech themselves acknowledge this limitation—the C270’s macOS support is more basic than its Windows functionality. You won’t find resolution or aspect ratio settings in System Preferences > Camera like you would with newer Logitech models.
How This Affects Your Video Calls
During important meetings on Zoom, Teams, or Google Meet, that square video feed makes you appear cramped in the frame with unnecessary black space. Colleagues see you in a boxy format that looks unprofessional compared to the widescreen video from modern webcams. The good news? You can fix this without buying new hardware by using virtual camera software that processes the feed before sending it to your conferencing app.
Mac USB Port Requirements for Logitech C270 Recognition
Before diving into software solutions, verify your physical connection meets the C270’s requirements. The camera needs proper power and data transfer to function correctly on your Mac.
Correct USB Port Selection for Reliable Detection
Plug your C270 directly into a USB-A port on your Mac—not through a hub or adapter. USB-C Macs will need a quality USB-A to USB-C adapter. Avoid daisy-chained hubs as they often cause power issues that prevent Macs from recognizing the camera. If using a MacBook Pro with only USB-C ports, try different ports as some models prioritize certain ports for video devices.
Testing Basic Functionality Without Third-Party Software
Open Photo Booth to verify the C270 is physically recognized. You should see video—but in that problematic 4:3 format. If Photo Booth doesn’t detect the camera, restart your Mac with the C270 plugged in. This forces macOS to reinitialize USB devices during boot. If still undetected, try a different USB cable as the C270 is sensitive to cable quality.
Logitech Capture Setup: Force 16:9 Video on Mac in 4 Steps
Logitech’s official solution for Mac users provides the simplest path to widescreen video without complex configuration.
Downloading and Installing Logitech Capture for Apple Silicon
Visit Logitech’s support site and download the latest version of Logitech Capture. For M1/M2/M3 Macs, the installer should automatically run through Rosetta 2—you’ll see a brief “translating” message during first launch. Don’t worry if the app looks slightly different than Windows versions; the core functionality remains the same.
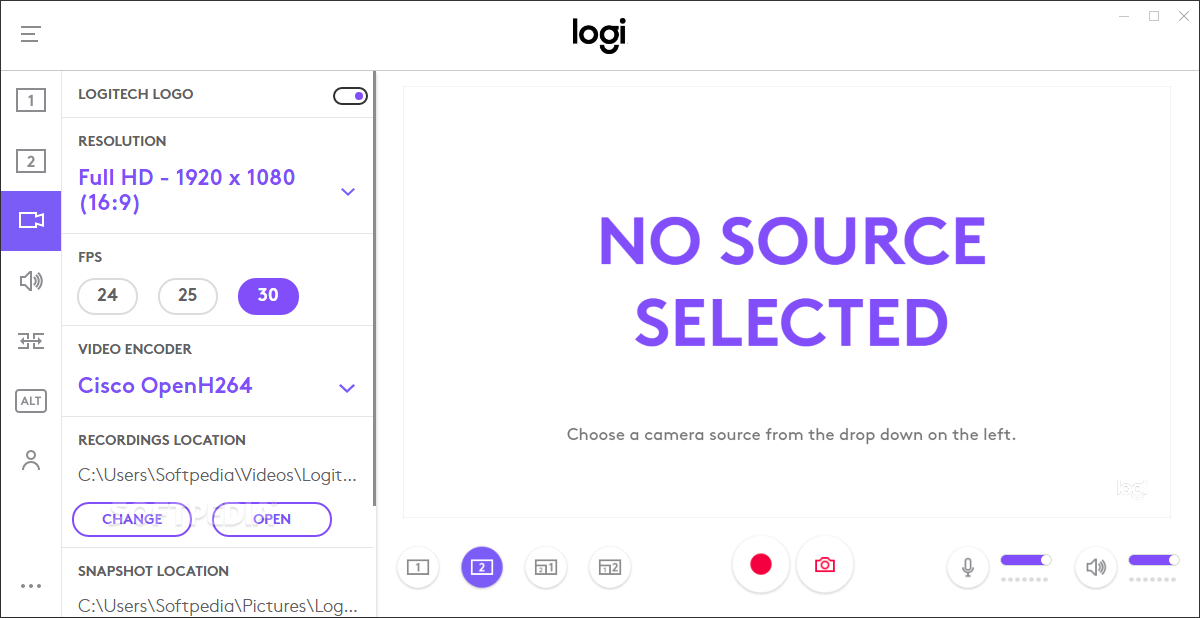
Configuring 16:9 Output in Logitech Capture
- Launch Logitech Capture and select your C270 from the device menu
- Click the gear icon for settings and navigate to Video Settings
- Change the Output Resolution to 1280×720 (720p HD)
- Close settings—the software automatically crops to 16:9
Selecting Logi Capture in Your Video Conferencing App
In Zoom, go to Settings > Video and select “Logitech Capture” from the camera dropdown—not “C270” or “FaceTime Camera.” The virtual camera feed will now show your properly cropped widescreen video. Keep Logitech Capture running in the background during calls; closing it terminates the virtual camera feed.
OBS Studio Method: Pixel-Perfect 16:9 Cropping for C270
For users wanting precise control over the cropped area, OBS Studio offers superior customization at the cost of a slightly steeper learning curve.
Installing OBS and the Virtual Camera Plugin
Download OBS Studio from obsproject.com (not third-party sites). On first launch, skip the auto-configuration wizard. The Virtual Camera feature is built into recent versions—no separate plugin needed for macOS 12+.
Cropping Your C270 Feed to Exact 16:9 Dimensions
- In Sources panel, click “+” and add “Video Capture Device”
- Select your C270 from the device dropdown
- Right-click the source in the preview window and choose “Filters”
- Click “+” under Effect Filters and select “Crop/Pad”
- Enter these values for perfect 16:9 from 4:3 720p: Top 60px, Bottom 60px
Activating and Using OBS Virtual Camera
Go to Tools > Start Virtual Camera. In Zoom or Teams, select “OBS Virtual Camera” as your video source. The cropped widescreen feed will now appear during calls. Pro tip: Create a scene preset so you don’t need to reconfigure cropping after restarts.
Fix “Camera Not Found” Error on MacBook Pro/Air
When macOS fails to detect your C270, these targeted solutions resolve most recognition issues.
Resetting macOS Camera Permissions
Go to System Settings > Privacy & Security > Camera and toggle off then on access for any apps showing “C270.” Reboot your Mac after making changes—this often clears permission conflicts that prevent camera detection.
Bypassing USB Power Management Issues
Open Terminal and enter: sudo pmset -a usbstandby 0 then restart. This disables macOS’s aggressive USB power saving that sometimes cuts power to webcams during sleep cycles. Revert with sudo pmset -a usbstandby 1 if you experience battery drain.
C270 Microphone Not Working? Mac Audio Settings Fix
The C270’s built-in mic often gets overlooked when troubleshooting, but these audio-specific fixes solve most sound issues.
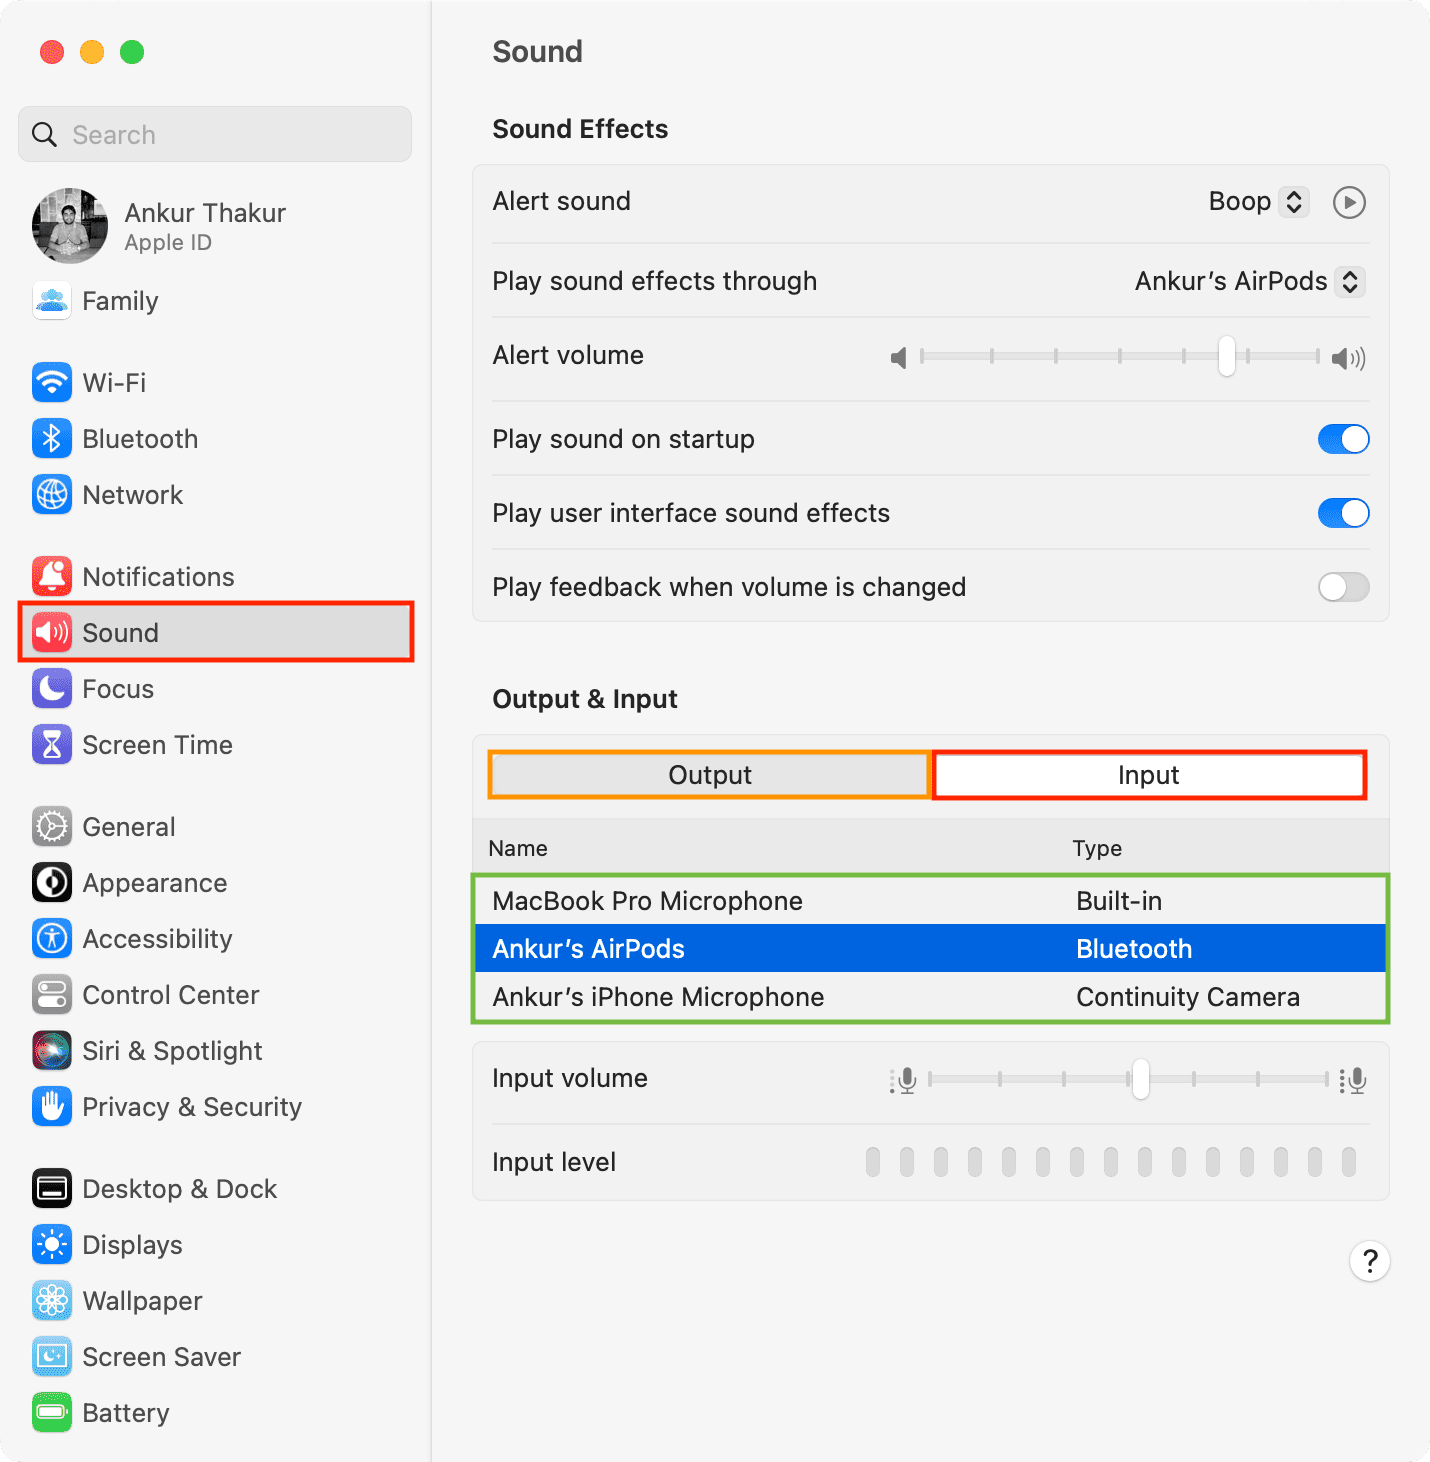
Selecting the Correct Input Device in System Settings
Navigate to System Settings > Sound > Input and select “Logitech USB Camera” from the list. Verify the input level meter responds when you speak. If not, click the “Details” button and ensure the correct sample rate (48.0 kHz) is selected.
Application-Specific Audio Configuration
In Zoom, go to Audio Settings and manually select “C270” under both Speaker and Microphone menus. Many apps default to the built-in Mac mic even when the webcam is selected for video. Test your audio before important calls using Zoom’s test meeting feature.
Low Light Fixes: Improve C270 Video Quality on Mac
The C270’s small sensor struggles in dim lighting, but these Mac-specific adjustments maximize available light.
Manual Exposure Settings in Third-Party Apps
In Logitech Capture or OBS, locate the camera controls menu (often under “Filters” or “Properties”). Increase exposure compensation by +1.0 to +2.0 stops. Avoid going higher as this introduces significant noise. Disable “Auto Exposure” to prevent flickering during calls.
Free Software for Enhanced Low-Light Performance
Install the open-source app CameraController (github.com/steve228uk/CameraController) which exposes manual controls macOS hides. Adjust gamma (+0.1) and gain (+5-10) for better low-light visibility without the yellow tint common in auto mode. Remember to close other camera apps before launching CameraController.
Logitech C920 vs C270: When to Upgrade Your Mac Webcam

If software workarounds feel too cumbersome, consider these upgrade paths that eliminate the 4:3 limitation entirely.
True Plug-and-Play Mac Webcams Worth the Investment
The Logitech C920 and C922 work natively in 16:9 on macOS without virtual camera software. They offer 1080p resolution, superior low-light performance, and full compatibility with Apple’s latest silicon. For $10-15 more than a C270, you gain hassle-free widescreen video and better image quality.
Smartphone-as-Webcam: Better Than C270 for Free
Install Camo (reincubate.com/camo) to turn your iPhone into a 1080p webcam. The free version provides dramatically better quality than the C270 with automatic lighting adjustment and portrait mode. Position your phone at eye level for professional-looking video without the C270’s aspect ratio headaches.
Final Note: While the Logitech C270 can function on Mac with proper configuration, its 4:3 limitation creates unnecessary hurdles for regular video callers. For occasional use, Logitech Capture provides the simplest fix. Frequent users should strongly consider upgrading to a C920-series webcam or using a smartphone solution for truly seamless widescreen video. Remember to always test your setup 10 minutes before important calls—nothing undermines professionalism like last-minute camera issues. Proper lighting remains the single most impactful improvement you can make regardless of which webcam solution you choose.


