
Your Logitech MX Master 3S isn’t just another mouse—it’s a productivity powerhouse that transforms your workflow when properly configured. Many users never unlock its full potential because they skip the essential logitech mx master 3s setup steps that turn this advanced hardware into a personalized command center. This guide cuts through the confusion with actionable steps to configure your MX Master 3S exactly how you need it, whether you’re a developer, designer, or business professional.
Don’t settle for default settings that barely scratch the surface of what this mouse can do. The real magic happens in the customization—reprogramming buttons for specific applications, creating seamless multi-computer workflows, and optimizing the unique scroll wheel behavior for your daily tasks. By the end of this guide, you’ll have a fully optimized Logitech MX Master 3S that feels like an extension of your workflow rather than just another peripheral.
Charge Your MX Master 3S and Power Up Before Configuration
Skip this critical first step and you’ll waste valuable time troubleshooting phantom connection issues. Your Logitech MX Master 3S ships partially charged, but a full USB-C charge ensures smooth setup without unexpected power interruptions. Plug in the included USB-C cable for at least 15 minutes (a 1-minute quick charge provides 3 hours of use if you’re in a hurry).
Locate the physical power switch on the bottom of the mouse and slide it to the “on” position—you’ll see a brief LED indicator confirming power. This simple step prevents the most common setup frustration: trying to connect a mouse that’s simply turned off. While charging, download the essential Logi Options+ software from Logitech’s official website—don’t skip this, as the mouse’s advanced features won’t work without it.
Connect Your Mouse: Bolt vs. Bluetooth vs. Unifying Receiver

Don’t just plug and pray—choose the right connection method for your workspace. The Logitech MX Master 3S offers three connection options with significant performance differences:
- Logi Bolt Receiver (Recommended): Provides the most secure, low-latency connection (2.4GHz) with enterprise-grade encryption. Ideal for offices with crowded wireless environments.
- Bluetooth: Best for minimalist setups where USB ports are limited, but may experience interference in busy wireless areas.
- Unifying Receiver: Compatible with older Logitech devices but lacks Bolt’s security and stability.
For most professional environments, the Bolt receiver delivers the smoothest logitech mx master 3s setup experience. Insert the tiny receiver into a USB port, then press the Easy-Switch button on the mouse bottom until the LED blinks blue. The mouse should pair automatically within seconds. If not, open Logi Options+ and follow the on-screen pairing prompts.
Install Logi Options+ to Unlock Full Customization Potential
Without Logi Options+, your MX Master 3S functions as a basic three-button mouse—barely utilizing its capabilities. This free software is the control center for all advanced features. Download the correct version for your operating system (Windows or macOS) directly from Logitech’s website—avoid third-party download sites that may bundle unwanted software.
After installation, launch Logi Options+ and verify your mouse appears in the device list. If not, try reconnecting the Bolt receiver or restarting Bluetooth. The app’s clean interface organizes customization into logical sections: button assignments, scroll behavior, application-specific profiles, and advanced features like Logi Flow. This is where your logitech mx master 3s setup transitions from basic connectivity to true productivity enhancement.
Remap Core Buttons for Maximum Productivity
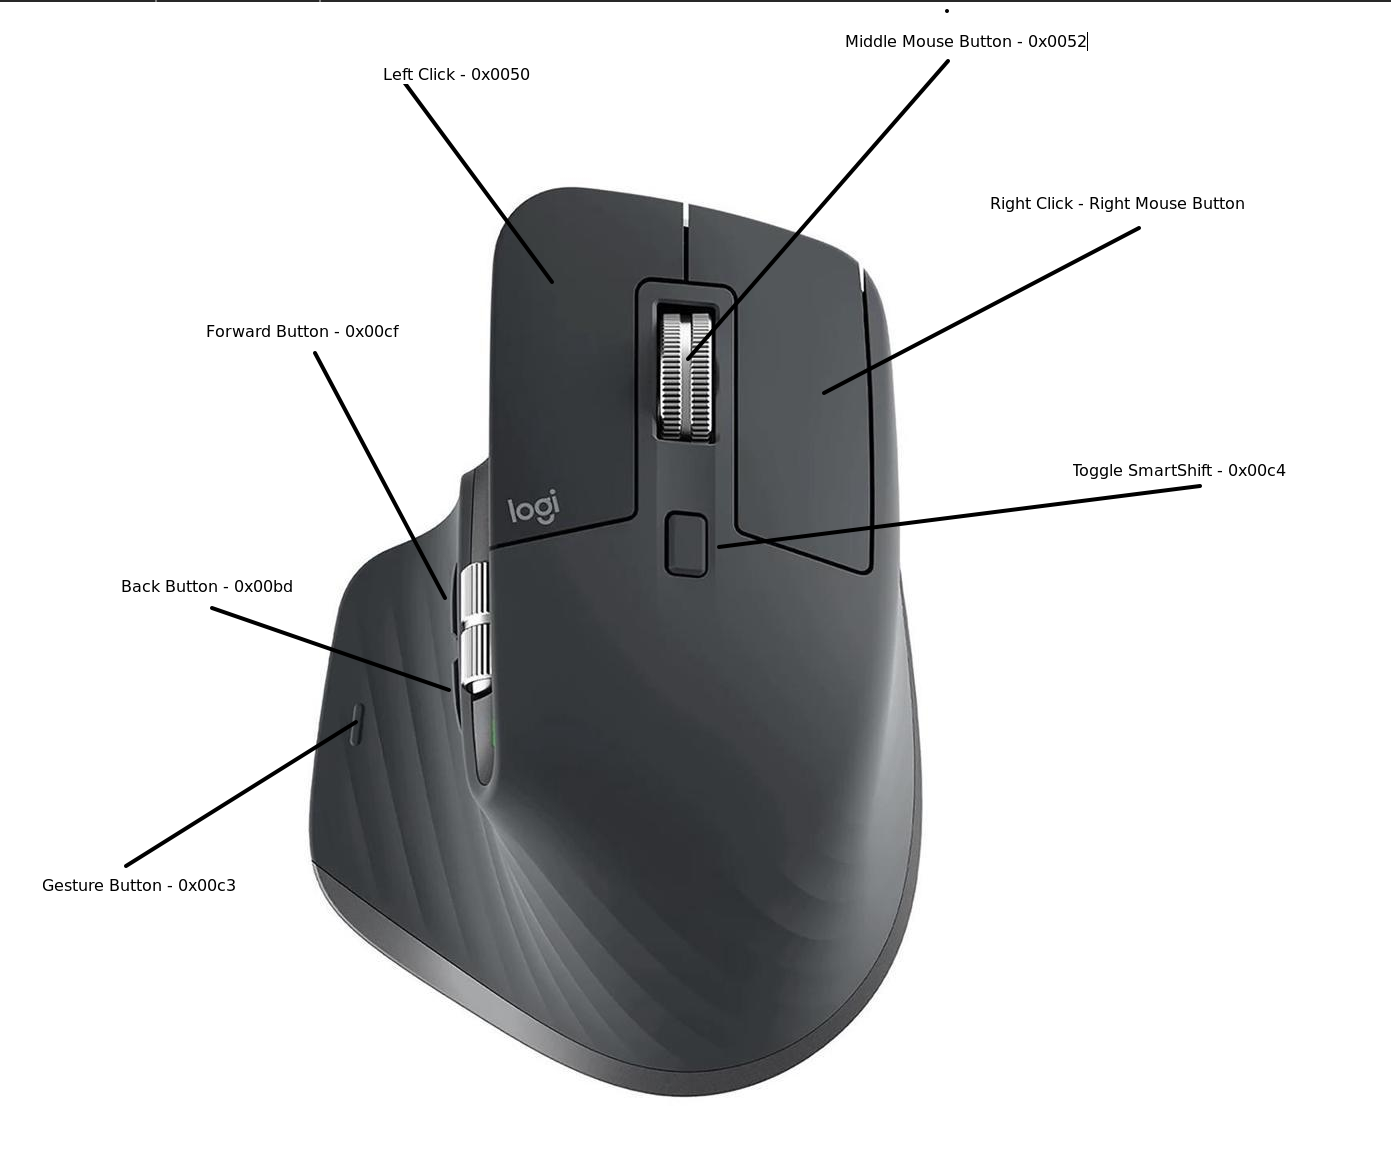
Stop using the MX Master 3S with default settings that ignore your actual workflow needs. Every physical control—thumb buttons, gesture button, and scroll wheels—is fully reprogrammable. Access the “Button Customization” section in Logi Options+ to transform generic inputs into workflow accelerators.
Optimize Thumb Buttons for Your Daily Tasks
Most professionals immediately reassign the thumb buttons for instant access to frequently used functions:
- Thumb Button 1: Set to “Mission Control” (macOS) or “Task View” (Windows) for instant workspace switching
- Thumb Button 2: Assign to “Copy” or “Paste” for text-heavy workflows
- Gesture Button (under thumb): Configure as a modifier key—hold to enable secondary functions like volume control via scroll wheel
Transform the Thumb Wheel into a Workflow Multiplier
The horizontal thumb wheel often goes underutilized. Reprogram it based on your primary applications:
- Browsers: Switch between open tabs with left/right tilts
- Creative Software (Photoshop, Premiere): Adjust brush size or timeline navigation
- Spreadsheets: Horizontal scrolling through wide columns
- Code Editors: Navigate between split panes or function definitions
Create Application-Specific Profiles That Adapt to Your Work
This is where the Logitech MX Master 3S setup delivers real ROI—custom button mappings that change automatically based on which application you’re using. In Logi Options+, click “Add Application” and select your most-used programs (Chrome, VS Code, Photoshop, etc.).
Developer-Specific Configuration
For coding environments like VS Code or IntelliJ:
- Thumb Button 1: Build/compile command (F5)
- Thumb Button 2: Debug mode activation
- Gesture Button + Scroll: Toggle terminal visibility
- Thumb Wheel: Horizontal navigation through wide code files
Creative Professional Configuration
For Adobe Creative Suite users:
- Thumb Wheel: Brush size adjustment (left/right) or zoom (up/down)
- Gesture Button: Quick tool switching between brush, eyedropper, and hand tools
- Thumb Buttons: History navigation or layer management
Master Advanced Features: Smart Actions and Logi Flow
Beyond simple button remapping, these premium features justify the MX Master 3S’s price tag when properly configured during your setup process.
Set Up Logi Flow for Multi-Computer Control
If you work across multiple machines (laptop + desktop), Logi Flow eliminates constant device switching. In Logi Options+:
- Enable Logi Flow in the settings menu
- Pair all computers to the same mouse using Bolt receivers
- Position screens side-by-side on your desktop
- Move cursor to screen edge to seamlessly transition between machines
This feature requires all computers to be on the same network and running compatible OS versions (Windows 10+ or macOS 10.15+).
Create Smart Actions for Complex Workflow Automation
Transform single clicks into multi-step processes with Smart Actions. For example:
- “Start My Day” Action: Launch email client, project management tool, and calendar with one button press
- “Research Workflow”: Highlight text, search Google, and save results with a single gesture
- “Document Prep”: Format headings, insert templates, and apply styles automatically
Access Smart Actions through Logi Options+ > Smart Actions > Create New to build these time-saving sequences.
Optimize Scroll Wheel Behavior for Your Workflow

The MX Master 3S’s MagSpeed electromagnetic scroll wheel offers two distinct modes—configure them properly during setup to eliminate frustration.
- Ratcheted Mode (Default): Precise, click-to-click scrolling for documents and code
- Free-Spin Mode: Flick the wheel for rapid scrolling through long pages or timelines
In Logi Options+, adjust the transition sensitivity between modes—lower the threshold if you frequently switch between precise and fast scrolling. For video editors and data analysts, set free-spin as the default mode with ratcheted engagement when scrolling upward.
Fix Common MX Master 3S Setup Issues in Minutes
Even with perfect configuration, you might encounter these common logitech mx master 3s setup problems:
Connection Drops or Unresponsive Buttons
- Solution: Reset the mouse by holding the power switch for 10 seconds, then re-pair
- Pro Tip: Update your Bolt receiver firmware through Logi Options+ for improved stability
Inconsistent Tracking on Glass or Shiny Surfaces
- Solution: Enable “Surface Tuning” in Logi Options+ > Tracking Settings
- Pro Tip: Run the calibration on your actual workspace surface for best results
App-Specific Profiles Not Activating
- Solution: Verify you’ve selected the exact application executable (e.g., “Code.exe” for VS Code)
- Pro Tip: Create a “Default Profile” with your most common settings as a fallback
Maximize Battery Life with Smart Power Management
The USB-C charging is convenient, but proper setup extends time between charges. A full charge delivers approximately 70 days of use, but these configuration tweaks can stretch that further:
- Reduce LED brightness in Logi Options+ settings
- Disable Flow when not using multiple computers
- Set higher sleep timers for extended battery life
- Enable “Battery Saver” mode for occasional users
When battery runs low, a 1-minute quick charge provides 3 hours of use—perfect for urgent situations. Monitor battery status directly in Logi Options+ rather than waiting for performance issues.
Final Configuration Checklist for Peak Performance
Before declaring your logitech mx master 3s setup complete, verify these critical steps:
- Export Your Configuration: Save your custom profile in Logi Options+ for easy restoration
- Test All Buttons: Physically verify each remapped function in your primary applications
- Update Firmware: Check for the latest mouse and receiver firmware
- Document Your Setup: Note your custom mappings for future reference
The true power of your MX Master 3S emerges not from the hardware alone, but from the thoughtful configuration that aligns with your specific workflow. Investing 30 minutes in proper setup delivers hours of saved time each week through reduced friction in your daily tasks. Now that your logitech mx master 3s setup is complete, you’re not just using a mouse—you’ve deployed a personalized productivity engine that adapts to your work rather than forcing you to adapt to it. Revisit your configuration monthly as your workflow evolves to maintain peak efficiency.


