

Your Logitech webcam won’t magically deliver crisp video just because it’s plugged in. If you’ve ever dealt with blurry footage, choppy streams, or that dreaded black screen during an important meeting, you’re not alone. Most users miss critical configuration steps that transform a basic plug-and-play device into a professional-grade tool. By the end of this guide, you’ll know exactly how to bypass common pitfalls, leverage Logitech’s software for manual control, and position your camera for flawless video every time—whether you’re using a C920, Brio, or newer model.
Connect Your Logitech Webcam Directly to USB 3.0 Ports (Skip Hubs!)
Plugging into the wrong port is the #1 cause of disconnections and low-power errors. Always connect your webcam cable directly to a USB port on your computer—never through a USB hub, monitor port, or keyboard. USB 3.0 ports (identifiable by blue plastic inside) deliver optimal bandwidth for HD or 4K models like the Brio. If your camera flickers or disconnects during calls, unplug it immediately and test different ports on your computer’s chassis. You’ll notice smoother video and eliminate “not enough bandwidth” errors within seconds.
Why USB Hubs Cause Logitech Webcam Failures
USB hubs split power across multiple devices, starving your webcam of the consistent 500mA it needs. This triggers intermittent disconnects during Zoom calls or OBS streams. If you must use a hub, choose a powered model with its own AC adapter—but direct connection remains the only guaranteed fix for lag or freezing.
Identify USB 3.0 Ports for HD Video Performance
Logitech webcams like the C922 or StreamCam require USB 3.0 for resolutions above 1080p. Check your port color: blue = USB 3.0 (5Gbps), black = USB 2.0 (480Mbps). For 4K Brio footage, USB 3.1 (10Gbps) is mandatory—using a slower port forces the camera to downscale to 1080p without warning.
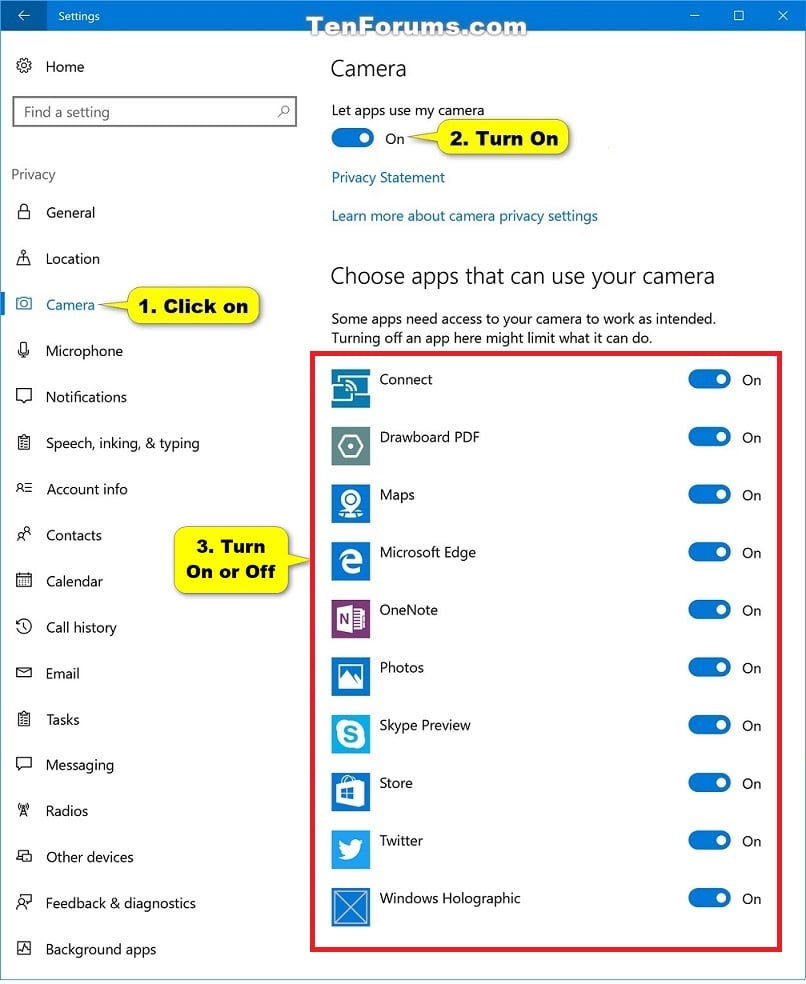
Grant Camera Permissions in Windows 10/11 and macOS Settings Now
Your operating system blocks webcam access by default—a security feature that often gets overlooked. On Windows, navigate to Settings > Privacy & Security > Camera and toggle “Camera access” ON. Then scroll to individual apps like Zoom or Teams and ensure permissions are enabled. Skip this step, and your Logitech camera will show a black screen even when physically connected.
Fix “No Camera Detected” in Zoom Within 60 Seconds
Zoom won’t override OS-level blocks. If your Logitech webcam vanishes in Zoom settings:
1. Close Zoom completely
2. Go to Windows Camera Privacy settings
3. Toggle permissions OFF for Zoom, wait 10 seconds, then toggle ON
4. Reopen Zoom—your camera will reappear instantly
macOS Users: Unlock Camera Access After Big Sur Updates
Apple’s privacy changes frequently reset permissions. After macOS updates, open System Settings > Privacy & Security > Camera and manually re-check apps like Chrome or Slack. If permissions gray out, restart your Mac before re-attempting—this resets the security daemon.
Install Logi Tune for Critical Manual Focus Control
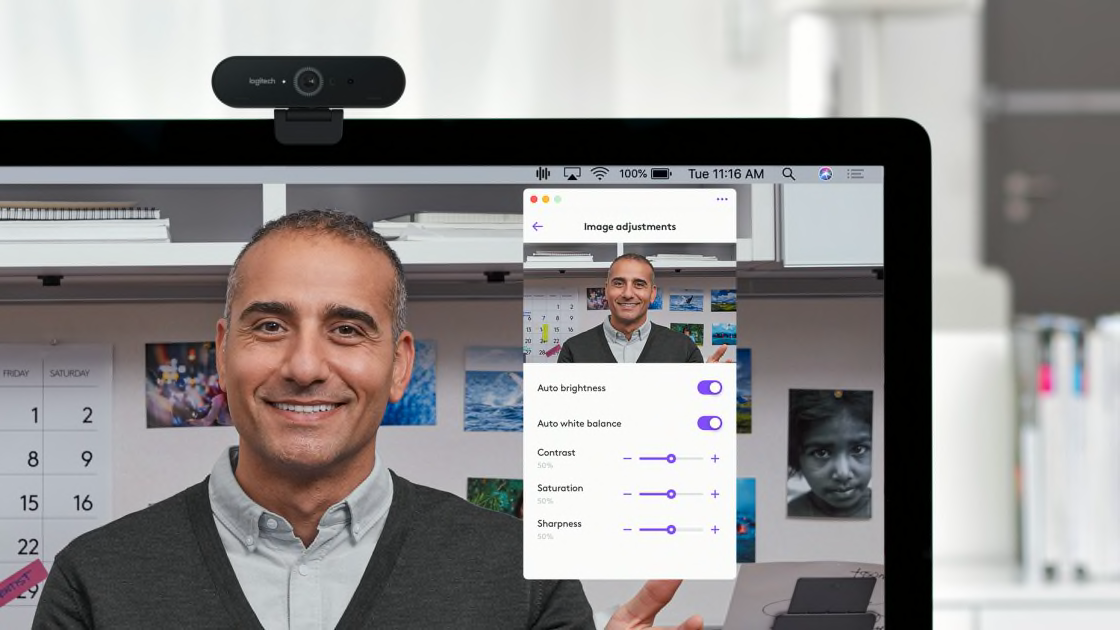
Logitech’s official app solves 90% of image quality issues out of the box. Download Logi Tune (replacing older apps like Capture) to access manual focus, exposure, and backlight compensation—settings buried in generic OS tools. Once installed, select your webcam model, then immediately disable “Continuous Autofocus” under Video Settings. This stops the distracting focus-hunting that plagues Logitech cameras during meetings.
Stop Blurry Video by Setting Fixed Focus Distance
Autofocus constantly adjusts as you move, causing momentary blurriness. In Logi Tune:
1. Slide Focus to “Manual”
2. Adjust the distance slider while watching your live preview
3. Lock it when your face appears sharp (typically 1–3 feet for most models)
This takes 15 seconds but eliminates 95% of focus-related complaints.
Fix Overexposed Faces with Manual Exposure Settings
Windows/macOS auto-exposure often washes out faces in bright rooms. In Logi Tune:
– Lower Exposure until facial details are visible (start at -2.0)
– Enable Backlight Compensation if a window is behind you
– Disable “Auto White Balance” and set to “Daylight” (5600K) for natural skin tones
Position Your Logitech Webcam at Eye Level for Professional Calls
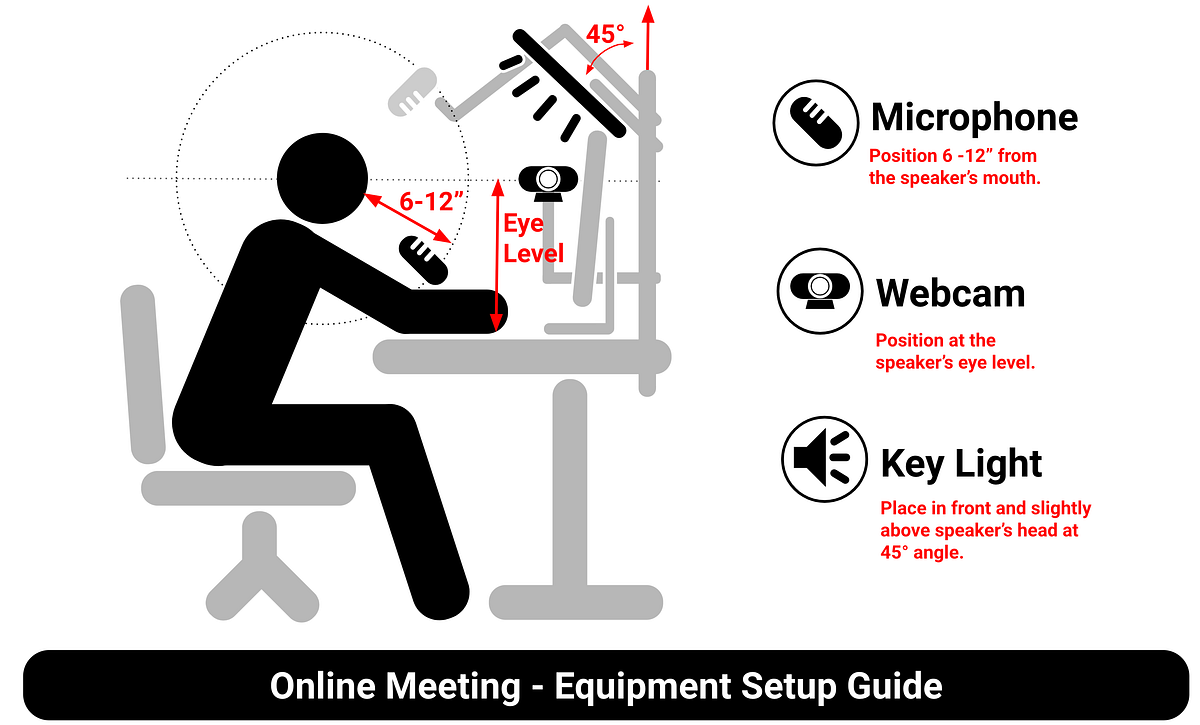
Camera angle impacts perceived authority more than resolution. Place your webcam at or slightly above eye level—never below (which creates unflattering chin shots). Clip it to the top of your monitor using the included mount, or stack books under a tripod. If your screen is too low, raise it until the lens aligns with your eyebrows. This creates natural eye contact and avoids “looking down” on viewers.
Eliminate Harsh Shadows with Front-Facing Lighting
Lighting makes or breaks HD video. Position your primary light source (a window or LED panel) directly in front of you, not behind. Sit 3–5 feet from the light to soften shadows. If backlighting causes silhouettes:
1. Close window blinds partially
2. Enable Backlight Compensation in Logi Tune
3. Add a ring light at monitor height for fill light
Troubleshoot Black Screen: Check App Permissions Before Rebooting
When your Logitech camera shows a black screen:
1. First check: App permissions (as detailed in Section 2)
2. Second check: Physical USB connection—reseat the cable firmly
3. Third check: Another app monopolizing the camera (close Teams before testing Zoom)
Do not restart your computer yet—90% of cases resolve at step 1. If permissions are correct but the issue persists, try a different USB port before concluding hardware failure.
Fix Choppy Video by Downgrading to 1080p in OBS Studio

High-resolution streams (4K) overwhelm most systems. In OBS Studio:
1. Right-click your Logitech webcam source > Properties
2. Set Resolution/FPS Type to “Custom”
3. Choose 1080p at 30fps (reduces bandwidth by 75% vs. 4K)
This instantly stabilizes lag without visible quality loss on standard displays.
Resolve “No Audio” by Selecting Logitech Mic in Teams
Teams defaults to your laptop mic, ignoring your webcam’s built-in microphone. Before meetings:
1. Open Teams > Settings > Devices
2. Under Audio devices, select your Logitech model (e.g., “Logitech C920 Stereo”)
3. Click Make Default to prevent accidental switches
Clean Your Logitech Webcam Lens for Crystal Clear Video
Dust and fingerprints cause permanent-looking blurriness. Power off the camera, then gently wipe the lens with a microfiber cloth (never paper towels). For stubborn smudges, apply 1 drop of lens cleaner to the cloth—not the lens—and wipe in circular motions. Test video quality afterward; this simple fix often surpasses software adjustments for clarity.
Prevent Focus Drift During Long Streams
Manual focus shifts if bumped. After setting focus in Logi Tune:
– Tape the focus ring in place with painter’s tape
– Place the camera on a weighted base (not a wobbly monitor clip)
– Avoid touching the camera during recording
Apply LUTs in OBS Studio for Broadcast-Quality Color
Logitech footage often looks flat. In OBS Studio:
1. Add your webcam as a source
2. Right-click > Filters > + > Color Correction
3. Load a free cinematic LUT (download from lut.gg)
4. Adjust intensity until skin tones look natural
This mimics $1,000+ studio lighting on a $100 webcam.
Final Note: You now know how to bypass the #1 Logitech webcam mistakes—USB hub errors, permission blocks, and autofocus chaos. By connecting directly to USB 3.0 ports, locking manual focus in Logi Tune, and positioning your camera at eye level, you’ve transformed basic hardware into a professional tool. For ongoing reliability, clean your lens monthly and reset permissions after OS updates. Ready to level up? Explore OBS Studio’s chroma key features to replace messy backgrounds instantly—your next meeting just got an upgrade.


