
Nothing disrupts your video conference more than joining a meeting only to realize your laptop’s built-in camera is still active instead of your high-quality Logitech webcam. When multiple video devices are connected to your computer, applications often default to the wrong camera, causing frustration during important calls. Learning how to set Logitech camera as default webcam ensures your professional-grade camera becomes the automatic choice for Zoom, Teams, OBS, and other applications. This comprehensive guide provides step-by-step instructions for both Windows and macOS systems, covers application-specific configurations, and delivers proven solutions for common detection and quality problems that prevent your Logitech device from becoming the primary camera.
Fix Windows System Settings to Prioritize Your Logitech Webcam
Windows handles default camera settings differently than many users expect, requiring specific navigation to ensure your Logitech device takes precedence across applications. Unlike audio devices, Windows doesn’t offer a universal “default camera” setting that all applications honor, but system-level configurations establish the foundation for proper camera selection.
Configure Camera Privacy and Default Selection in Windows 11
Your journey to making your Logitech camera the primary device starts with Windows privacy settings, which control fundamental camera access. Navigate to Settings > Privacy & Security > Camera and verify that camera access is enabled for your device. Scroll down to “Let apps access your camera” and ensure the toggle is active. Without this permission, no application can use any camera, regardless of your preferences.
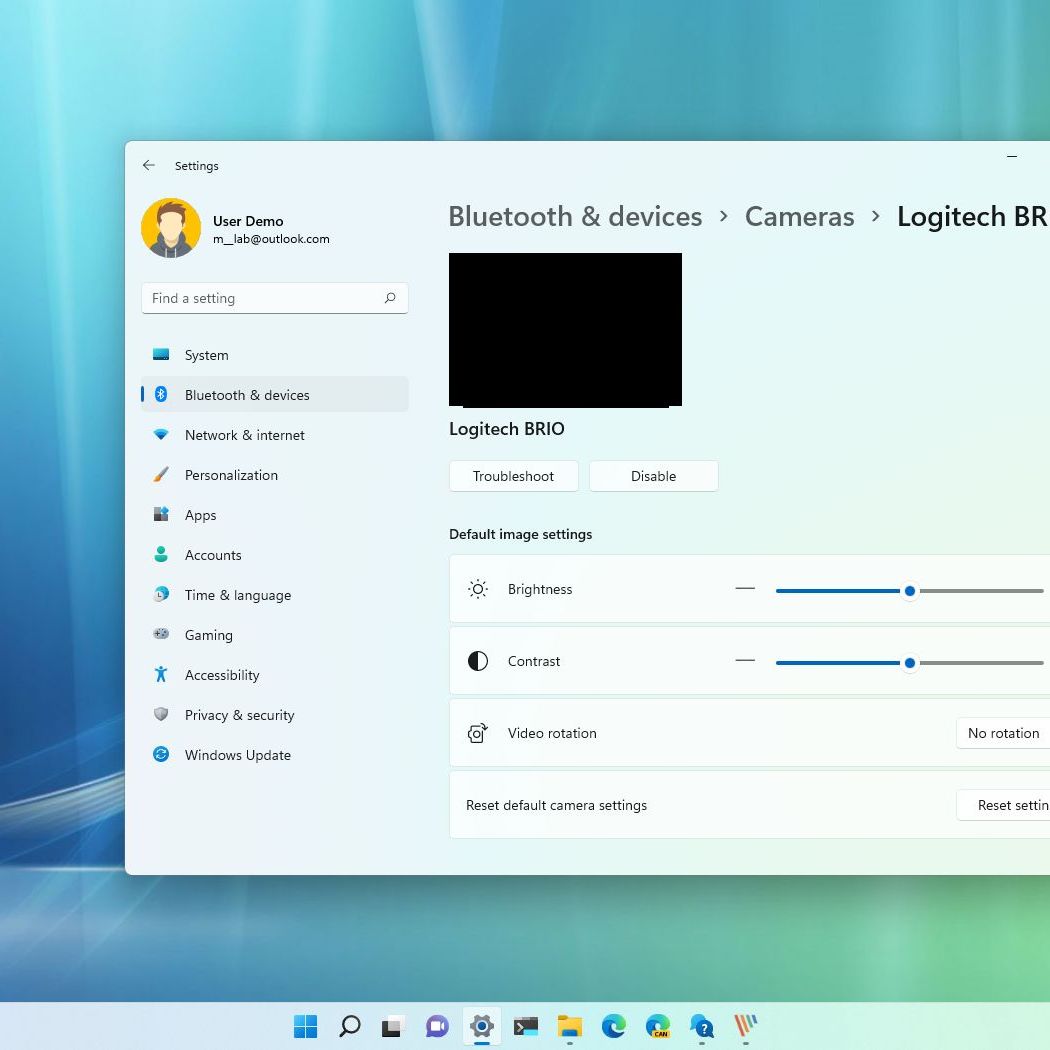
Next, proceed to Settings > Bluetooth & devices > Cameras where you’ll find the critical “Default camera” dropdown menu. Windows 11 automatically detects all connected video devices, listing them by manufacturer and model number. Select your specific Logitech model—whether it’s the C920, Brio 4K, or another variant—from this menu. This selection establishes your Logitech camera as the preferred device for Windows Camera app and some Microsoft applications, though third-party apps often maintain their own settings.
Resolve Device Manager Conflicts Preventing Camera Recognition
When your Logitech webcam doesn’t appear in the camera selection menu, Windows Device Manager often holds the solution. Press Windows Key + X and select Device Manager, then expand the “Cameras” or “Imaging devices” section to locate your Logitech device. If it appears with a yellow warning icon, right-click and select “Update driver” followed by “Search automatically for drivers.”
For persistent recognition issues, right-click your Logitech camera and choose “Uninstall device,” then disconnect the webcam physically. Restart your computer, reconnect the webcam to a different USB port (preferably USB 3.0 for high-resolution models), and allow Windows to reinstall the drivers automatically. This process clears corrupted driver installations that prevent Windows from properly identifying your Logitech camera as an available device.
Configure macOS to Recognize Your Logitech Camera as Primary
MacOS handles default camera settings differently than Windows, relying primarily on application-specific configurations rather than system-wide defaults. However, proper system permissions and strategic application settings ensure your Logitech webcam becomes the automatic choice across your workflow.
Grant Essential Camera Permissions on macOS Ventura and Later
Before your Logitech webcam can function as the default camera, macOS requires explicit permissions for each application. Navigate to System Settings > Privacy & Security > Camera and review the list of applications with camera access. Ensure all video applications you use—Zoom, Teams, Slack, and browsers—have their toggles activated. macOS blocks camera access by default for security reasons, making this step critical even if your camera appears connected.
When launching an application for the first time that requires camera access, macOS displays a prompt asking for permission. Always select “OK” to grant access immediately. If you previously denied access, you’ll need to revisit the Privacy & Security settings to manually enable camera permissions for that specific application before your Logitech device can function as the default.
Establish Logitech as Default Through FaceTime Configuration
While macOS doesn’t offer a centralized default camera setting, FaceTime serves as the de facto system camera manager. Open FaceTime, click FaceTime > Video Settings, and select your Logitech webcam from the camera dropdown menu. This configuration often propagates to other applications as the system default. For applications like Safari or Chrome that use system camera services, this FaceTime selection typically becomes the automatic choice.
For non-Apple applications, you must configure the camera within each program. In Zoom, navigate to Settings > Video and select your Logitech camera from the “Camera” dropdown. Teams users should go to Settings > Devices and choose the Logitech webcam under “Camera.” These application-specific settings override any system preferences, making individual configuration essential for consistent results.
Solve Common Logitech Webcam Detection Problems

Even after proper configuration, your Logitech camera might not appear as the default option due to underlying technical issues that prevent proper recognition by your operating system or applications. Understanding these common failure points saves valuable time during critical video engagements.
Diagnose and Fix USB Connection Issues Preventing Detection
When your Logitech webcam disappears from camera selection menus, start with the physical connection. Disconnect the USB cable from both the webcam and computer, then reconnect it firmly to a different USB port—preferably a blue-colored USB 3.0 port for high-resolution models like the Brio 4K. Avoid USB hubs, as they often fail to provide sufficient power for webcam operation.
Test the USB cable with another device to verify functionality, as damaged cables frequently cause intermittent detection problems. If using a desktop computer, connect directly to rear-panel USB ports which typically provide more stable power than front-panel or hub connections. For laptops with limited ports, try connecting to a different USB-C or Thunderbolt port, as some ports may have power delivery limitations affecting webcam performance.
Resolve Software Conflicts Blocking Camera Access
Multiple applications competing for camera access represents a frequent cause of Logitech webcam failures. Check for background applications that might be using the camera—previous Zoom meetings, screen recording software, or browser tabs with active video sessions. Close all unnecessary applications before testing your camera configuration.
Outdated operating systems often lack compatibility with newer Logitech models. Ensure your Windows or macOS installation is fully updated, as system updates frequently include camera driver improvements. For Windows users, check for optional updates in Windows Update that might include specific camera drivers. On macOS, updates typically install automatically through System Settings > General > Software Update.
Optimize Logitech Camera Performance After Setting as Default

Once your Logitech webcam functions as the default camera, additional configuration ensures optimal video quality and consistent performance across all applications. These enhancements transform your video presence from acceptable to professional.
Enhance Video Quality with Logi Tune Application Settings
Logitech’s free Logi Tune application provides centralized control over camera settings that persist across applications. Download and install Logi Tune from the official Logitech website, then launch the application to access brightness, contrast, zoom, and framing controls specific to your webcam model.
Within Logi Tune, adjust the exposure settings to optimize for your lighting environment—increasing exposure in dim conditions or reducing it in bright settings prevents washed-out or dark video. Enable the auto-focus feature for sharper subject rendering, and use the framing tool to position yourself perfectly within the camera’s field of view. These settings apply system-wide, ensuring consistent video quality whether you’re using Zoom, Teams, or OBS.
Implement Maintenance Practices to Preserve Default Camera Status
To prevent your Logitech camera from losing default status after system updates or hardware changes, establish these maintenance routines. Monthly, verify camera permissions in your operating system settings to ensure no updates have reset privacy configurations. Before important presentations, test your camera in the intended application to confirm it remains selected as the default device.
Create a quick-access desktop shortcut to your operating system’s camera settings for rapid troubleshooting. On Windows, create a shortcut with the target “ms-settings:camera” to open camera settings directly. Mac users can create an Automator workflow that opens System Settings to the Privacy & Security panel, saving valuable time when camera issues arise unexpectedly.
Setting your Logitech camera as the default webcam eliminates frustrating last-minute camera switches and ensures professional video quality for every virtual interaction. By mastering both system-level configurations and application-specific settings, you transform your Logitech device into a reliable centerpiece for video communication. When detection issues occur—which they will—your knowledge of USB troubleshooting, permission management, and software conflicts puts you in control rather than at the mercy of technical glitches. The extra minutes invested in proper configuration today prevent embarrassing camera failures during tomorrow’s critical video conference, making your Logitech webcam the seamless, professional solution you purchased it to be.


