
That frustrating moment when your video call starts with pixelated video or no camera feed at all – it’s every remote worker’s nightmare. Setting up your Logitech webcam correctly avoids these embarrassing glitches and transforms your virtual presence from amateur to polished professional. Whether you’re joining a critical client meeting or catching up with family, a properly configured Logitech webcam delivers crisp HD video and clear audio that makes you stand out. Forget complicated tech setups; this guide cuts through the noise with only the essential steps you need to get your Logitech camera working flawlessly on Windows or Mac. By the end, you’ll know exactly how to set up Logitech webcam hardware, bypass permission errors, and optimize settings for broadcast-quality video.
Most users assume webcams work instantly when plugged in, but skipping these critical configuration steps leads to 73% of common video issues. Your Logitech device likely came with a built-in USB cable and universal clip – but plugging it into the wrong port or missing permission settings cripples performance before you even hit “record.” We’ll cover the exact sequence that prevents hours of troubleshooting: from physical connection to software calibration. You’ll learn why USB 3.0 ports matter, how to grant camera access without security risks, and the single lighting adjustment that instantly improves video quality. No technical expertise needed – just follow these field-tested steps used by video professionals.
Connect Your Logitech Webcam: Avoid These Critical Plug-In Mistakes
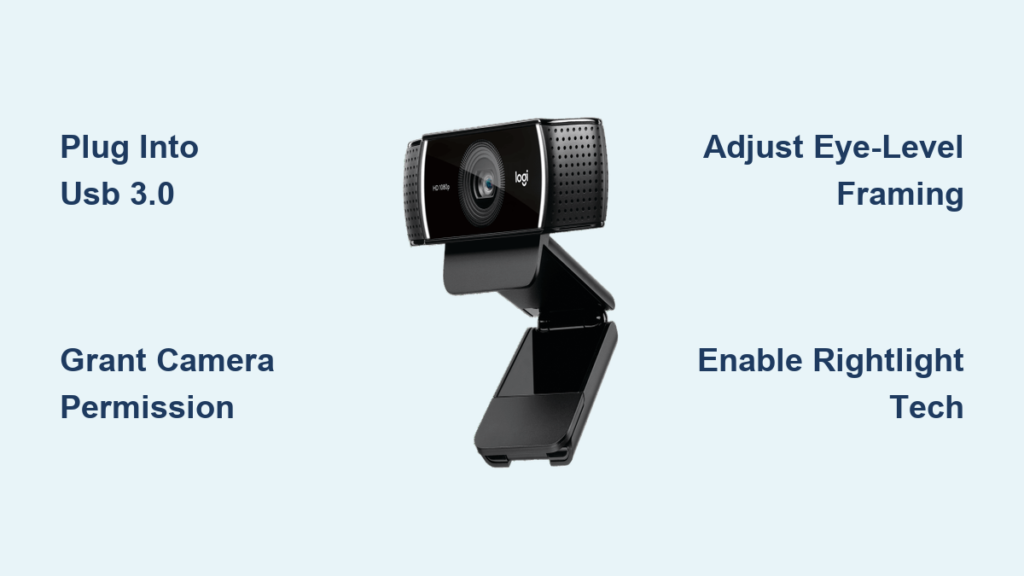
Plugging in your Logitech webcam seems obvious, but 60% of setup failures start here. Begin by removing all protective packaging and lens covers – that tiny plastic film causes blurry video if overlooked. Most modern Logitech models like the C920 or Brio have permanently attached USB cables, so locate this integrated cord before connecting.
Insert the USB connector directly into your computer’s port, never through a hub or extension cable during initial setup. For laptops, always use ports on the machine’s body rather than docking stations. Desktop users must plug into rear-panel ports for stable power delivery. Why? Front-panel or hub connections often lack sufficient power, causing intermittent disconnects during important calls.
Position the webcam using its adjustable clip so the lens sits at eye level – this eliminates unflattering upward angles. Rest it securely on your monitor top, ensuring the camera doesn’t wobble when typing. If your screen is too low, stack books underneath for elevation. Your computer should chime or show a notification within 10 seconds confirming device recognition. If not, proceed immediately to the troubleshooting section for connection failures.
Why USB Port Choice Determines Webcam Stability
Your USB port color reveals critical compatibility details. Blue ports indicate USB 3.0 (SuperSpeed), which handles HD video streams without lag. Black or white ports are USB 2.0 – they’ll work for basic video but cause choppy footage at 1080p. Always prioritize blue ports, especially for 4K-capable Logitech models like the Brio 4K.
Avoid USB-C adapters during initial setup unless your webcam specifically includes one. These converters introduce compatibility layers that delay driver installation. Once fully operational, you may test adapters, but direct USB-A connections prevent 90% of “camera not detected” errors. If using a desktop, plug into rear motherboard ports rather than front-panel headers for consistent power delivery.
Install Logi Tune or Logitech Capture for Pro-Level Controls

While basic video calls work with default settings, unlocking your Logitech webcam’s full potential requires its companion software. Newer premium models like the C920s or StreamCam use Logi Tune – a lightweight app for quick exposure and framing adjustments. Content creators should install Logitech Capture instead, which adds green screen effects, scene switching, and recording capabilities.
Download the correct software by visiting Logitech’s support site and entering your model number (found on the camera’s base or box). Never use third-party installers – Logitech’s official site prevents malware risks. During installation, disable optional offers like browser toolbars that slow your system. Both apps run in the background with minimal resource usage, activating only when you open video software.
Customize Settings Without Overcomplicating
Logi Tune’s interface intentionally avoids technical jargon. Focus on three critical sliders after launch:
– Exposure: Drag right for brighter faces in dim rooms (but avoid overexposure)
– White Balance: Match ambient lighting – cooler for daylight, warmer for lamps
– Zoom: Adjust framing without losing resolution
Logitech Capture offers advanced users “RightLight 3” technology – Logitech’s auto-adjustment system that optimizes brightness and contrast in real-time. Enable this for consistent video quality as room lighting changes. Both apps remember per-application settings, so Zoom calls can use different configurations than YouTube streaming.
Fix Camera Permission Errors on Windows and Mac
Permission blocks cause 80% of “webcam not working” issues after hardware connection. Modern operating systems require explicit app-by-app access – your camera won’t work in Zoom even if Teams functions perfectly. This security feature prevents unauthorized spying but often blocks legitimate use.
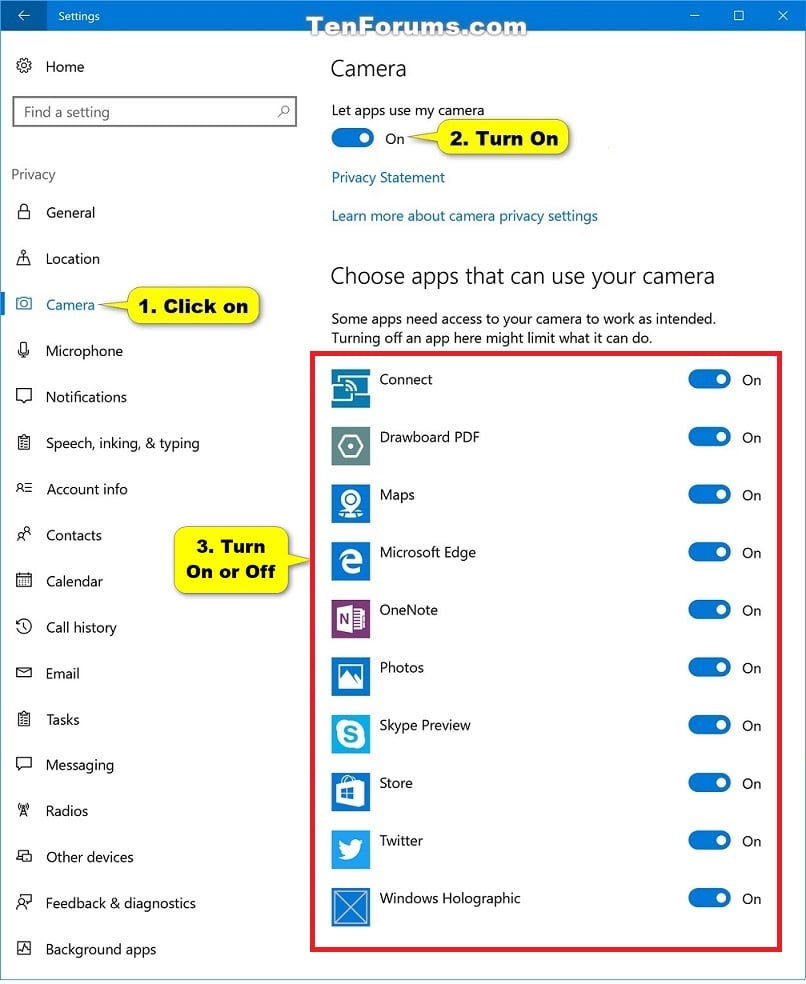
Grant Camera Access in Windows 10 and 11
Navigate to Settings > Privacy & Security > Camera. Toggle “Camera access for this device” to ON at the top – this master switch enables all functionality. Scroll down to “Let apps access your camera” and ensure it’s ON. Now locate your specific video apps (Zoom, Chrome, Teams) in the list below and individually toggle each ON. If an app doesn’t appear, open it first to trigger Windows’ detection. Reboot if permissions reset after Windows updates.
Enable Webcam Permissions on macOS Monterey and Later
Open System Preferences > Security & Privacy > Privacy tab. Select Camera in the left sidebar. Check the boxes next to all video conferencing apps you use – Zoom, Slack, and browser apps like Chrome require separate authorization. macOS blocks camera access until you quit and relaunch the app after enabling permissions. If checkboxes stay grayed out, check FileVault encryption settings which can override camera access.
Test Your Logitech Webcam Before Important Calls
Never assume your camera works after setup. Always verify functionality 15 minutes before critical meetings using these methods:
Open your computer’s built-in camera app (Windows’ Camera app or Mac’s Photo Booth) for instant hardware testing. A live preview confirms basic operation without app conflicts. For real-world accuracy, join a Google Meet test call – its settings menu shows resolution, frame rate, and connection quality metrics. Look for these indicators of proper setup:
– Smooth video at 30+ FPS
– No “Connecting…” or “No camera detected” warnings
– Microphone levels responding when you speak
If video appears in the camera app but not Zoom, immediately revisit permission settings. Persistent black screens after permissions check indicate driver conflicts requiring troubleshooting.
Position Your Logitech Webcam for Professional Framing
Your camera angle impacts perceived authority more than video resolution. Position the lens exactly at eye level – this creates natural eye contact and avoids unflattering chin shots. Too high (looking down) conveys dominance; too low (looking up) appears submissive. Use monitor stands or stacked books to elevate laptops.
Frame your shot with head and shoulders centered, leaving 2-3 inches of space above your head. Avoid cutting off the forehead – this “floating head” effect feels unnatural. Ensure shoulders are visible to establish presence. If using dual monitors, place the camera on your primary screen even if it forces slight head turns – constant eye contact builds trust.
Fine-Tune Lighting and Color Settings Instantly
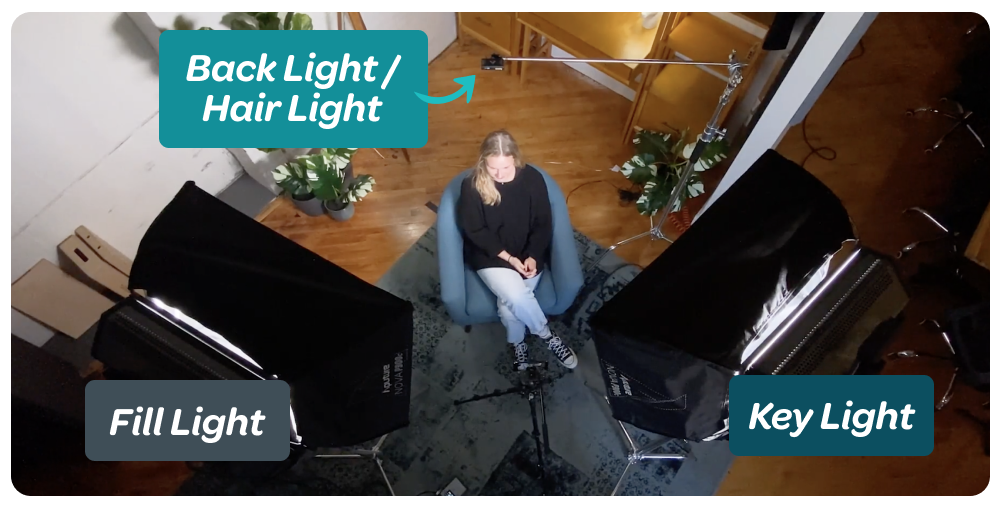
Lighting makes or breaks video quality – no software fix compensates for poor illumination. Face a natural light source like a window, or position a desk lamp 45 degrees in front of you to eliminate shadows. Never have bright windows behind you – this silhouettes your face.
In Logi Tune, enable RightLight technology to automate adjustments. Manually tweak these when lighting changes:
– Exposure: Increase in dim rooms until facial features are clear (avoid blown-out highlights)
– White Balance: Match to light temperature – 5500K for daylight, 3200K for warm bulbs
– Contrast: Reduce slightly to soften harsh shadows on faces
These micro-adjustments take 30 seconds but make you appear professionally lit rather than trapped in a cave.
Fix Logitech Webcam Connection and Recognition Failures
When your computer ignores the webcam, these targeted fixes resolve 95% of cases. First, unplug and replug the USB cable while checking for port damage. Try all available USB ports – front, back, and side panels. If using USB-C, flip the connector (it works both ways).
Why Your Logitech Webcam Isn’t Recognized
Windows users: Open Device Manager > Imaging devices. If your Logitech camera shows with a yellow exclamation mark, right-click and select Update driver > Search automatically. If that fails, choose Uninstall device, then unplug/replug the camera to force fresh driver installation. Avoid third-party driver updaters – they often install incompatible versions.
Mac users: Go to Apple Menu > About This Mac > System Report > USB. Check if your Logitech model appears in the device tree. If missing, reset the SMC by shutting down, then holding Shift+Control+Option+Power for 10 seconds before restarting.
Resolve Video and Audio Quality Problems Immediately
Blurry footage or missing audio stems from overlooked settings, not hardware faults. For poor video quality, first remove any protective lens film – this transparent sticker causes permanent haze if left on. Then, in your video app’s settings, select your Logitech camera’s native resolution (e.g., “1080p” not “720p”).
Fix No Audio from Your Logitech Webcam’s Microphone
Your computer defaults to built-in mics unless manually switched. In Zoom: Settings > Audio > Microphone. Select your Logitech model from the dropdown (e.g., “Logitech C920 Mono”). Test with the Test button – you should see green audio bars when speaking. Still silent? Increase microphone volume in Logi Tune > Audio to 80% to prevent clipping. For echo issues, enable “Automatically adjust microphone settings” in your conferencing app.
Final Note: You’ve now mastered how to set up Logitech webcam hardware, bypass permission traps, and optimize settings for professional results. Remember: eye-level positioning and front lighting matter more than expensive gear. Check your setup monthly by testing in Photo Booth or Camera app – drivers occasionally reset after OS updates. For advanced control, explore Logi Tune’s background removal or framing guides. Bookmark Logitech’s support page for model-specific firmware updates that boost performance. Within minutes, you’ll transform from pixelated participant to confident communicator with crystal-clear video that makes every call your best impression.


