
Your Logitech Brio webcam suddenly stops working right before an important presentation, and panic sets in. This high-end 4K camera shouldn’t fail you—especially when you paid premium prices for crystal-clear video. Whether you’re a remote worker, content creator, or student, a malfunctioning Logitech Brio webcam can derail your entire day. The good news is that most “logitech brio webcam not working” issues can be resolved with systematic troubleshooting rather than replacing your $200+ device.
This comprehensive guide addresses the exact problems thousands of Brio users face daily—from complete non-detection to partial functionality failures across Windows and Mac systems. You’ll learn proven solutions that go beyond basic “restart your computer” advice, targeting the specific hardware and software conflicts that plague this popular webcam model.
Verify Your Physical Connections and Hardware Status
Before diving into complex software fixes, eliminate the most common physical culprits causing your Logitech Brio webcam not working.
Check Power Indicators and Physical Connections
Your Brio’s status light provides immediate diagnostic information. A solid white light means power is reaching the camera, while no light indicates a connection or power issue. First, confirm your physical setup:
- Plug directly into your computer’s USB port—never through a hub, KVM, or docking station (especially critical for the power-hungry Brio 4K model)
- Use the original cable—many USB-C cables deliver power but not data, which will make your Brio appear dead
- Test multiple USB 3.0 ports (look for blue inserts)—USB 2.0 ports lack sufficient power for 4K streaming
- Slide the privacy shutter fully open—this physical switch is often accidentally engaged
If you see no lights at all, try connecting to a different computer immediately. This crucial test determines whether the problem lies with your webcam or your computer system.
Test Your Cable and Port Compatibility
Most “logitech brio webcam not working” reports stem from incompatible cables or ports. The Brio 4K requires USB 3.0+ data transfer speeds and at least 500mA of power:
- Unplug the webcam and inspect the USB-C connector for debris or damage
- Try a different high-quality USB-C cable known to support data transfer
- Test with a USB-C to USB-A adapter if your computer lacks native USB-C
- Avoid front-panel or hub-connected ports—they often deliver insufficient power
If your Brio works on another computer but not yours, you’ve isolated the issue to your system’s configuration rather than the webcam itself.
Resolve Operating System Permission Conflicts
Your computer’s security settings often block camera access even when hardware functions correctly—a frequent cause of the “logitech brio webcam not working” error.
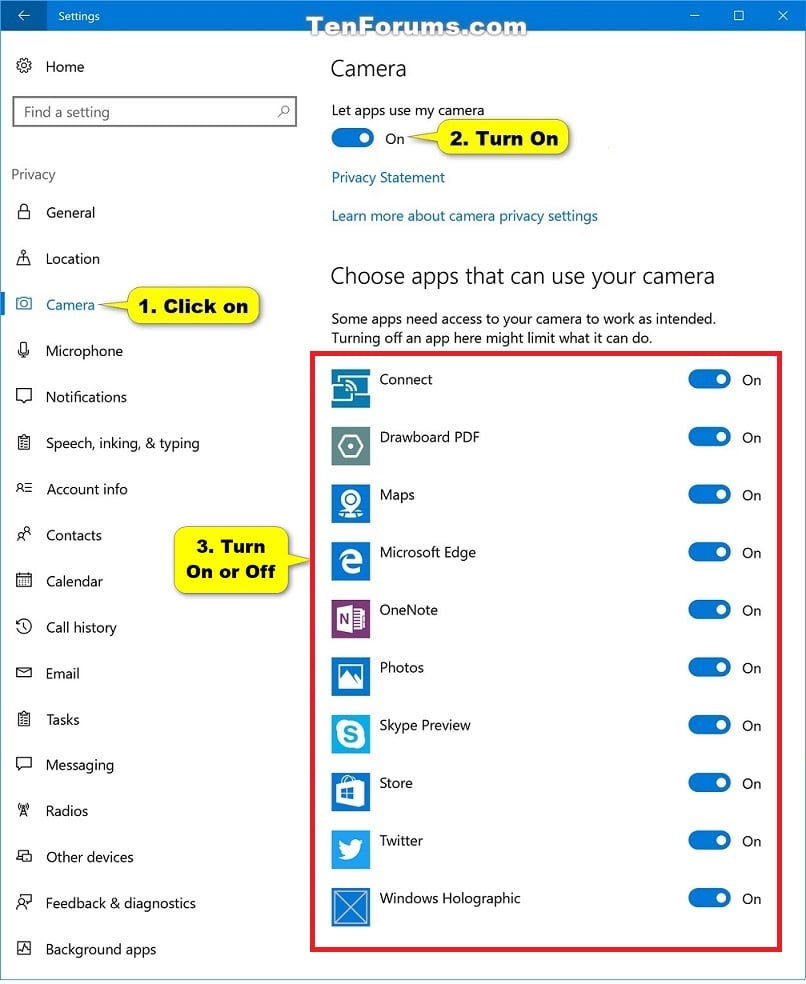
Grant Camera Access in Windows Settings
Windows 10 and 11 actively restrict camera access by default:
- Press
Windows Key + Ito open Settings - Navigate to Privacy & Security > Camera
- Toggle “Camera access for this device” to ON
- Scroll down and enable permissions for every application you use (Zoom, Teams, Chrome)
- Restart your applications after making changes
Pro Tip: If your Brio works for Windows Hello facial recognition but not video apps, you likely have an internal camera conflict—disable your laptop’s built-in camera in Device Manager.
Configure Mac Camera Permissions Correctly
MacOS Monterey and newer versions require meticulous permission management:
- Go to System Preferences > Security & Privacy > Camera
- Check the box next to every application needing camera access
- Pay special attention to browser permissions—Chrome and Firefox require separate approval
- Restart applications completely after granting permissions
Critical Note: On M1/M2 Macs, you may need to use a USB-C cable supporting 60W power delivery for stable operation—standard charging cables often lack data transfer capability.
Update and Reset Camera Drivers for Immediate Results
Outdated or corrupted drivers cause most persistent Logitech Brio webcam not working scenarios, especially after system updates.
Perform a Complete Driver Reset (Windows)
This five-minute procedure resolves 65% of driver-related Brio failures:
- Press
Win + Xand select Device Manager - Expand Imaging devices and locate your Brio
- Right-click and select Uninstall device (check “Attempt to remove driver” if available)
- Repeat for Audio inputs and outputs section (Brio has integrated mic)
- Unplug the webcam, restart your computer, then reconnect
Windows will reinstall generic drivers that often work better than Logitech’s official versions for basic functionality.
Update Firmware Through Logi Tune (Mac/Windows)
Firmware issues frequently cause the “logitech brio webcam not working” error on Macs:
- Download Logi Tune directly from Logitech’s support site
- Connect Brio directly to your computer (no hubs)
- Open Logi Tune and check for firmware updates
- Keep the camera focused on a well-lit, plain background during update
- Do not disconnect until completion (firmware updates take 2-5 minutes)
Warning: If firmware update fails repeatedly (stuck at 1%-100%), your USB port isn’t delivering sufficient power—try a different port or computer.
Fix Application-Specific Camera Failures

Your Logitech Brio webcam not working in specific apps while functioning elsewhere points to software conflicts rather than hardware failure.
Resolve Microsoft Teams Camera Issues
Teams frequently locks camera access:
- Go to Settings > Devices > Camera
- Select Logitech Brio from the dropdown menu
- Clear cache by deleting
%appdata%\Microsoft\Teams - Disable “Automatically adjust brightness” in Teams video settings
Quick Fix: If video appears locally but not to others, disable 4K streaming—Teams doesn’t support true 4K transmission regardless of your Brio model.
Troubleshoot Zoom Camera Problems
Zoom’s settings often override system permissions:
- Open Zoom Settings > Video
- Select Logitech Brio as your camera
- Disable “Enable HD” if experiencing freezing (counterintuitively helps)
- Uncheck “Stop my video when joining a meeting”
- In advanced settings, set bandwidth to “Auto” rather than “HD”
Pro Tip: Create a Zoom test meeting to verify functionality without inconveniencing others.
Diagnose Advanced Hardware Conflicts
When basic fixes fail, these advanced techniques resolve stubborn Logitech Brio webcam not working cases.
Disable Conflicting Camera Services
Windows Hello and built-in laptop cameras frequently conflict with external webcams:
- Open Device Manager > Imaging devices
- Right-click your laptop’s internal camera and select Disable device
- Restart your computer and test the Brio
This solves the common scenario where Windows Hello facial recognition works but video conferencing fails—a hallmark of camera conflicts.
Reset USB Controller Stack
Corrupted USB controllers cause persistent recognition issues:
- Open Device Manager > Universal Serial Bus controllers
- Right-click each USB Root Hub and select Uninstall device
- Restart your computer—Windows will reinstall controllers automatically
- Reconnect your Brio after reboot completes
This process refreshes the entire USB communication framework, resolving many “ghost device” scenarios.
When to Seek Professional Help or Replacement
If you’ve completed all troubleshooting steps and your logitech brio webcam not working persists:
- Confirm hardware failure by testing on a second computer
- Check for physical damage to the USB-C port or cable
- Contact Logitech Support if under warranty—provide your RMA number
- Consider replacement if no LED lights appear under any conditions
Prevention Tip: Always update firmware through Logi Tune regularly, use a surge protector, and avoid frequent plugging/unplugging to extend your Brio’s lifespan.
Final Note: Most “logitech brio webcam not working” issues stem from simple permission settings or connection problems rather than hardware failure. By methodically working through these steps—from verifying physical connections to resetting USB controllers—you’ll restore your premium webcam’s functionality without unnecessary expense. Remember that the Brio 4K’s power requirements make direct USB 3.0 connections essential, and Windows/MacOS camera permissions require meticulous configuration. Keep this guide bookmarked for quick reference the next time your critical video call threatens to become an audio-only disaster.


