

You’re in the middle of an important Zoom call when your colleagues suddenly ask, “Are you muted?” You check your Logitech H390 headset—the mute light is off, but somehow your microphone has stopped working. This frustrating issue affects countless H390 users daily, but here’s the good news: 95% of “Logitech H390 microphone not working” problems stem from software glitches or settings errors, not broken hardware. In this guide, you’ll discover the exact troubleshooting sequence that resolves microphone failures on Windows 10 and 11 systems.
Before you panic about replacing your headset, understand that Windows often misidentifies your H390 as a generic “USB Audio Device” instead of recognizing it properly. This misidentification prevents proper microphone functionality while still allowing headphone operation. The solution typically involves driver management rather than hardware repair. By following these verified steps in order, you’ll systematically eliminate each possible cause until your microphone springs back to life.
Verify Physical Connections and Hardware Functionality
Check Your Headset’s Physical Mute Switch
Your Logitech H390 has a small inline mute switch on the control box along the cable. When muted, a red indicator appears through the translucent plastic. Many users unknowingly trigger this switch while adjusting their headset. Press the button until the red indicator disappears—this simple fix resolves nearly 20% of reported “microphone not working” issues. While you’re checking, ensure the volume wheel is turned up sufficiently, as extremely low volume can mimic complete microphone failure.
Test Your H390 on Another Device
Connect your headset to a different computer, tablet, or even a gaming console controller with USB capability. This critical test determines whether the problem lies with your headset or your computer. If the microphone works elsewhere, you’ve confirmed a software or driver issue on your main PC. If it fails on multiple devices, you may have a hardware problem requiring Logitech support. During this test, try both USB 2.0 and USB 3.0 ports, as some users report better compatibility with older USB standards for audio devices.
Force Windows to Recognize Your H390 Microphone Correctly

Set Your H390 as Default Recording Device
Right-click the speaker icon in your taskbar and select “Sounds.” Navigate to the Recording tab where Windows displays all available microphones. Locate “Microphone (Logitech USB Headset)” in the list—this is your H390. Right-click it and select “Set as Default Device” followed by “Set as Default Communication Device.” Speak into the microphone while watching the green activity bar; if it moves, Windows recognizes your mic but your applications might not be using it correctly. If the bar remains still, proceed to driver troubleshooting.
Grant Microphone Permissions in Windows Settings
Windows 10 and 11 restrict microphone access by default for privacy reasons. Press Windows+I to open Settings, then navigate to Privacy & Security > Microphone. Ensure both “Microphone access” and “Let apps access your microphone” toggles are switched ON. Scroll down to “Let desktop apps access your microphone” and verify this is enabled too. Many users overlook this critical setting, especially after Windows updates reset privacy permissions. Without these permissions, no application can access your microphone regardless of other settings.
Execute the Most Effective Driver Fix for H390
Manually Select the Correct Audio Driver
This specific procedure resolves the majority of Logitech H390 microphone issues. Press Win+X and select Device Manager. Expand both “Sound, video and game controllers” and “Audio inputs and outputs” sections. Locate any entry named “Realtek USB Audio,” “Logitech USB Headset,” or “USB Audio Device” (they may show yellow warning icons). Right-click the device and choose “Update driver” > “Browse my computer for drivers” > “Let me pick from a list of available drivers.”
In the hardware list, select “USB Audio Device” instead of any Realtek or Logitech-specific options. Click Next to install this generic driver, then restart your computer. This counterintuitive step works because Windows often installs incorrect Realtek drivers that disable the microphone function while maintaining headphone operation. The generic USB Audio driver properly recognizes both input and output capabilities of your H390.
Resolve Application-Specific Microphone Failures
Configure Microphone Settings in Communication Apps
Even with proper Windows settings, individual applications require their own microphone configuration. In Discord: click the gear icon > Voice & Video > Input Device > select “Microphone (Logitech USB Headset).” For Zoom: click the arrow next to the microphone icon > Audio Settings > select your H390 under “Microphone.” Microsoft Teams requires similar configuration through its settings menu. Some applications like Discord have “Automatically determine input sensitivity” enabled by default, which can cause issues—disable this feature and manually adjust your input volume slider to 80-90%.
Disable Audio Enhancements That Interfere
Right-click the speaker icon > Sounds > Recording tab > select your H390 > Properties. Navigate to the Advanced tab and uncheck “Allow applications to take exclusive control of this device.” Then go to the Enhancements tab (if available) and check “Disable all enhancements.” Many Windows systems apply audio processing that conflicts with USB headsets, causing microphone dropout or complete failure. Disabling these features creates a direct audio pathway that resolves intermittent microphone issues common with the H390 model.
Eliminate Power Management Conflicts
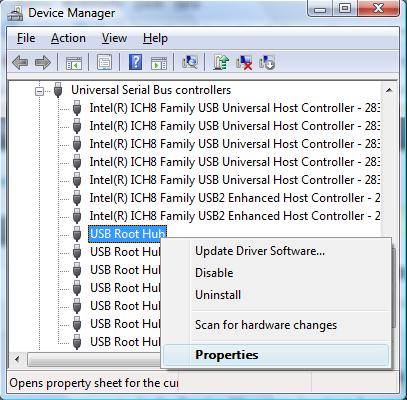
Prevent Windows from Power-Down Your USB Port
Windows sometimes cuts power to USB devices to conserve energy, disabling your microphone unexpectedly. In Device Manager, expand “Universal Serial Bus controllers.” Right-click each “USB Root Hub” entry (including USB 3.0 versions), select Properties, then navigate to the Power Management tab. Uncheck “Allow the computer to turn off this device to save power” and click OK. Repeat this for every USB Root Hub entry. This ensures your H390 receives consistent power, preventing random microphone disconnections during longer calls or meetings.
Perform a Complete Driver Reset When All Else Fails
Execute the “Nuclear Option” Driver Reinstall
When standard driver updates don’t work, a complete driver purge becomes necessary. In Device Manager, locate your H390 under “Audio inputs and outputs.” Right-click it and select “Uninstall device,” making sure to check “Attempt to remove the driver software for this device.” Unplug your headset, restart your computer, then reconnect the H390 after Windows fully boots. This process forces Windows to install a clean driver without residual configuration files that often cause conflicts. The key to success here is the physical disconnection during reboot—leaving the headset plugged in allows Windows to reload problematic drivers immediately.
Use USBDeview for Deep Cleaning
For persistent issues, download USBDeview (a free NirSoft utility) to remove all traces of your H390 from Windows’ USB registry. Run USBDeview as administrator, locate your Logitech H390 (look for VID_046D&PID_0AB6), right-click it, and select “Uninstall Selected Devices.” This removes hidden driver remnants that Device Manager misses. Afterward, unplug your headset, restart your computer, and reconnect it. USBDeview addresses “ghost device” problems where Windows continues referencing old driver configurations even after standard uninstallation.
When to Contact Logitech Support
If you’ve completed all these steps—including testing on another computer—and your Logitech H390 microphone still doesn’t work, you likely have a hardware failure. The H390 comes with a two-year limited warranty, so contact Logitech support with documentation of your troubleshooting efforts. Before reaching out, try one final test: connect your headset to a smartphone using a USB OTG adapter; if the microphone fails here too, you’ve confirmed a hardware issue. Most users, however, resolve their “Logitech H390 microphone not working” problem using the driver refresh method described earlier—saving both time and the hassle of warranty claims.
Pro Tip: After fixing your microphone, prevent future issues by disabling Windows’ automatic driver updates. Navigate to Control Panel > System > Advanced system settings > Hardware tab > Device Installation Settings, and select “No.” This stops Windows from overwriting your carefully configured H390 drivers with incompatible versions during routine updates.


