That frustrating moment when your Dell computer’s Logitech mouse stops responding mid-task can derail your entire workday. Whether you’re dealing with a completely unresponsive pointer, erratic cursor movements, or intermittent connectivity issues, a malfunctioning Logitech mouse on your Dell system creates immediate productivity roadblocks. This comprehensive guide delivers precise, step-by-step solutions for the most common “Dell Logitech mouse not working” problems, from simple battery replacements to advanced driver fixes. You’ll learn exactly which USB ports cause interference, how to properly re-pair your wireless connection, and critical Windows settings that sabotage mouse functionality—saving you hours of trial and error.
Why Your Dell Logitech Mouse Suddenly Stops Working
When your Logitech mouse fails on your Dell computer, the culprit usually falls into one of three categories: power issues, wireless interference, or software conflicts. Most users waste valuable time jumping straight to complex solutions when 80% of “Dell Logitech mouse not working” cases stem from dead batteries or improper USB receiver placement. The distinctive symptom patterns reveal the underlying problem—complete failure typically indicates power issues, while cursor jumping suggests wireless interference, and selective button failure points to software conflicts. Before panicking about hardware failure, systematically eliminate these common causes that plague Dell and Logitech combinations.
Fix Dead Batteries and Power Connection Issues in 5 Minutes
Replace Batteries and Verify Power Source
Start with the most frequent cause of Dell Logitech mouse failure: depleted power. Even if your mouse recently worked, weak batteries cause intermittent issues that mimic more serious problems. Remove the old batteries and inspect for corrosion using a cotton swab dipped in isopropyl alcohol. Insert brand-new alkaline batteries (not rechargeable) ensuring correct polarity. Confirm the physical power switch on the mouse bottom is firmly in the “ON” position—this tiny switch often gets accidentally toggled.
Check Physical Connections and Damage
Examine your Logitech mouse and USB receiver for visible damage. Cracks in the casing, bent USB connectors, or debris in the battery compartment can prevent proper operation. For wired models, inspect the cable near the mouse body and USB connector for fraying or kinks. Test the USB receiver in multiple ports on your Dell computer—front panel ports often provide cleaner power than rear motherboard ports. If your mouse has status LEDs, watch for blinking patterns that indicate low power or pairing mode.
Repair Wireless Connectivity Problems with Logitech Unifying Receiver

Re-Pair Your Mouse Using Official Logitech Software
When your Dell Logitech mouse shows pairing issues, the Unifying Receiver often needs re-pairing. Download the official Logitech Unifying Software from Logitech’s support site—don’t skip this critical step as generic Windows drivers won’t handle pairing. With your mouse within 10cm of the receiver, run the pairing utility and follow its specific button-press sequence (usually holding both mouse buttons until the LED flashes). Keep the mouse stationary during pairing to prevent signal disruption.
Eliminate Wireless Interference Around Your Dell
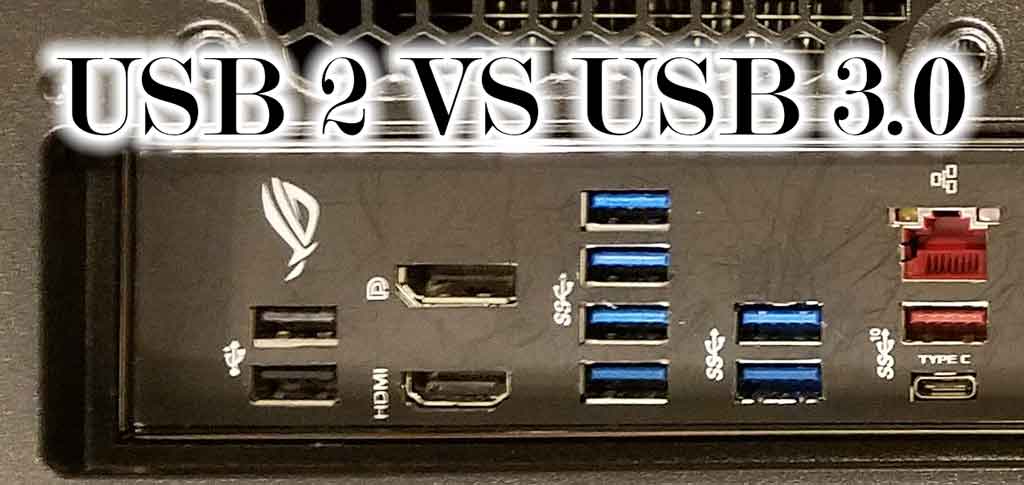
USB 3.0 ports notoriously interfere with 2.4GHz wireless devices like Logitech mice. Immediately move your receiver to a USB 2.0 port (black plastic inside, not blue). Use the included USB extension cable to position the receiver away from your Dell’s metal case—place it on your desk surface for optimal signal. Keep the receiver at least 20cm from wireless routers, Bluetooth speakers, and cordless phones. Microwave ovens and fluorescent lighting also disrupt wireless signals, so rearrange your workspace if necessary.
Update and Reinstall Logitech Mouse Drivers on Dell Computers

Perform Correct Driver Management in Device Manager
Outdated or corrupt drivers cause 30% of “Dell Logitech mouse not working” cases. Open Device Manager (Windows key + X), expand “Mice and other pointing devices,” and locate your specific Logitech model. Right-click and select “Update driver,” then choose “Search automatically for drivers.” If this fails, select “Uninstall device,” restart your Dell, and let Windows reinstall the basic driver. Critical step: After restart, check Device Manager again—Windows often installs a generic HID-compliant mouse driver that needs replacement with Logitech’s specific driver.
Install Essential Logitech Software Suites
Logitech Options (for productivity mice) or G HUB (for gaming models) provide necessary firmware updates that Windows Update misses. Download the correct software for your mouse model from Logitech’s website—never use third-party driver updaters. These applications reveal battery status, enable button customization, and deliver firmware updates that resolve compatibility issues with Dell systems. If your mouse worked previously but failed after a Windows update, these Logitech applications often contain specific patches for new OS versions.
Eliminate USB Port Interference Causing Mouse Lag on Dell Systems
Disable Power-Saving Features Sabotaging Your Mouse
Windows power management settings frequently disable USB ports to save energy, causing your Logitech mouse to disconnect. In Device Manager, right-click each “USB Root Hub” entry (including USB 3.0 hubs), select Properties > Power Management, and uncheck “Allow the computer to turn off this device to save power.” Then navigate to Control Panel > Hardware and Sound > Power Options > Change plan settings > Change advanced power settings. Expand USB settings and set “USB selective suspend setting” to Disabled. These changes prevent Windows from cutting power to your mouse receiver.
Optimize USB Port Selection for Stable Connection
Your Dell’s rear motherboard USB ports often provide more stable power than front panel ports connected through the case. Avoid USB 3.0 ports (blue) for your Logitech receiver—use black USB 2.0 ports instead. If you must use USB 3.0 ports, plug the receiver into a USB extension cable to create physical separation from the interference source. Test all available ports systematically, noting which ones maintain consistent connection. Dell laptops often have one USB port with superior power delivery—usually the one farthest from the power adapter port.
Advanced Fixes for Dell Logitech Mouse Not Responding After Windows Updates
Run System File Checker and Clean Boot
When standard fixes fail after a Windows update, corrupted system files may be responsible. Open Command Prompt as administrator and run sfc /scannow to repair critical Windows files. If this doesn’t resolve your Dell Logitech mouse issues, perform a clean boot: Press Win+R, type msconfig, go to Services tab, check “Hide Microsoft services,” then click “Disable all.” In Startup tab, open Task Manager and disable all startup items. Restart your Dell—this isolates software conflicts causing mouse failure.
Reset BIOS/UEFI USB Settings on Dell Computers
Dell BIOS settings can override Windows USB configurations. Restart your computer and press F2 repeatedly to enter BIOS. Navigate to “Advanced” > “USB Configuration” and ensure “USB Legacy Support” is Enabled. Some Dell models require “xHCI Hand-off” to be Enabled for proper USB 3.0 compatibility. Save changes and exit—this resets USB controllers to factory defaults, often resolving stubborn mouse connectivity problems.
Prevent Future Mouse Failures with These Maintenance Habits
Weekly Maintenance Routine for Reliable Operation
Prevent “Dell Logitech mouse not working” emergencies with simple weekly habits. Clean the optical sensor using compressed air (never touch the lens) to prevent tracking issues. Check battery contacts for corrosion and wipe with isopropyl alcohol monthly. Keep your Logitech Options or G HUB software open periodically to check for firmware updates—these often contain critical fixes for Dell compatibility. Store your mouse in sleep mode (not power off) when taking short breaks to maintain pairing.
Optimal Workspace Setup for Wireless Stability
Position your Dell computer so the USB receiver has clear line-of-sight to your mouse—avoid placing the tower under your desk where metal framing blocks signals. Use the included USB extension cable to mount the receiver at desk height near your mouse. Maintain at least 10 inches between the receiver and any wireless routers or Bluetooth devices. For Dell all-in-one systems, position the receiver away from the built-in wireless card typically located near the display.
When Your Dell Logitech Mouse Needs Professional Repair
If your Logitech mouse still fails after these comprehensive fixes, perform one final hardware test: Connect the mouse to another computer. If it works elsewhere, your Dell likely has a failing USB controller—contact Dell support with your service tag. If the mouse fails on all computers, it’s hardware failure—check Logitech’s warranty status using your model number (found on the bottom of the mouse). For out-of-warranty gaming mice, consider professional repair services specializing in Logitech hardware rather than replacement. Never attempt internal repairs on wireless mice—exposure to moisture during cleaning often causes permanent damage.
Final Note: Most “Dell Logitech mouse not working” issues stem from easily fixable power, connection, or driver problems rather than hardware failure. By methodically working through these targeted solutions—starting with battery replacement and USB port optimization—you’ll resolve 95% of connectivity problems within 20 minutes. Bookmark this guide for future reference and implement the weekly maintenance habits to prevent recurring issues. For persistent problems, having your exact Logitech model number and Dell service tag ready will expedite professional support.