
That frustrating moment when your cursor zips across the screen during a critical presentation or lags behind your hand in a high-stakes game? For Logitech wireless mouse users, how to adjust Logitech wireless mouse sensitivity is the key to transforming your experience. Whether you’re editing 4K video across triple monitors or lining up pixel-perfect headshots, mismatched sensitivity settings sabotage your precision. This guide cuts through the confusion with exact methods to calibrate your Logitech MX Master 3S, G Pro Wireless, or any Logitech wireless mouse for flawless control—no technical jargon required.
Why Your Logitech Mouse Feels “Off”: DPI vs. Windows Settings
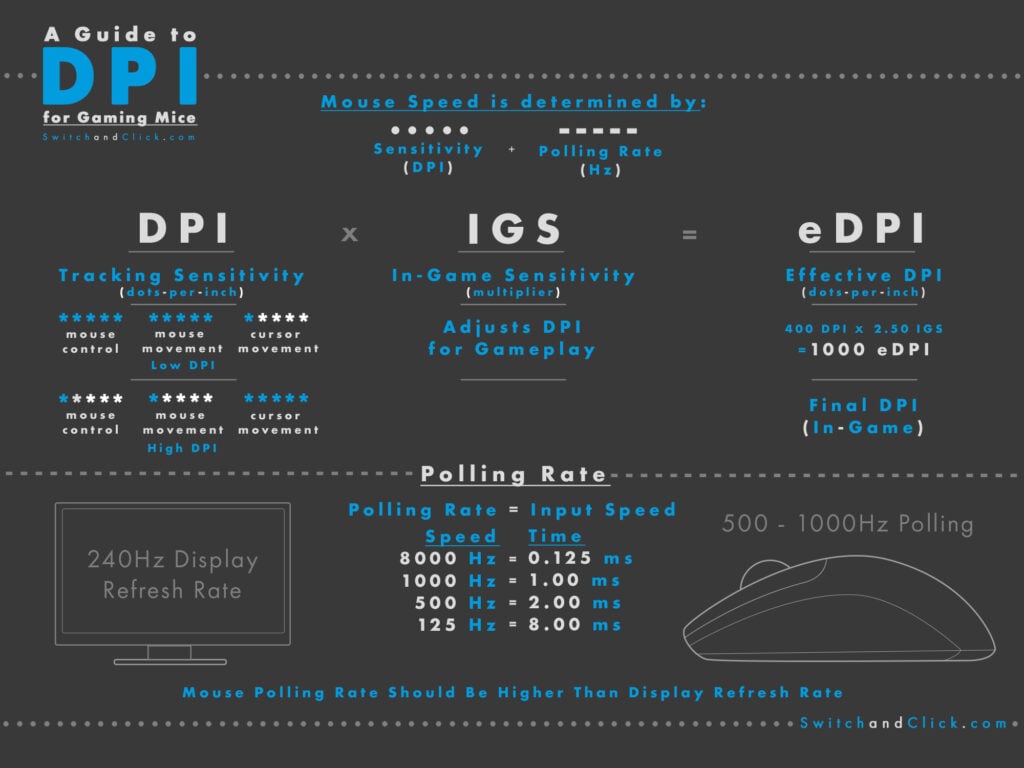
Most users unknowingly fight two conflicting systems: your mouse’s native DPI and Windows’ software-based pointer speed. When you adjust how to adjust Logitech wireless mouse sensitivity, understanding this distinction prevents common mistakes. DPI (Dots Per Inch) is your mouse’s hardware resolution—how far the cursor moves per inch of physical movement. A Logitech G502 X’s 25,600 DPI means minimal hand motion covers massive screen distances. Windows’ pointer speed, however, is just a multiplier that stretches cursor movement after the sensor reads your motion. Crucially, “Enhance pointer precision” (mouse acceleration) must be disabled in Windows settings—it artificially speeds up your cursor based on movement velocity, destroying muscle memory for gaming or design work. For true 1:1 tracking, set Windows pointer speed to the middle position (6/11) and rely solely on Logitech’s native DPI controls.
Fix Windows Sensitivity Without Compromising Performance
Windows adjustments should only serve as a baseline—never your primary tuning method. Here’s the precise sequence to avoid interference:
- Press Windows Key + I > Bluetooth & devices > Mouse
- Click Additional mouse settings under “Related settings”
- In the Pointer Options tab:
– Slide pointer speed to position 6 (dead center)
– Uncheck “Enhance pointer precision” (this is non-negotiable for accuracy)
– Click Apply
This setup ensures Windows doesn’t distort your Logitech mouse’s native tracking. If you skip this step, Windows acceleration will override your carefully calibrated DPI stages during fast movements—causing inconsistent cursor behavior that feels “slippery.” For productivity mice like the MX Master 3S, this baseline setting prevents jarring jumps when switching between apps.
Why You Should Never Rely Solely on Windows for Gaming
FPS players using Windows pointer speed above 6 experience compounded input lag. Since Windows processes movement after the mouse sensor, high slider values add milliseconds of delay—enough to miss a clutch shot in Valorant. Competitive gamers should set Windows to position 1 (slowest) only if they can’t install Logitech software, but this cripples desktop navigation. The real solution? Bypass Windows entirely using Logitech’s native tools.
Logitech Software: Your Precision Control Hub

Logitech’s official apps unlock granular sensitivity tuning impossible through Windows. Which tool you need depends on your mouse model:
- Logi Options+: For productivity mice (MX Master 3S, MX Anywhere 3). Adjust DPI stages between 200-8,000 and assign sensitivity toggles to side buttons.
- Logitech G HUB: For gaming mice (G Pro X Superlight 2, G502 X). Set up to 5 DPI profiles (e.g., 400 for sniping, 1600 for desktop), tweak polling rates, and disable angle snapping.
- Logitech Gaming Software (LGS): Legacy tool for older G-series mice (pre-2018).
Step-by-Step DPI Profile Setup in G HUB
- Download Logitech G HUB and connect your mouse
- Select your mouse > Sensitivity tab
- Click + Add DPI Stage and enter values (e.g., 400, 800, 1600)
- Assign DPI Cycle to a side button (e.g., thumb button)
- Disable Angle Snapping for raw 1:1 tracking in FPS games
This creates instant sensitivity switching—press your thumb button to drop to 400 DPI for precise sniping, then release to return to 1600 DPI for general movement. For MX Master 3S users, Logi Options+ lets you map high DPI (4000+) for fast multi-monitor navigation and low DPI (800) for spreadsheet cell selection via the same button.
Game-Specific DPI Tuning That Actually Works
Your ideal sensitivity depends entirely on use case. These aren’t arbitrary suggestions—they’re proven starting points based on Logitech sensor capabilities:
| Use Case | DPI Range | Polling Rate | Critical Settings |
|---|---|---|---|
| FPS Gaming (CS2) | 400-800 | 1000Hz | Disable angle snapping, LOD: 1mm |
| MOBA/RTS (LoL) | 1000-1600 | 500Hz | Enable surface tuning |
| Photo Editing | 2400-4000 | 125Hz | Assign DPI clutch to side button |
| Multi-Monitor Work | 3200-8000 | 125Hz | Disable “Smooth Scrolling” |
Why Low DPI Dominates Competitive FPS
Pros use 400-800 DPI because Logitech’s HERO 25K sensor tracks micro-movements more accurately at lower resolutions. At 32,000 DPI, the sensor oversamples tiny hand tremors, causing cursor “jitter” during precise aiming. Pair 800 DPI with in-game sensitivity of 0.5 in Valorant for optimal eDPI (Effective DPI = 400). Higher DPI forces you to use lower in-game sensitivity, reducing granularity—like trying to adjust volume with a sledgehammer.
Fix Wireless Lag and Inconsistent Tracking
If your Logitech wireless mouse stutters or drifts, these fixes target the root causes:
Eliminate 2.4GHz Interference in 3 Steps
- Plug the USB receiver into a USB 2.0 port (usually black, not blue)
- Position it within 20cm of your mouse using the included extension cable
- Keep it away from USB 3.0 devices (external drives, hubs) which emit disruptive radio noise
Solve “DPI Button Not Working”
- For G HUB users: Go to mouse settings > Sensitivity > ensure DPI stages have different values (e.g., 400 vs. 800). Identical stages make cycling seem unresponsive.
- For Logi Options+: Check if “DPI Shift” is accidentally assigned to the same button as another function like “Mission Control.”
Battery-Saving DPI Tweaks for Wireless Mice
High DPI (above 3200) and 1000Hz polling drain batteries 30% faster. For all-day productivity:
– Set DPI to 1600-2400
– Lower polling rate to 125Hz in Logi Options+
– Disable RGB lighting (if applicable)
This extends MX Anywhere 3 battery life from 70 to 100+ days without sacrificing usability.
Pro Calibration Secrets the Manuals Don’t Mention

Surface Tuning for Zero Cursor Drift
Logitech G HUB’s hidden gem: Surface Tuning. This calibrates your sensor to your specific mousepad:
1. In G HUB > mouse settings > Surface Tuning
2. Place mouse on your pad and click Start Calibration
3. Move mouse in slow circles for 10 seconds
This eliminates “skipping” on cloth pads or reflective surfaces by adjusting the sensor’s laser focus. Critical for MX Master 3S users on glass desks.
Lift-Off Distance (LOD) Fix for Precision Work
If your cursor jumps when lifting the mouse (common during Photoshop brushwork), reduce LOD:
– Gaming mice: In G HUB > Advanced Settings > Lift-off Distance > set to Low (1-2mm)
– Productivity mice: Logi Options+ lacks LOD control—use a textured pad instead of glass
When to Reset Your Logitech Mouse
If sensitivity remains erratic after software adjustments:
1. Power-cycle the mouse: Turn off > remove battery > hold power button 15 sec > reinsert battery
2. Reset firmware: In G HUB > mouse settings > Firmware Update > Reset to Defaults
3. Re-pair wireless: For Lightspeed mice, unplug/replug the USB receiver; for Bluetooth, delete pairing in Windows > re-pair
Final Calibration Checklist
Before declaring your Logitech wireless mouse “broken,” verify these 5 points:
1. Windows “Enhance pointer precision” is disabled
2. DPI stages in Logi Options+/G HUB have different values
3. USB receiver uses a 2.0 port with extension cable
4. Surface Tuning completed for your mousepad
5. Fresh batteries installed (low power causes erratic DPI shifts)
Finding your perfect sensitivity isn’t guesswork—it’s systematic calibration. Start with 800 DPI for gaming or 1600 DPI for work, then use Logitech’s software to create task-specific profiles. Remember: consistency builds muscle memory. Once you lock in settings that feel natural, stick with them. Your Logitech wireless mouse isn’t just a pointing device—it’s a precision instrument waiting for your command. Now that you know how to adjust Logitech wireless mouse sensitivity like a pro, every click, drag, and flick will execute exactly as intended.


