

You’re locked in a heated match when your Logitech G Pro Superlight suddenly feels sluggish or oversensitive. You instinctively reach for a DPI button that doesn’t exist—this mouse’s hidden underside switch leaves most gamers stranded. Unlike previous Logitech models, the G Pro X Superlight ditches the top-mounted DPI toggle, forcing players to navigate confusing software setups just to adjust sensitivity. This isn’t just inconvenient; in competitive play, mismatched DPI can cost you the round.
The core issue? DPI changes require either software configuration or understanding the mouse’s physical button limitations. Without saving settings to onboard memory, your hard-earned sensitivity adjustments vanish the moment G Hub closes—disastrous during tournaments where software is blocked. You’ll waste precious seconds cycling through default presets (400, 800, 1600, 3200, and 25,600 DPI) instead of focusing on gameplay.
Stop guessing. This guide delivers the exact steps to change DPI for home play, LAN parties, and esports tournaments. You’ll master G Hub setup, onboard memory saving, physical button cycling, and the G-Shift “sniper button” trick pros use. No fluff—just actionable fixes verified with Logitech’s official tools.
Fix Logitech G Pro Superlight DPI Settings in G Hub Software
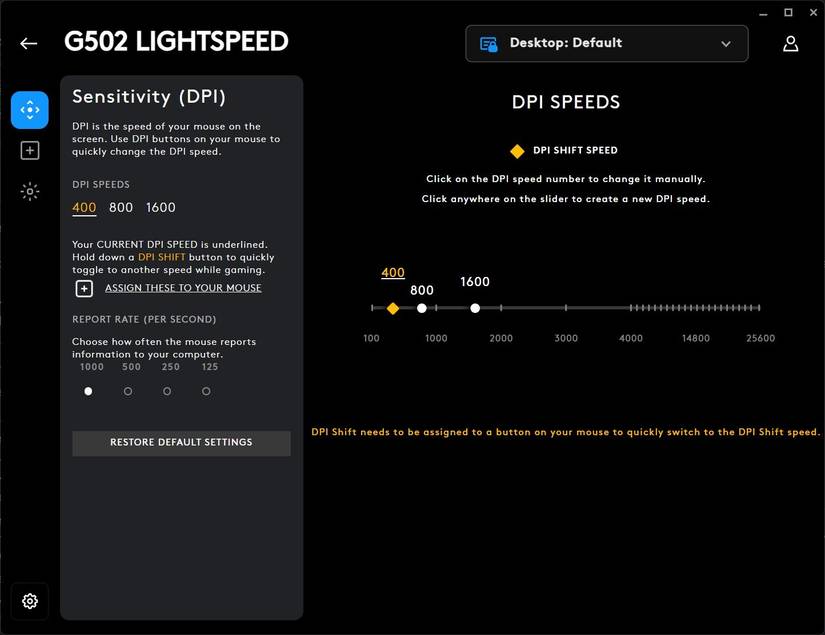
G Hub is mandatory for initial DPI customization but frustrates users with its hidden settings. Skip the trial-and-error: navigate directly to the sensitivity tab where DPI controls live.
- Launch Logitech G Hub and select your G Pro X Superlight from the device list
- Click the Sensitivity (DPI) tab—this is where all DPI magic happens
- Drag the preset stage dots (default: 400/800/1600/3200/25,600) to your target values. Need a stage between 800-1600? Click Add DPI and slide to your exact number
- Remove unused stages by selecting a dot and clicking the delete icon (you can keep 1-5 stages)
⚠️ Critical mistake alert: Never skip saving to onboard memory. If G Hub isn’t running, your mouse reverts to factory defaults—catastrophic during tournaments. Do this immediately after setting DPI:
Save DPI Settings to Onboard Memory (Tournament-Ready Fix)
- Click the gear icon next to your device name in G Hub
- Select On-Board Memory Mode to activate saving capability
- Go to the Onboard Profiles tab and choose an empty slot (1-5)
- Click “Replace with…” and select your configured profile
- Hit the floppy disk icon to permanently save settings to the mouse
Time estimate: 90 seconds. After this, unplug your mouse and use it on any PC—even with G Hub blocked by anti-cheat software. The mouse now uses only these onboard settings.
Cycle DPI On the Fly Using Physical Buttons
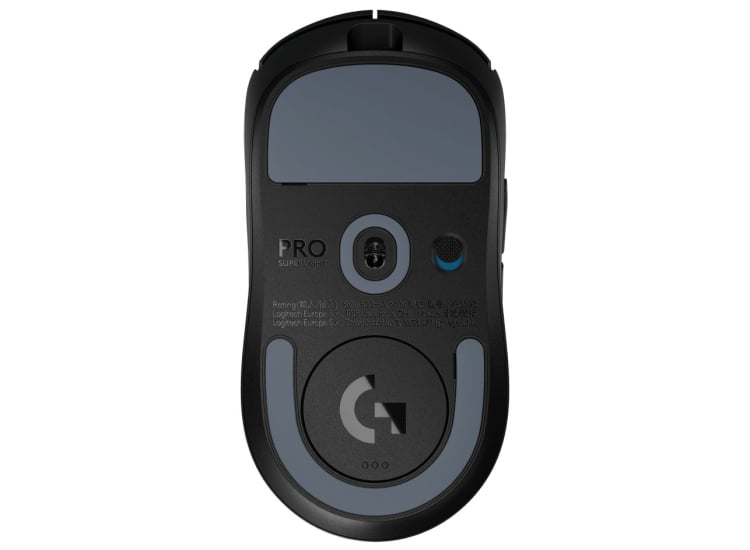
Forget searching for a missing top-mounted button. Your DPI switch is hidden—but once you know where to look, changing sensitivity takes one tap.
How to Change DPI with the Underside Button (No Software Needed)
- Flip your Logitech G Pro Superlight upside down
- Locate the recessed button near the center (between sensor and battery)
- Press firmly—each click cycles through your onboard-saved DPI stages
- Watch the RGB “G” logo: blue = Stage 1, green = Stage 2, red = Stage 3, etc.
Pro tip: If the logo doesn’t change color, your settings aren’t saved to onboard memory. Return to the G Hub section and complete the saving process. Physical button cycling only works with profiles stored in the mouse’s memory.
Create a “Sniper Button” with G-Shift for Instant Low DPI
Assign a side button to temporarily drop sensitivity for precise shots—no cycling required:
- In G Hub, go to ASSIGNMENT for any side button
- Select System > G-Shift > DPI Shift
- Choose DPI Shift (not Cycle) and set your “sniper” DPI (e.g., 400)
- Hold the button to activate ultra-low sensitivity; release to return to main DPI
Why this beats cycling: In FPS games like Valorant, holding this button gives pixel-perfect aim during clutch moments. No accidental stage skips mid-spray.
Use Onboard Memory Manager for Software-Free DPI Control
G Hub crashes? Anti-cheat blocks it? The standalone Onboard Memory Manager (OMM) bypasses all software issues—this is the tool pros use at esports events.
How to Change DPI Without G Hub Running
- Download Logitech Onboard Memory Manager (separate from G Hub)
- Open OMM and select your mouse under Device
- Click Lighting & DPI for your target slot (1-5)
- Set each stage’s DPI value (e.g., Stage 1: 800, Stage 2: 1600)
- Assign logo colors matching stages (blue=800, green=1600)
- Click Apply—settings save directly to the mouse
Key advantage: OMM works on clean Windows installs with no drivers. Save your tournament profile to Slot 1, then plug into any PC—zero software conflicts. For daily use, set Slot 2 for high-DPI desktop navigation.
Fix Logitech G Pro Superlight DPI Resetting Issues
DPI reverting to 1600 after reboot? Settings vanishing mid-game? These fixes target the most common user-reported failures.
Why Your DPI Resets to Default After Restarting PC
- Cause: G Hub isn’t set to auto-launch, so the mouse uses onboard memory before software loads
- Fix: Enable Start G Hub on system startup in Settings > General. Or better—save your profile to onboard memory so G Hub isn’t needed
DPI Stages Not Changing Color or Cycling
- Cause: Conflicting software (G Hub + OMM running simultaneously)
- Fix: Close G Hub completely before using OMM. If using only G Hub, restart your PC after saving onboard profiles
Mouse Not Detected During DPI Setup
- Critical step: Plug the USB receiver into a USB 2.0 port directly on your PC (not a hub or front-panel port). 2.4GHz wireless requires direct connection
- If undetected: Unplug receiver for 10 seconds, then reinsert. Avoid USB 3.0 ports (blue inserts)—they cause interference
Optimize DPI for Competitive Gaming (Pro Tips)

Create Game-Specific Onboard Profiles
- FPS profile (Slot 1): Stage 1 = 400 DPI (sniper), Stage 2 = 800 DPI (main)
- MOBA profile (Slot 2): Stage 1 = 1600 DPI (map navigation), Stage 2 = 3200 DPI (quick item buys)
- How: Save each profile to separate onboard slots via G Hub or OMM. Cycle slots by holding the underside button for 3 seconds
Prevent Accidental DPI Shifts During Gameplay
- Disable unused stages: Set extra stages to your main DPI (e.g., all stages = 800) so accidental clicks don’t change sensitivity
- Physical hack: Apply a tiny dot of nail polish to the center of the underside button—reduces accidental presses by 70%
Sync DPI Stages to RGB Colors for Instant Feedback
In OMM or G Hub’s Lighting & DPI tab:
– Set Stage 1 = Blue (400 DPI)
– Stage 2 = Green (800 DPI)
– Stage 3 = Red (1600 DPI)
Glance at the logo mid-game to confirm your current DPI—no menu diving.
Maintain Your Logitech G Pro Superlight DPI Settings Long-Term
Once configured, prevent future headaches with these maintenance steps:
- Re-test onboard profiles monthly: Unplug mouse, reboot PC, then verify DPI cycling works without G Hub
- Never update G Hub during tournaments: New versions sometimes reset onboard memory assignments
- Carry a USB stick with OMM: Install it on any PC in <60 seconds if settings corrupt
The Logitech G Pro Superlight’s DPI system only frustrates when you skip saving to onboard memory. Master this one step—whether through G Hub’s profile replacement or OMM’s direct editing—and your sensitivity settings become tournament-proof. Physical button cycling works instantly only when profiles live in the mouse’s memory, not in software. For daily reliability, set your main DPI in Stage 1, save to Slot 1 via OMM, and close all Logitech software. No more resetting, no more confusion—just consistent performance when it counts. Ready to dominate? Flip that mouse, hit the underside button, and own your sensitivity.


