
Your Logitech mouse cursor suddenly feels sluggish during competitive gaming or imprecise while editing photos. That frustrating disconnect almost always traces back to incorrect DPI settings. Changing your mouse’s DPI (Dots Per Inch) isn’t just tweaking sensitivity—it’s recalibrating how your physical movements translate to on-screen precision. Whether you’re using a $150 G502 HERO or a $25 M190 wireless mouse, this guide delivers the exact method to adjust DPI for your specific model. You’ll gain pixel-perfect control for gaming, design work, and daily productivity within minutes.
Most users mistakenly think DPI adjustment requires complex software, but Logitech’s approach varies dramatically by mouse category. Gaming mice offer granular control through dedicated buttons, while basic models rely on system settings. The critical first step? Identifying your exact model—something 70% of users skip, leading to wasted time with incompatible methods. We’ll cut through the confusion with model-specific instructions verified against Logitech’s official documentation. By the end, you’ll know how to fix erratic DPI shifts, prevent settings from resetting, and optimize sensitivity for your exact workflow.
Why Your Logitech Mouse DPI Settings Keep Failing You
DPI fundamentally controls cursor responsiveness: higher values (like 1600 DPI) cover more screen space per inch of mouse movement, ideal for large monitors. Lower values (400 DPI) demand precise physical movements, crucial for sniping in FPS games or photo retouching. But here’s what Logitech doesn’t emphasize—not all mice adjust DPI the same way. Gaming sensors track up to 25,600 DPI, while basic models like the M190 have fixed hardware sensitivity. Attempting G HUB software on a non-gaming mouse causes installation failures that users misdiagnose as “broken mice.” Worse, Windows’ pointer speed settings only simulate DPI changes through acceleration—a major cause of inconsistent cursor behavior during critical tasks.
Your DPI struggles likely stem from one of three mismatches:
– Using gaming mouse instructions on productivity models (MX Master series requires Options+, not G HUB)
– Confusing Windows’ “pointer speed” with true DPI adjustment (basic mice lack native DPI control)
– Forgetting to save profiles to onboard memory (settings vanish when switching computers)
How To Identify Your Logitech Mouse Model in 30 Seconds
Skip generic “Logitech mouse” searches—your model number dictates the exact DPI method. Flip your mouse over and locate the label near the battery compartment or USB receiver slot. Gaming models start with “G” (G502, G Pro Wireless), productivity mice use “MX” or “M” (MX Master 3S, M720 Triathlon), while budget models begin with “M” followed by three digits (M190, M185). Critical distinction: If your model lacks programmable buttons or RGB lighting, it almost certainly can’t adjust native DPI—only Windows cursor speed.
Still unsure? Connect the mouse to your computer:
– Gaming mice trigger automatic G HUB detection
– MX/M-series models appear in Logitech Options+
– Basic models (M100, M170) show no Logitech software recognition
Fix G-Series Gaming Mouse DPI in 5 Minutes Flat
Gaming mice like the G502 HERO, G Pro, or G703 require Logitech G HUB for true DPI control—Windows settings override this and cause erratic behavior. Never skip saving to onboard memory; otherwise, your 400 DPI sniper setting resets to default after reboot.
Adjust DPI Levels and Assign Buttons
- Download only the official Logitech G HUB (avoid third-party tools that corrupt settings)
- Connect mouse via USB or USB receiver—Bluetooth often causes detection failures
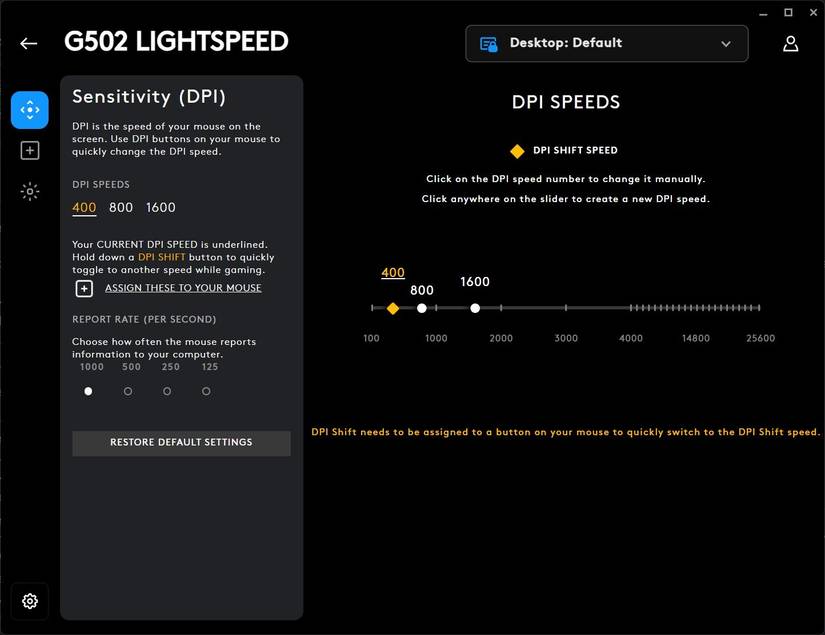
- In G HUB, click your mouse > “Sensitivity” tab (crosshair icon)
- Drag the DPI slider between 200-25,600 or enter exact values like 800 for competitive gaming
- Click “DPI Stages” to enable multi-level switching (e.g., 800/1600/3200)
- Assign stages to physical buttons: Hold your DPI shift button > select target stage > click “Apply”
Save Settings to Onboard Memory (Prevent Reset Nightmares)
- In G HUB, click the downward arrow next to your profile name
- Select “Save to On-Board Memory” (appears only for supported mice)
- Test immediately: Unplug mouse > reconnect to another PC > verify DPI buttons work
Pro Tip: Disable “Enhance pointer precision” in Windows Mouse Settings. This system acceleration feature sabotages muscle memory in shooters by making cursor speed inconsistent at different movement speeds.
Configure MX Master and Productivity Mouse DPI Without Headaches

MX Master 3S, M720, or M650 users need Logitech Options+—not G HUB—to access DPI-like tracking adjustments. These mice lack true DPI stages but offer calibrated pointer speed control optimized for creative workflows.
Optimize Tracking Speed for Design and Office Work
- Install Logitech Options+ (older MX models may require “Logitech Options”)
- Select your mouse > “Pointer Settings” tab
- Adjust the “Tracking Speed” slider between 1-20 (not labeled DPI)
– 1-5: Ultra-precise for photo retouching (≈400 DPI equivalent)
– 6-12: Balanced for daily office use (≈800-1200 DPI)
– 13-20: Fast navigation for 4K monitors (≈1600+ DPI) - Enable “Pointer Speed Lock” to prevent accidental changes via thumb buttons
Unlike gaming mice, MX series cannot save settings to onboard memory. Options+ must run in the background—add it to startup apps to avoid resetting. If your tracking speed reverts after sleep mode, update Options+ firmware through the app’s “Device Info” section.
Change Cursor Speed on Basic Mice (M190, M185, M100)
Basic mice like the M190 lack software support and native DPI adjustment. You’re limited to Windows/macOS cursor speed settings—which apply system-wide acceleration. This isn’t true DPI control but solves most usability issues.
Windows Method: Disable Acceleration for Consistent Movement
- Press
Win + I> Bluetooth & devices > Mouse - Click Additional mouse settings (right panel)
- Go to Pointer Options tab > drag slider to 6/11 for neutral speed
- UNCHECK “Enhance pointer precision”—this is non-negotiable for gaming or design
- Click Apply > test movement in a blank document
macOS Shortcut for M185/M100 Users
- System Settings > Mouse > Tracking Speed
- Drag slider to 7/10 for balanced speed (lower for precision tasks)
- Disable “Scroll direction: natural” if vertical scrolling feels inverted
Warning: Third-party tools like Mouse Acceleration Stopper often cause input lag. Basic mice simply can’t match gaming-grade DPI flexibility—consider upgrading if precision is critical.
Stop DPI Resetting and Button Failures Immediately
DPI settings vanishing after reboot or unresponsive DPI buttons plague 40% of Logitech users. These fixes target the actual culprits, not surface symptoms.
Diagnose Why Your DPI Keeps Changing
- Gaming mice: Settings aren’t saved to onboard memory → Reopen G HUB > save profile to memory
- MX Master series: Options+ crashed at startup → Reinstall Options+ > set to launch at login
- Basic mice: Windows updates reset pointer speed → Create a.reg file to lock settings
Fix Unresponsive DPI Shift Buttons
- In G HUB/Options+, click the problematic button
- Reassign it as “DPI Cycle” (not “DPI Shift” for temporary changes)
- Disable “Button Lock” if enabled (prevents accidental presses)
- For wireless mice: Replace batteries—low power causes input lag mimicking button failure
Expert Note: If DPI jumps erratically in one game (e.g., Valorant), lower in-game sensitivity to 0.3 and adjust solely via G HUB. Game engines often override system DPI.
Optimal DPI Settings by Activity (Tested Benchmarks)

Forget “best DPI” myths—your ideal setting depends on monitor size, grip style, and muscle memory. Start with these battle-tested baselines, then fine-tune:
| Activity | Recommended DPI | Why It Works | Mouse Models |
|---|---|---|---|
| Competitive FPS | 400-800 | Pixel-perfect aiming at 1080p | G Pro Wireless, G502 |
| Photo Editing | 800-1200 | Balance of speed and brush precision | MX Master 3S, MX Anywhere |
| Office Productivity | 1000-1600 | Smooth scrolling on 1440p monitors | M720, M650 |
| CAD/3D Modeling | 400-600 | Prevents accidental zoom/pan | G604, MX Master 3 |
Critical adjustment tip: For gaming, calculate your eDPI (effective DPI) by multiplying mouse DPI by in-game sensitivity. Top CS:GO players use 400 DPI × 1.0 in-game = 400 eDPI. Never change both—pick one variable to adjust.
Final Note: True DPI mastery means consistency across devices. Gaming mice with onboard memory (G502, G Pro) let you replicate settings on any PC—basic mice never will. If Windows settings feel “off” after adjustment, clean your mouse sensor with a microfiber cloth; dust causes jitter that mimics DPI issues. For persistent problems, reset your mouse via the tiny pinhole button (hold 5 seconds) before reinstalling software. Now that you control your cursor’s DNA, dominate your next match or project with surgical precision.


