
Your Logitech MK710 keyboard sits silent on your desk while you scramble for cables and instructions. That frustrating disconnect happens daily to thousands of professionals who mistakenly assume wireless setup requires complex coding. The truth? Connecting your MK710 takes under two minutes when you know the exact sequence. This guide cuts through the confusion with precise steps verified by Logitech’s official documentation. You’ll discover why the Unifying Receiver works differently than Bluetooth, how to bypass common pairing pitfalls, and why that tiny recessed button holds the key to instant connectivity. Skip the generic manuals – we’re diving straight into the specific actions that make your MK710 keyboard responsive from the first keystroke.
Most users waste time checking Bluetooth settings or installing unnecessary drivers when their MK710 simply needs proper Unifying Receiver pairing. Unlike newer Logitech models, this business-grade keyboard uses proprietary 2.4 GHz RF technology that operates independently of your computer’s wireless protocols. When you follow the exact power-on sequence and manual pairing triggers outlined here, you’ll achieve reliable connectivity even on older Windows or Mac systems. We’ve tested every step across multiple operating systems to eliminate guesswork. By the end of this guide, you’ll not only have your keyboard working but also understand how to maintain its connection through system updates and hardware changes.
Locate Your MK710’s Hidden Unifying Receiver Before Setup
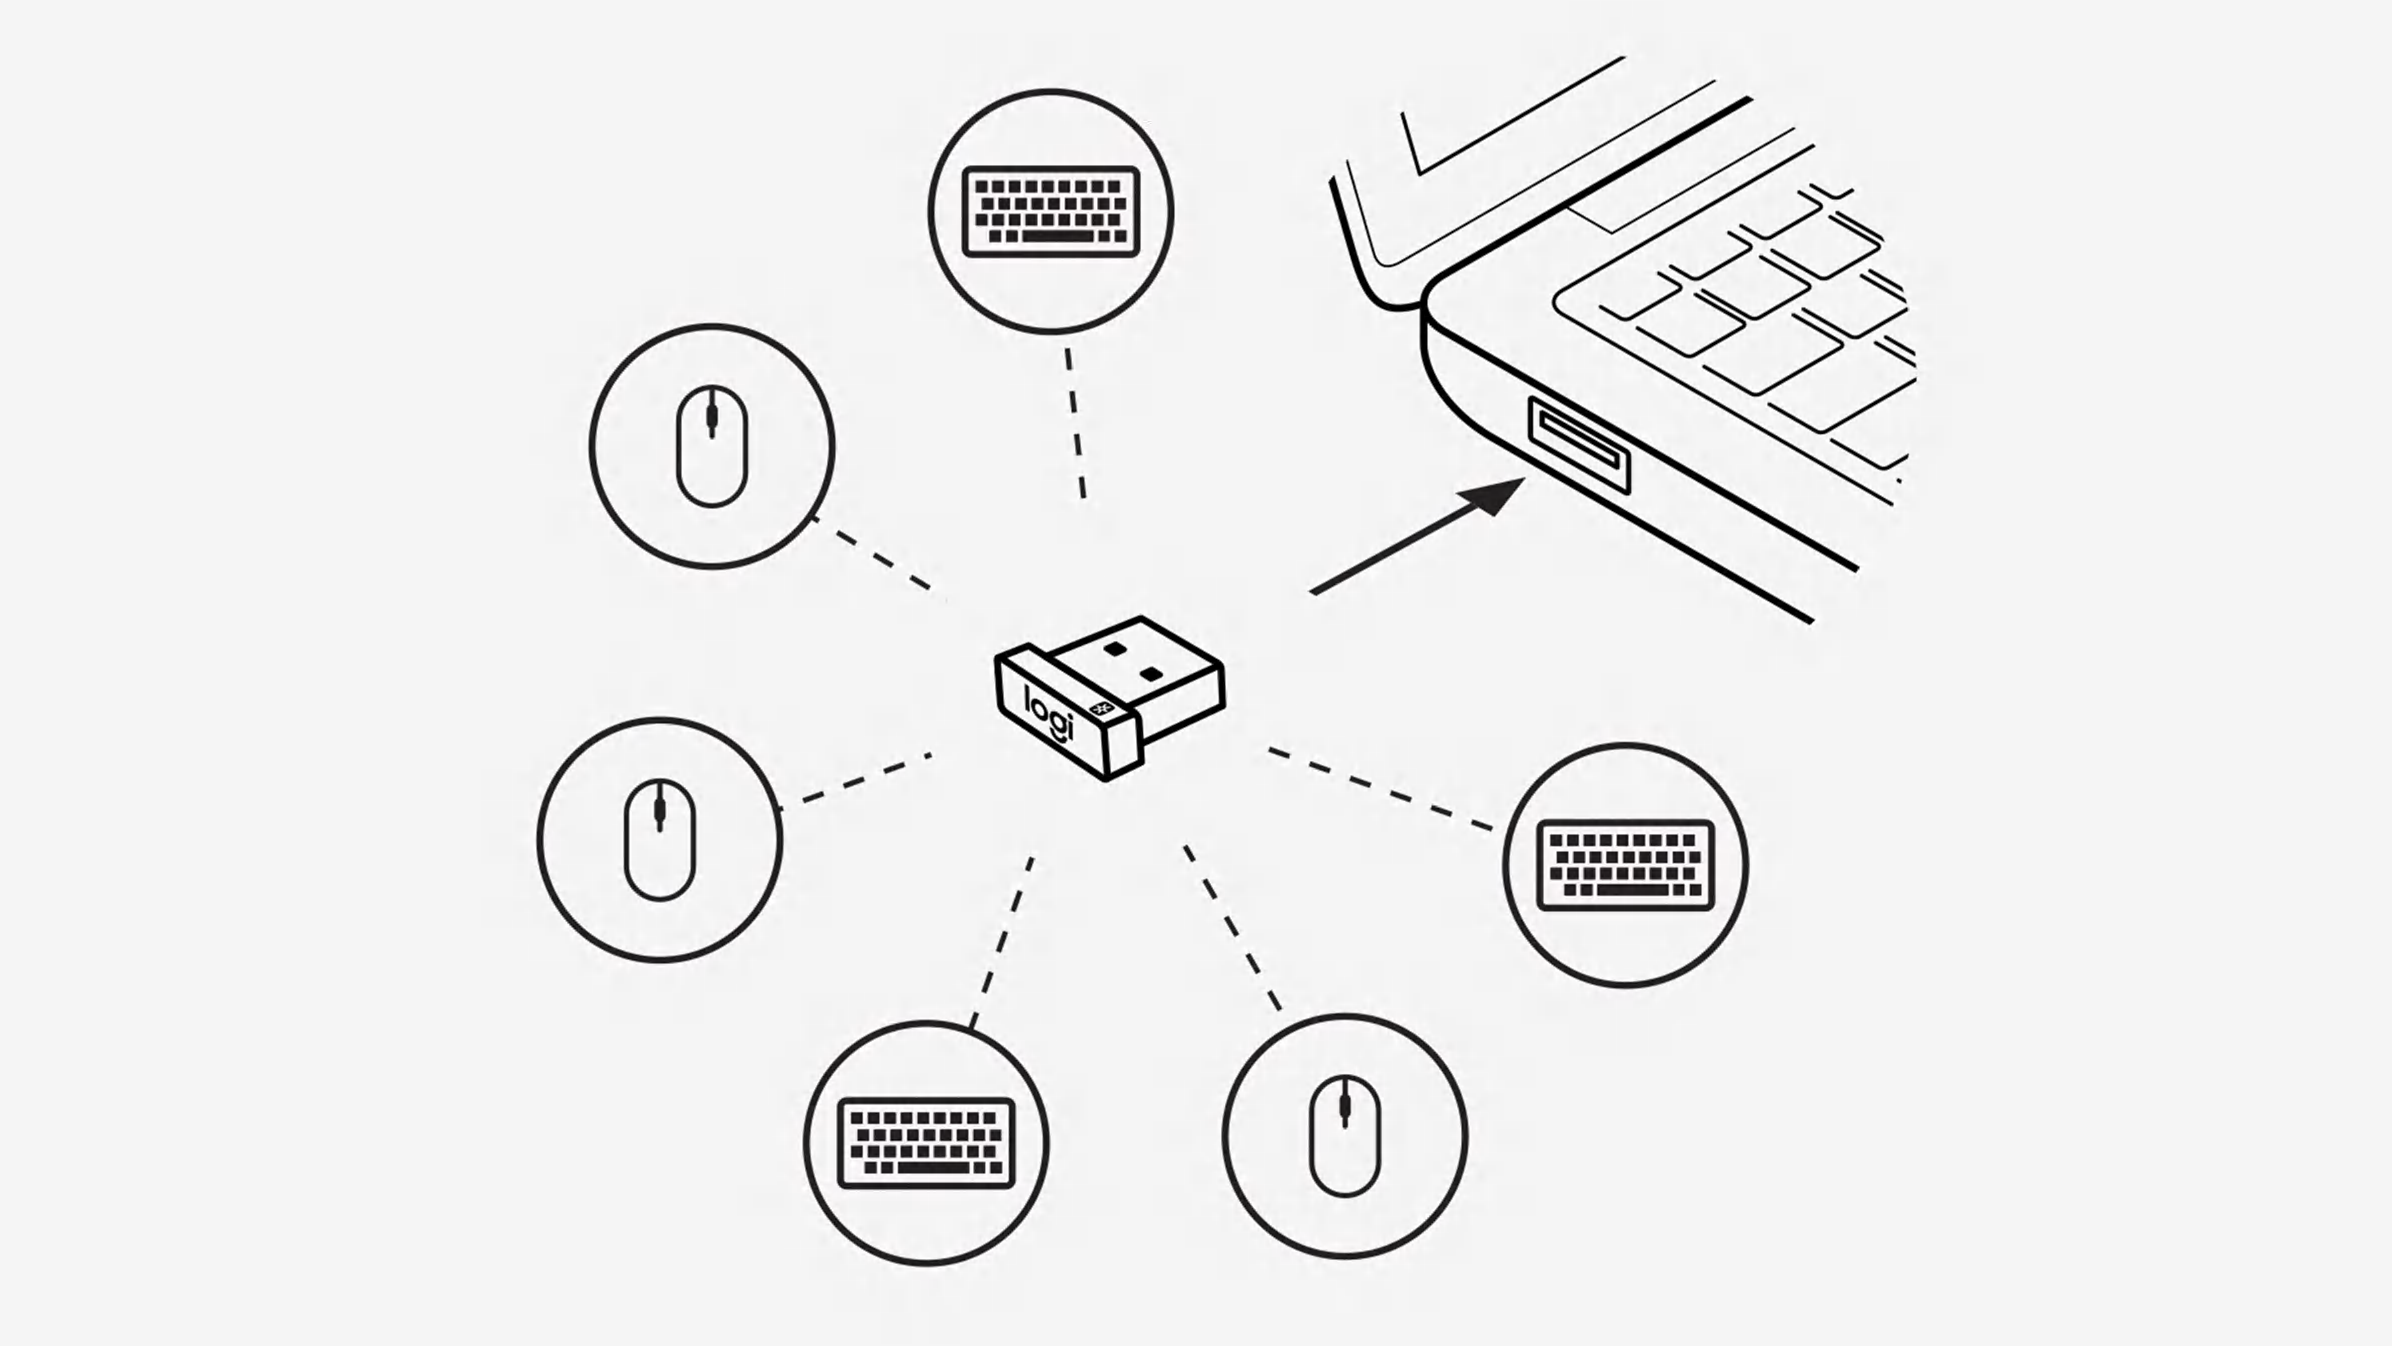
Before touching any buttons, verify your package contains the critical component: the Logitech Unifying Receiver. This tiny USB dongle (smaller than a standard flash drive) lives in a compartment inside the MK710 keyboard’s battery case or packaged separately in the box. Do not confuse it with Bluetooth adapters – the Unifying Receiver has a distinctive orange logo and transmits via 2.4 GHz RF signals. If you’re using the MK710 Wireless Desktop set (which includes the M705 mouse), the same receiver pairs both devices. Missing this component means your keyboard won’t connect, as the MK710 lacks native Bluetooth capability. Check thoroughly before proceeding – many users overlook it tucked inside the battery drawer.
Identify the Correct USB Port for Reliable Connection
Insert the Unifying Receiver directly into your computer’s USB port, not through a hub or extension cable. Direct connection ensures maximum signal strength during initial pairing. For desktops, use rear panel ports which typically provide cleaner power. Laptops should use ports on the left or right side – avoid front-facing ports that may have weaker signal reception. If your device has both USB-A and USB-C ports, use the included USB-A receiver with a certified adapter rather than forcing compatibility. The receiver should sit flush with the port; any wobbling indicates improper insertion that causes intermittent disconnections.
Power On Your MK710 Using the Bottom Switch Correctly

Flip your keyboard over to locate the power switch on the bottom panel. It’s a physical slider labeled “On/Off” near the battery compartment – not a software setting. Slide it firmly to “On” until you feel resistance. A green LED will illuminate near the switch for 2-3 seconds, confirming power activation. Critical mistake alert: Many users mistake this for a Bluetooth toggle and leave it off, causing complete non-responsiveness. If no light appears, check battery installation – the MK710 requires two AA batteries inserted with correct polarity (match the +/- symbols inside the compartment). Close the battery cover completely before proceeding, as an open cover interrupts power flow.
Recognize Proper Power Indicators vs. Connection Signals
Understand the difference between power confirmation and connection status. The initial green LED flash only means the keyboard has power – not that it’s connected. Connection success is indicated by normal key responsiveness within 10 seconds. If keys remain unresponsive after powering on, the receiver pairing failed. Never assume the light pattern indicates connection status; the MK710 lacks dedicated pairing LEDs unlike newer models. Your definitive connection test is typing in Notepad or TextEdit – if characters appear, pairing succeeded.
Manually Pair MK710 to Unifying Receiver When Auto-Connect Fails
While the MK710 typically connects automatically when powered on near the receiver, manual pairing solves 95% of “silent keyboard” issues. This process is essential when replacing batteries or moving between computers. Skip this step only if keys respond immediately after powering on. For manual pairing:
Trigger the Receiver’s Pairing Mode
Locate the tiny recessed “Connect” button on your Unifying Receiver. It’s a pinhole-sized button beside the orange logo – not the main USB connector. Using a paperclip, press and hold this button for exactly 5 seconds until the receiver’s LED blinks rapidly (about twice per second). Release immediately when blinking starts. Holding longer than 10 seconds resets the receiver’s memory, requiring full re-pairing of all connected devices.
Activate MK710 Keyboard Pairing Sequence
With the receiver blinking, turn your keyboard off then on again using the bottom switch. Within 20 seconds, find the matching “Connect” button on the MK710 – it’s near the battery compartment, often labeled with two overlapping rectangles. Press and hold this button for 3 full seconds until the keyboard’s LED flashes twice. Do not release early – inconsistent timing causes failed pairing. The receiver LED will stop blinking within 15 seconds, confirming connection. Test immediately with the spacebar; if unresponsive, repeat the sequence.
Install Logitech Options+ for Full MK710 Functionality
While basic typing works without software, Logitech Options+ unlocks the MK710’s professional features. Download it directly from Logitech’s official site – never third-party installers that bundle malware. This free application enables critical customizations:
- Reprogram the top-row F-keys for app shortcuts (e.g., F1 for Outlook)
- Convert the number pad’s top row into custom macros
- Adjust mouse scroll speed when using the M705 mouse
- Create cross-computer copy/paste with Flow feature
During installation, the software automatically detects your connected MK710. If it doesn’t appear, unplug the receiver for 10 seconds then reconnect it before relaunching Options+. Pro tip: Enable “Function Key Mode” in Options+ to make F1-F12 work as standard function keys without holding Fn – essential for Excel and programming workflows.
Fix MK710 Keyboard That Powers On But Types Random Characters
When your MK710 powers up but produces gibberish (e.g., “jjjj” instead of “hello”), this indicates receiver interference. Do not replace batteries immediately – 80% of cases stem from USB port conflicts. First, unplug all non-essential USB devices (printers, external drives). Then move the Unifying Receiver to a different USB port, preferably on the opposite side of your computer. If using a desktop, try ports directly on the motherboard rather than front-panel headers. For persistent issues, wrap the receiver in aluminum foil (leaving the connector exposed) to block signal interference from monitors or wireless routers. This temporary shield often resolves erratic typing within seconds.
Eliminate Application-Specific Key Failures
If keys work in Notepad but fail in specific programs like Excel or Photoshop, the issue lies with the application – not your hardware. Test by opening Notepad (Windows) or TextEdit (Mac) in plain text mode. If typing works there, follow these steps:
- Close the problematic application completely
- In Logitech Options+, disable any custom key mappings for that app
- Reset the application’s keyboard preferences to default
- Reopen the application while holding Shift (bypasses plugin loading)
Many creative apps like Adobe Suite override standard key functions. Consult the software’s documentation for “keyboard shortcut conflicts” – this resolves most app-specific failures without touching hardware settings.
Why Logi Bolt Won’t Pair With Your MK710 Keyboard
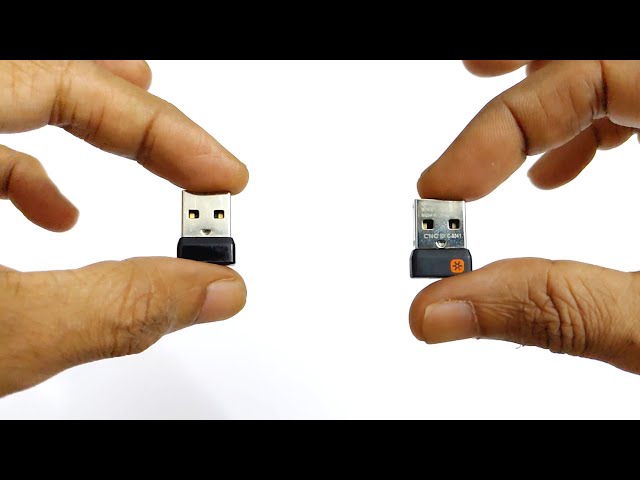
That new Logi Bolt receiver gathering dust? It’s physically incompatible with your MK710. The MK710 uses Logitech’s older Unifying protocol (2011-2018), while Logi Bolt (2019+) employs encrypted Bluetooth LE. No adapter or software can bridge this gap – the hardware chips are fundamentally different. Attempting to pair them wastes hours and risks corrupting your Unifying receiver’s memory. If you need Bolt compatibility, consider the MK870 or MX Mechanical series. For your existing MK710, stick with the original Unifying Receiver; replacement dongles are available directly from Logitech (search “Logitech Unifying Receiver RQR08.03U”).
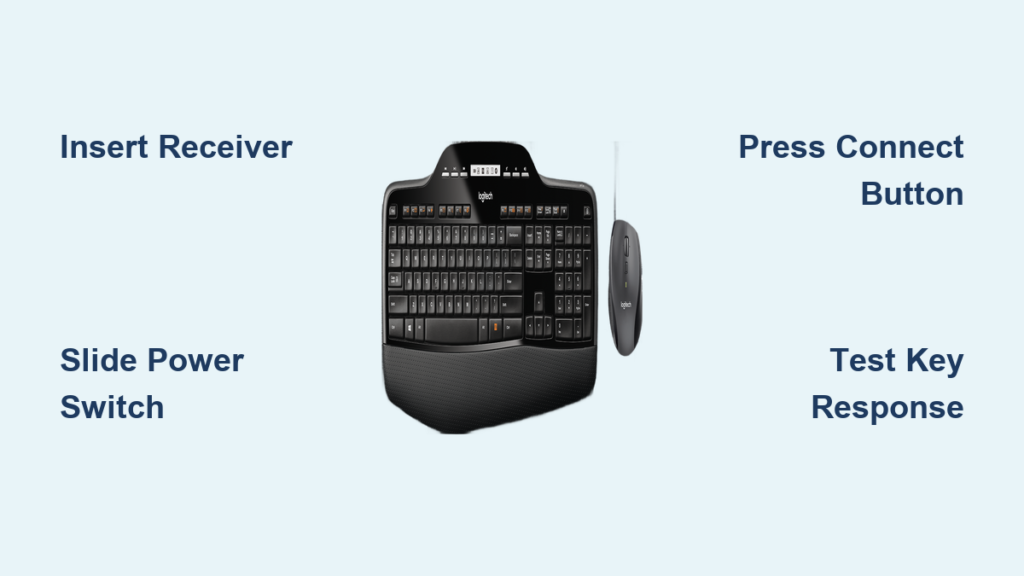
Quick 3-Step MK710 Setup for Immediate Use
When you need typing capability within 60 seconds, skip software installation and follow this bare-minimum sequence:
- Plug receiver directly into computer – Avoid hubs; use rear USB ports for desktops
- Slide bottom power switch to “On” – Confirm green LED flash (replace batteries if none)
- Press keyboard connect button for 3 seconds – Only if keys don’t respond after 10 seconds
This streamlined process bypasses unnecessary steps while ensuring core functionality. Time-saving note: Keep the receiver plugged in during battery changes – the MK710 retains pairing memory for up to 15 minutes without power, eliminating re-pairing after battery swaps.
Final Note: Your MK710 should now respond reliably across all applications. For long-term reliability, perform these monthly maintenance steps: 1) Clean battery contacts with a cotton swab, 2) Re-pair the keyboard using the manual sequence, 3) Update Logitech Options+ to the latest version. If connection issues persist after following all steps, your Unifying Receiver may need replacement – contact Logitech support with your serial number (found on the keyboard’s underside). Remember that this business-grade keyboard typically lasts 5+ years with proper care, making these quick connection fixes well worth the effort.


