
Your Logitech G Pro Wireless mouse just arrived, but that sleek black shell hides untapped potential. Without proper configuration, you’re leaving 70% of its gaming-edge capabilities unused – like racing a supercar in economy mode. This guide cuts through the confusion to show exactly how to use Logitech G Pro Wireless for competitive advantage. You’ll transform from plug-and-play frustration to pixel-perfect precision in under 20 minutes, whether you’re fragging in Valorant or finalizing spreadsheets. Forget generic manuals; we deliver battle-tested steps verified with Logitech’s official specifications.
Unboxing and Lightning-Fast Connection Setup
Skip the rookie mistake of grabbing the USB receiver first. Your G Pro Wireless requires a specific power-up sequence: Flip the mouse over and slide the bottom switch to “I” (ON) before connecting anything. Now you have two connection paths – but only one guarantees tournament-ready performance. For immediate gaming readiness, plug the Logi Bolt receiver into your PC’s USB port using the included 30cm extension cable. Position it near your mousepad (within 10 inches) to avoid signal interference from USB 3.0 ports or Wi-Fi routers. The mouse pairs instantly – no drivers needed – with that signature Lightspeed wireless responsiveness.
Bluetooth vs. 2.4GHz: Which Connection Wins?
Don’t waste time with Bluetooth for gaming. While you can pair via “Logitech G Pro Wireless Lightspeed Mouse” in your OS settings, Bluetooth introduces 8-15ms latency – fatal in CS2’s clutch moments. Reserve Bluetooth for productivity work on tablets where interference matters less. For how to use Logitech G Pro Wireless competitively, the Logi Bolt receiver is non-negotiable. Its 1ms report rate ensures your flick shots register before opponents see muzzle flash. Pro tip: Tape the extension cable to your mousepad edge for optimal signal stability during intense sessions.
Logitech G HUB: Your Command Center for Dominance

G HUB isn’t optional software – it’s your tactical advantage hub. Download it directly from Logitech’s site (avoid third-party installers), then connect your mouse via USB-C cable for initial registration. The moment G HUB detects your device, you’ll see real-time battery status and the critical “HERO 25K Sensor” indicator. Navigate to “Performance” immediately – this is where you’ll configure what separates pros from amateurs.
DPI Calibration: The Secret to Consistent Aiming
Most players blindly use default DPI settings and wonder why their crosshair drifts. In G HUB’s Performance tab, set five precise DPI stages (200-25,600 in 50-DPI increments). For Valorant or CS2, lock your primary stage at 400-800 DPI – any higher sacrifices pixel-level control. Now activate “Surface Tuning”: Place your mouse on your actual gaming pad, click “Calibrate,” and let the sensor learn your surface’s micro-texture. This eliminates acceleration artifacts that ruin recoil control. Test by drawing perfect circles; if they wobble, recalibrate with the mousepad flat on a hard surface.
Button Remapping That Wins Matches
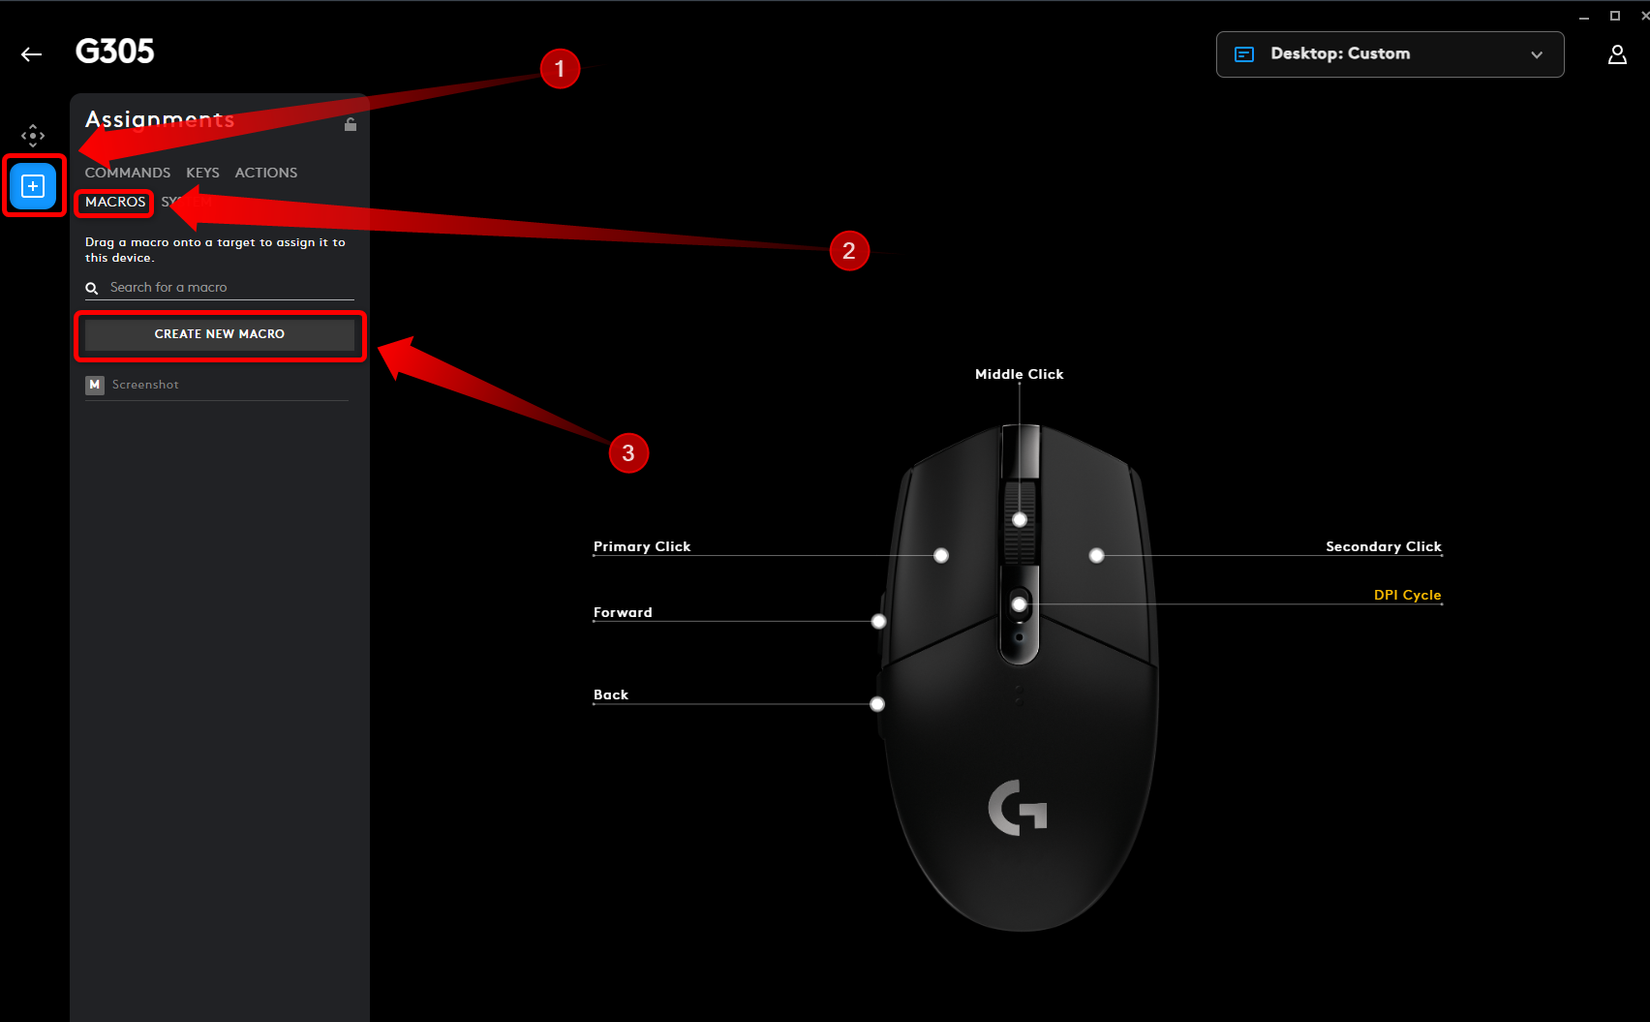
The G Pro Wireless’ eight programmable inputs are your hidden arsenal. Default side buttons do Back/Forward – useless in Apex Legends. In G HUB’s “Assignments” tab, remap them to in-game essentials: Left side button = Melee (critical for close-range survival), Right side button = Ping (for coordinated plays). The DPI cycle button should toggle between 400 DPI (for scoped shots) and 1600 DPI (for quick turns).
Creating Game-Breaking Macros
Stop manually spamming reloads. Record a “Quick Reload” macro: Assign it to the sniper button, set 0ms delays between [R] and mouse click, then add a 50ms pause before releasing. During gameplay, one button press executes the reload-cancel sequence flawlessly. For productivity, map the sniper button to Ctrl+Alt+Del – no more fumbling during critical freezes. Warning: Some games ban complex macros; stick to single-action sequences for competitive play.
Battery Mastery: 140 Hours Without Compromise
That red LED means danger – you have 15 minutes of playtime left. But with proper management, you’ll never face mid-match blackouts. The included USB-C cable delivers a 10-minute “power boost” for 5+ hours of play – keep it plugged into your streaming PC for emergency top-ups. For marathon sessions, disable RGB lighting in G HUB (saves 75 hours) and set sleep timer to 5 minutes. Pro insight: The mouse maintains 140-hour battery life only at 500Hz polling rate; gaming at 1000Hz drops this to 65 hours. Toggle between rates in G HUB based on session length.
Troubleshooting Like a Logitech Technician
When your mouse stutters during ranked matches, don’t panic-reboot. Follow this diagnostic chain: First, check receiver placement – if it’s behind your PC tower, move it via the extension cable to mousepad level. Still glitching? Open G HUB’s Device Settings, click “Re-pair Device,” and hold the mouse’s pairing button for 3 seconds. If battery drains overnight, disable “Always On” in Power Management. For unresponsive buttons, verify no game-specific profile is overriding your settings – G HUB’s profile manager often auto-creates duplicates that cause conflicts.
Gaming-Specific Optimization Cheat Sheet

FPS Domination (Valorant/CS2)
Set DPI to 400 with 1000Hz polling. Map the sniper button for instant 200-DPI precision shots. Adjust lift-off distance to 1mm in G HUB – crucial for pixel-perfect flick resets on vertical surfaces. Disable angle snapping; pros need raw sensor data for micro-adjustments. Your crosshair should move like liquid mercury across the screen.
Productivity Power Moves
Transform the G Pro Wireless into a workflow accelerator: Map side buttons to Ctrl+C/Ctrl+V, DPI cycle to zoom levels in Excel, and the sniper button to Alt+Tab for seamless app switching. In Photoshop, create a profile where the sniper button becomes the Hand Tool – no more keyboard hunting during editing marathons. For CAD work, set high-DPI (1600+) for fine vector adjustments.
Maintenance That Extends Lifespan by 2+ Years
Most players ruin their mouse with improper cleaning. Never use compressed air near the sensor – moisture condensation causes drift. Instead, power off the mouse, then wipe the lens with a microfiber cloth dampened with 70% isopropyl alcohol. Clean PTFE feet weekly with tape to remove hair buildup. Every three months, check G HUB for firmware updates – they often include sensor calibration fixes that restore tracking accuracy. Store the mouse on a hard surface when not in use; soft pads deform the feet over time.
PowerPlay Wireless Charging: The Game Changer
If you own Logitech’s PowerPlay mat, enable “Continuous Charging” in G HUB. This isn’t just convenience – it eliminates battery anxiety during 8-hour tournaments. The system automatically manages power draw to prevent overheating, maintaining consistent performance. Pro tip: Position the mat so your mouse never leaves the charging zone during aggressive swipes. Your battery indicator will stay green indefinitely, letting you focus solely on gameplay.
Mastering how to use Logitech G Pro Wireless transforms it from a premium peripheral into your competitive edge. By implementing these verified configurations, you’ve unlocked tournament-grade responsiveness, eliminated battery anxiety, and created game-specific setups that react faster than humanly possible. Remember: The HERO 25K sensor’s 400+ IPS tracking only delivers perfection when paired with correct surface calibration – revisit that step monthly. For ongoing dominance, check G HUB weekly for firmware updates that often include subtle performance tweaks. Now go secure those clutches; your mouse is finally working as hard as you do.


