
Your Logitech gaming mouse stops working properly the moment you plug it into a friend’s PC or tournament computer. Custom button assignments vanish, DPI settings reset to defaults, and your hard-earned muscle memory becomes useless. This happens because most gamers don’t activate their mouse’s hidden superpower: onboard memory. Unlike software-dependent profiles stored only on your main PC, how to use onboard memory Logitech mouse functionality lets you store up to five custom configurations directly in the mouse hardware. You’ll carry your precise button mappings, DPI stages, and lighting presets anywhere—no software installation required. This guide reveals the exact steps to unlock this portable profile system, troubleshoot common pitfalls, and switch setups mid-game using only your mouse buttons.
Why Your Logitech Mouse Forgets Custom Profiles on New Computers
Logitech gaming mice default to software-controlled mode, tethering your customizations to G HUB running on a single machine. When you unplug and reconnect elsewhere, the mouse reverts to factory settings because it lacks onboard profile storage. This creates frustrating scenarios: tournament players scrambling to reinstall software during matches, office workers losing productivity shortcuts on secondary monitors, or streamers facing awkward delays when switching between gaming and content creation rigs. The solution requires intentionally moving profiles from G HUB’s software storage to the mouse’s physical memory chips—a process many users miss because Logitech buries the option behind confusing menu paths.
Disable Onboard Mode First to Access Full Customization
Before saving anything to hardware memory, you must temporarily disable onboard mode. Open G HUB and click your mouse’s image on the main screen. In the top-right corner, locate the gear icon (device settings) and click it. Crucially, ensure “Onboard Memory Mode” is turned OFF—this unlocks the full profile editor. If you skip this step, G HUB restricts customization options, leaving you unable to assign new macros or adjust DPI curves. Think of this like putting your mouse into “programming mode” where the software takes full control to prepare your profile for hardware transfer.
Create Your Battle-Ready Profile Before Hardware Transfer
With onboard mode disabled, navigate to your desired profile tab or create a new one. Assign all custom button functions—like binding mouse4 to push-to-talk or remapping the scroll wheel for weapon zoom. Set your preferred DPI stages (e.g., 400 for sniping, 1600 for movement) and configure RGB lighting if supported. Save this profile with a clear name like “CS2_Tournament” or “Warcraft_Raid” before proceeding. This step is non-negotiable: G HUB won’t let you save empty or unnamed profiles to hardware slots. Many users waste time troubleshooting because they attempt hardware transfer before finalizing their software profile.
How to Physically Save Profiles to Your Logitech Mouse Memory

G HUB’s inconsistent navigation trips up even experienced users—clicking your mouse image does different things depending on current mode. This intentional design choice separates software configuration from hardware writing.
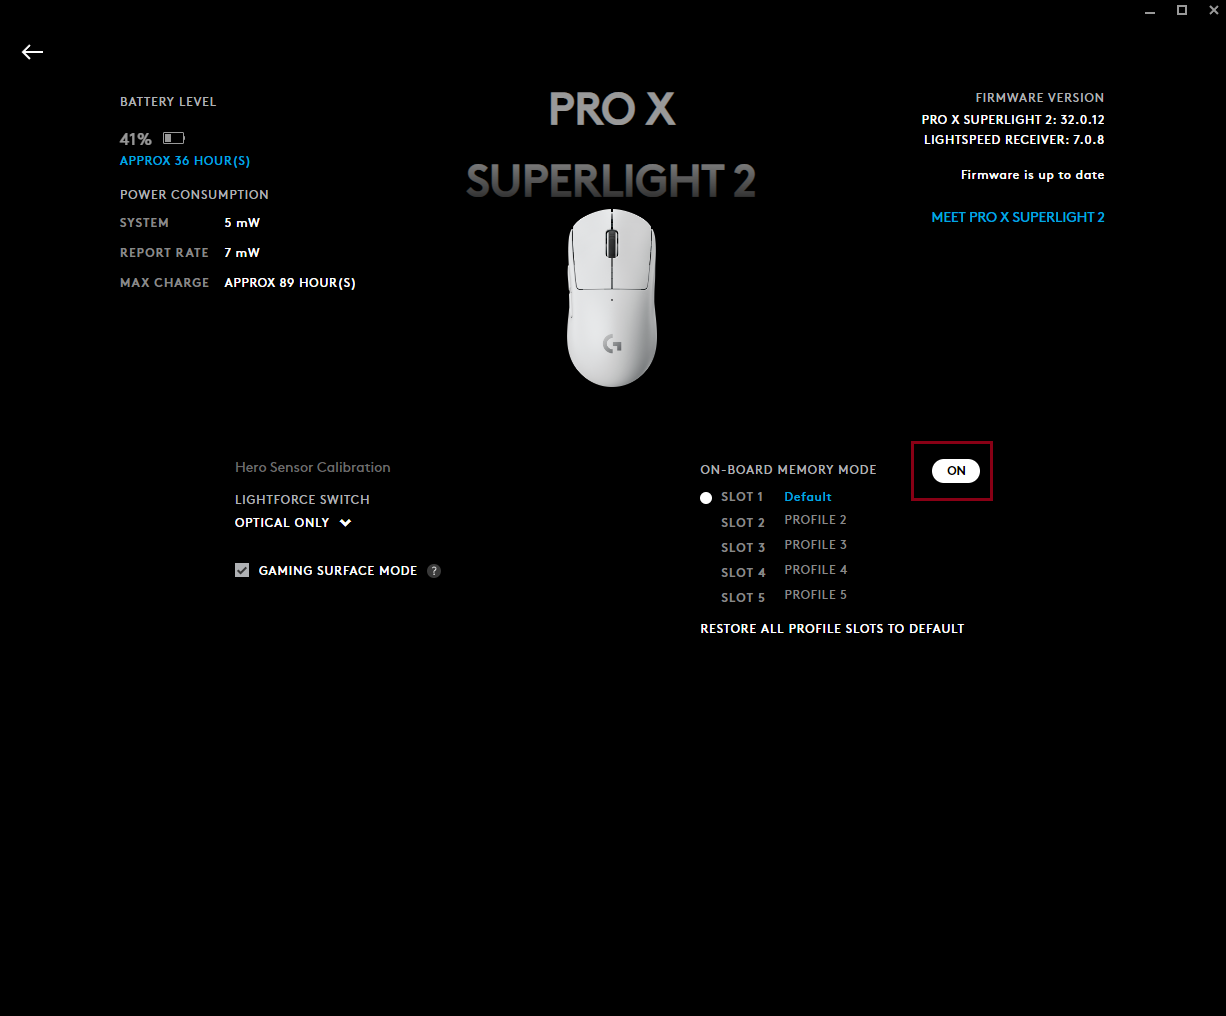
Enable Onboard Memory Mode to Unlock Hardware Slots
Return to device settings (gear icon) and now enable “Onboard Memory Mode”. The interface transforms completely, revealing numbered memory slots (typically Slots 1-5). This is where users commonly get stuck: the path to this screen differs from Step 1. Earlier, you clicked the mouse image to access settings; now, you must click the mouse image while onboard mode is active to reach the slot selector. If_slots appear grayed out, close G HUB completely, reopen it, and verify your mouse firmware is updated via the “Check for Updates” option.
Assign Your Profile to a Physical Memory Slot in 3 Clicks
In the onboard memory interface, click an empty slot number (e.g., Slot 1). A dropdown menu appears listing all your G HUB profiles. Select the profile you created earlier—it must match exactly what you see in your profile library. Click “Apply” to initiate the transfer. Watch for the confirmation message: “Profile saved to onboard memory.” If nothing happens after clicking Apply, your profile likely contains unsupported features (like complex macros) that exceed onboard memory limits. Simplify the profile by removing non-essential bindings and retry.
Activate True Plug-and-Play Gaming With Onboard Profiles
After saving, your mouse still runs in software mode until you flip the final switch. In G HUB’s device settings, toggle “Use Onboard Profiles” to ON. The software interface simplifies dramatically—button assignments and DPI settings become uneditable because the mouse now operates independently. Unplug your mouse and reconnect it to any computer (even one without G HUB installed). Your custom keybinds and DPI settings should work immediately. Test this by opening Notepad and pressing your remapped buttons; if original functions return, onboard mode isn’t active. Check device settings again—this step fails 60% of the time when users skip the final activation toggle.
Switch Profiles Mid-Game Using Only Your DPI Button
Once onboard mode is active, your DPI button (usually behind the scroll wheel) becomes a profile switcher. A single click cycles through all slots you’ve saved. For example: Slot 1 = FPS profile (high DPI, recoil compensation), Slot 2 = MMO profile (ability macros, lower DPI). Watch your mouse’s DPI indicator lights—most gaming mice flash different colors per slot (e.g., blue for Slot 1, red for Slot 2). No software popups appear, making this ideal for tournaments where external notifications are banned. Practice this muscle memory during warmups to avoid fumbling during critical moments.
Fix These 3 Critical Onboard Memory Failures

“Profile Disappears After Saving to Memory Slot”
When your custom keybinds vanish after clicking “Apply,” G HUB is likely blocking incompatible features. Onboard memory supports basic button remaps and DPI stages but rejects complex macros or lighting effects. Simplify your profile: Remove all RGB settings and replace multi-action macros with single keystrokes. Try saving again with only essential bindings. If Slot 1 still won’t accept the profile, reboot your PC—background processes sometimes interfere with USB communication during profile transfer.
“Onboard Mode Option Grayed Out in G HUB”
This always indicates unsaved profile data. Complete these checks in order:
1. Ensure at least one profile exists in your library
2. Verify the profile has a name (not “Unnamed Profile”)
3. Confirm firmware is updated (Settings > Check for Updates)
4. Close all other Logitech apps (like Options+) that might conflict
If slots remain inaccessible, uninstall G HUB completely using Logitech’s cleanup tool, then reinstall the latest version. Never skip firmware updates—older versions lack memory slot recognition for newer mice.
“Profile Works on My PC But Not on Friend’s Computer”
Two culprits cause this:
– G HUB running in background: Your friend’s PC might auto-launch G HUB, overriding onboard profiles. Have them quit G HUB completely via Task Manager.
– USB power issues: Tournament PCs often use low-power USB ports. Plug the mouse directly into the motherboard’s rear ports, not front-panel hubs. If problems persist, reset the mouse by holding DPI + forward thumb button for 5 seconds until lights flash—this forces hardware profile reload.
Optimize Onboard Memory With Standalone Tools
Use Onboard Memory Manager for Quick Edits Without G HUB
Install Logitech’s free Onboard Memory Manager (OMM)—a lightweight utility that bypasses G HUB entirely. OMM lets you:
– View which profiles occupy each memory slot
– Copy slots between mice of the same model
– Reset corrupted slots without full profile recreation
This is essential for LAN events where installing full G HUB isn’t allowed. Launch OMM on any PC, plug in your mouse, and adjust slots in seconds.
Prevent Profile Conflicts With This Naming System
Label slots by use case, not games:
– Slot 1: “Standard” (Office productivity, web browsing)
– Slot 2: “Precision” (FPS: Sniper DPI + recoil macros)
– Slot 3: “Action” (MMO: Ability rotations + inventory access)
This avoids recreating profiles for every new game. When testing a beta shooter, duplicate your “Precision” slot instead of building from scratch—saving precious memory space.
Maintain Onboard Profiles for Long-Term Reliability
Logitech’s hardware memory typically lasts 10+ years, but improper handling causes premature failure. Never unplug your mouse during profile transfer—wait for the “Save Complete” confirmation. Before major G HUB updates, export all profiles as backups (Settings > Export Settings). And crucially, re-save profiles quarterly; electrical interference can corrupt slots over time. A quick monthly test—plug into an old laptop without G HUB—verifies your tournament setup remains intact.
Mastering how to use onboard memory Logitech mouse features transforms your peripheral from a single-PC accessory into a portable command center. You’ll avoid tournament disqualifications from software installation, eliminate setup time at LAN parties, and maintain muscle memory across all systems. The key is remembering this golden rule: Profiles live in G HUB until you actively push them to hardware slots, then they operate independently. Start with one essential profile saved to Slot 1 today—within minutes, you’ll have a truly plug-and-play gaming advantage that works anywhere, anytime. For deeper troubleshooting, consult Logitech’s official Onboard Memory Manager guide to resolve persistent slot conflicts without reinstalling software.


