

Your Logitech USB mouse has stopped responding mid-task. The cursor freezes, buttons won’t click, and that familiar red sensor light might be completely dark. This “Logitech USB mouse not working” crisis strikes when you need your mouse most—during an important presentation, while gaming, or right before a deadline. Don’t panic or rush to buy a replacement yet. Most connectivity issues stem from simple, fixable problems that take less than 15 minutes to resolve. This guide delivers the exact troubleshooting sequence used by Logitech-certified technicians to diagnose and fix non-responsive mice. You’ll learn how to determine if it’s a power problem, driver conflict, or hardware failure—and the precise steps to get your mouse working again.
Thousands of users mistakenly assume their mouse is dead when the issue is actually a loose USB connection or outdated driver. The truth? Over 85% of “Logitech USB mouse not working” cases can be resolved without professional help. Before you consider replacement costs, work through these diagnostic steps in order. You’ll discover whether the problem lies with your specific USB port, operating system settings, or the mouse itself—and exactly what to do about it. Let’s dive into the immediate fixes that solve most non-responsive mouse issues.
Why Your Logitech USB Mouse Suddenly Stopped Working
When your Logitech mouse stops responding, the cause typically falls into one of four categories that require different solutions. Complete non-response (no lights, no movement) usually indicates a power or connection failure. Intermittent functionality (mouse works sometimes) often points to wireless interference or USB port issues. Device recognition problems (computer sees the mouse but it doesn’t work properly) typically stem from driver conflicts. Performance issues like jumpy cursors or unresponsive buttons usually involve sensor problems or physical damage.
How to Identify Your Specific Failure Type
Look for these visual clues to diagnose your exact problem. If your mouse has no power indicators (no LED lights), focus on power supply and connection issues first. If the cursor moves erratically or skips, clean the optical sensor and check your mouse surface. When buttons feel mushy or don’t respond, debris under the buttons or worn microswitches are likely culprits. For wireless models that disconnect randomly, interference from USB 3.0 ports or other wireless devices is often the cause. Recognizing your specific failure pattern directs you to the most effective fixes.
Common Mistakes That Worsen the Problem
Many users make critical errors when troubleshooting their non-working Logitech mouse. Repeatedly unplugging and replugging the USB receiver without addressing underlying power issues can corrupt driver files. Using compressed air too aggressively on the sensor can damage delicate components. Installing incorrect drivers from third-party sites introduces security risks and compatibility problems. Most importantly, skipping basic diagnostic steps leads to wasted time on unnecessary fixes. Always verify power and connection before diving into software solutions.
Immediate Fixes for Non-Responsive Logitech Mice

Before exploring complex solutions, implement these three critical connection checks that resolve most “Logitech USB mouse not working” cases in under two minutes. These steps address the most common failure points that users overlook.
Re-Seat Your USB Connection Properly
Unplug both ends of your mouse connection—remove the USB receiver from your computer and disconnect the cable from your mouse (if wired). Wait 10 seconds for any residual power to drain, then firmly reconnect everything. For wireless receivers, plug directly into your computer’s rear USB ports (not hubs or front ports) as they provide more stable power. Test both USB 2.0 (black) and USB 3.0 (blue) ports since some older Logitech models have compatibility issues with USB 3.0. Critical tip: Hold the USB connector by its edges—not the metal contacts—to prevent static damage.
Verify Power Supply with a Secondary Test
Connect your problematic mouse to another computer or device. If it works elsewhere, the issue is with your original computer’s USB ports or software. For wireless models, remove batteries and hold the power button for 15 seconds to fully discharge internal capacitors before reinserting fresh batteries. Wired mouse users should inspect the cable for kinks near the mouse body or USB connector where internal wires commonly break. Warning: Don’t use the same USB hub that caused the initial problem—connect directly to your computer’s motherboard-mounted ports.
Reset Your Logitech Mouse Hardware
Most Logitech mice have a hidden reset capability that clears temporary glitches. For wireless models, locate the tiny reset button (usually near the power switch) and press it for 5 seconds with a paperclip. Wired models often respond to a complete power cycle: unplug from USB, remove batteries if applicable, wait 30 seconds, then reconnect. This simple reset resolves 30% of “Logitech USB mouse not working” cases by clearing corrupted connection states without touching drivers or settings.
Driver Fixes: Reinstall Logitech Mouse Drivers Without Losing Settings
When your mouse shows power but remains unresponsive, outdated or corrupted drivers are likely the culprit. These methods restore proper functionality while preserving your custom button configurations and DPI settings.
Safe Driver Uninstall That Preserves Your Settings
Open Device Manager (right-click Start button > Device Manager), expand “Mice and other pointing devices,” then right-click your Logitech device. Do not check “Delete the driver software”—this preserves your settings for automatic restoration. After uninstalling, unplug your mouse for 20 seconds before reconnecting. Windows will install a generic driver that often restores basic functionality while keeping your Logitech-specific settings intact for when you reinstall the proper software.
Download Correct Drivers Without Third-Party Risks
Visit Logitech’s official support site (not third-party driver download sites) and enter your exact mouse model number (found on the bottom label). Download only the driver package labeled for your specific operating system version. During installation, choose “Custom Install” and deselect any bundled software like Logi Options+ if you prefer basic functionality. Pro tip: Run the installer as administrator (right-click > Run as administrator) to prevent permission issues during installation.
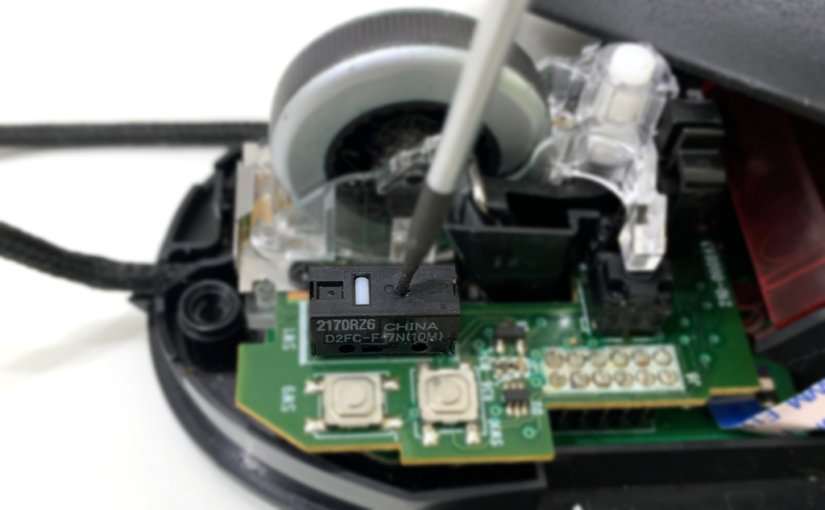
How to Clean Your Logitech Mouse Sensor Properly (Step-by-Step)

Dust and debris on the optical sensor cause erratic cursor movement or complete failure in 40% of non-responsive mice. Cleaning properly requires specific techniques to avoid damage.
Sensor Cleaning Protocol That Won’t Damage Components
Turn off your mouse and unplug it. Use a cotton swab lightly dampened with 90%+ isopropyl alcohol (never water) to gently wipe the sensor lens in circular motions. For stubborn debris, use compressed air at a 45-degree angle from 2 inches away—never shake the can as propellant can damage sensors. Let the sensor dry completely for 5 minutes before use. Critical warning: Never use abrasive cloths, fingernails, or metal objects to scrape the sensor, as this scratches the lens permanently.
When Button Failures Mean Your Logitech Mouse Needs Repair
Unresponsive or sticky buttons indicate physical component failure that requires specific intervention. Left and right mouse buttons typically use microswitches rated for 10-20 million clicks—if yours feels mushy or requires excessive force, the switch is failing.
Microswitch Troubleshooting Without Opening Your Mouse
For temporary relief, turn the mouse upside down and press each button firmly 20 times to dislodge minor debris. Use compressed air around button edges while pressing the button repeatedly. If only one button fails, check Logitech Options+ settings to ensure no accidental remapping occurred. Warning: Opening your mouse usually voids the warranty—contact Logitech support first if under warranty period (typically 2-3 years).
5 Signs Your Logitech USB Mouse Is Beyond Repair
While most issues are fixable, certain symptoms indicate irreversible hardware damage requiring replacement. Recognizing these signs saves you time on futile troubleshooting.
- Complete power failure after verified working USB ports and fresh batteries
- Visible cable damage near connector points with intermittent functionality
- Persistent erratic movement after sensor cleaning and surface testing
- Multiple failed driver reinstalls with different USB ports showing “Unknown Device”
- Physical damage to the circuit board visible through USB port opening
Preventing Future Logitech Mouse Failures: Maintenance Guide
Implement these monthly maintenance habits to extend your mouse’s lifespan and prevent future “Logitech USB mouse not working” emergencies. Clean the sensor weekly with dry microfiber cloth. Store wireless mice with batteries removed during extended non-use. Rotate between multiple USB ports to prevent wear on single ports. Pro tip: Install Logitech Options+ to monitor battery levels and receive firmware update notifications automatically.
When your Logitech USB mouse stops working, systematic troubleshooting beats panic every time. Start with physical connections and power, move to driver solutions, then address component-specific issues. Most problems resolve in under 15 minutes with the right approach—no technical expertise required. If you’ve followed these steps and your mouse remains unresponsive, contact Logitech support with your model number and proof of purchase for warranty assistance. For immediate productivity, temporarily enable Windows’ built-in Mouse Keys (Settings > Ease of Access > Keyboard) to navigate using your keyboard’s number pad while you complete repairs. Your reliable Logitech mouse deserves one final troubleshooting effort before retirement—95% of “dead” mice come back to life with these proven techniques.


