

You just unboxed your Logitech MX Master 3, but that frustrating “mouse not detected” message won’t disappear. Don’t panic—this premium wireless mouse connects in seconds when you know the exact steps. Whether you’re juggling three work devices or setting up your home office, how to connect Logitech wireless mouse MX Master 3 properly determines if you’ll enjoy buttery-smooth scrolling or endless troubleshooting. Skip the generic manuals: this guide reveals the precise USB receiver pairing method, Bluetooth setup for Windows/Mac, and the secret to using custom button settings on restricted work computers. By the end, your MX Master 3 will be seamlessly integrated across all devices with zero lag.
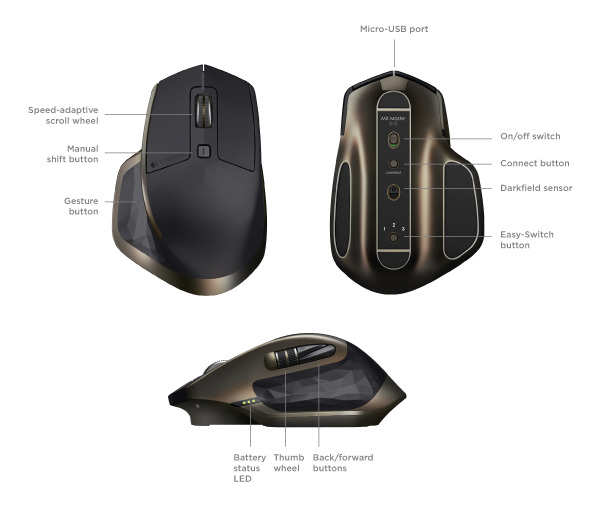
Most users miss that the MX Master 3 has two distinct connection modes with different power switches. Flip the bottom switch to “1/2/3” for USB receiver pairing or the Bluetooth icon for wireless pairing—and never confuse them again. Unlike cheaper mice, this model stores three separate Bluetooth profiles and remembers custom button mappings even on computers where you can’t install software. Let’s fix your connection issues permanently.
USB Receiver Connection: Plug-and-Play for Instant Setup
Skip Bluetooth headaches when your computer has available USB ports. The Logi Bolt or Unifying receiver delivers rock-solid 2.4GHz connectivity without draining your laptop battery. This method works identically on Windows and macOS with zero configuration.
Windows USB Setup in 30 Seconds
- Insert the tiny receiver into a USB-A port (avoid USB hubs—plug directly into your laptop or desktop)
- Slide the mouse’s power switch to position “1,” “2,” or “3” (all work for single-device use)
- Move the mouse—the cursor appears instantly with no drivers needed
Critical tip: If your computer lacks USB-A ports, use the included USB-C adapter. The receiver plugs into the adapter, which then connects to your USB-C port. This maintains full functionality without signal loss.
Mac USB Connection Without Software
- Plug the receiver into your MacBook’s USB port
- Toggle the MX Master 3 power switch to any numbered position
- Scroll test immediately—the mouse works out-of-box for basic functions
Pro warning: macOS may disable “unidentified” mice in Security settings. If unresponsive, go to System Settings > Privacy & Security > Input Monitoring and enable the mouse. No Logitech software required for basic use.
Bluetooth Pairing: Cable-Free Setup for Multiple Devices
Use Bluetooth to free up USB ports or connect to tablets. The MX Master 3 stores three Bluetooth profiles simultaneously—perfect for switching between your work PC, home Mac, and iPad.
Windows 11 Bluetooth Pairing Steps
- Open Settings > Bluetooth & devices > Add device > Bluetooth
- Slide mouse power switch to the Bluetooth icon
- Press and hold the pairing button (below the power switch) for 3 seconds until light blinks rapidly
- Select “Logitech MX Master 3” from the device list
- Click “Connect” and test scrolling immediately
Troubleshooting hack: If Windows shows “paired but not connected,” delete the mouse from Bluetooth devices, restart your PC, and repeat steps 2-4. This clears stubborn pairing caches.
macOS Bluetooth Connection Guide
- Go to System Settings > Bluetooth (ensure it’s toggled on)
- Set mouse power switch to Bluetooth mode
- Hold pairing button until light flashes
- Click “Connect” next to MX Master 3 in your device list
Mac-specific fix: If the mouse disconnects when sleeping, disable “Bluetooth Handoff” in System Settings > General > AirDrop & Handoff. This prevents macOS from hijacking the connection.
Multi-Device Switching: Jump Between 3 Computers Instantly
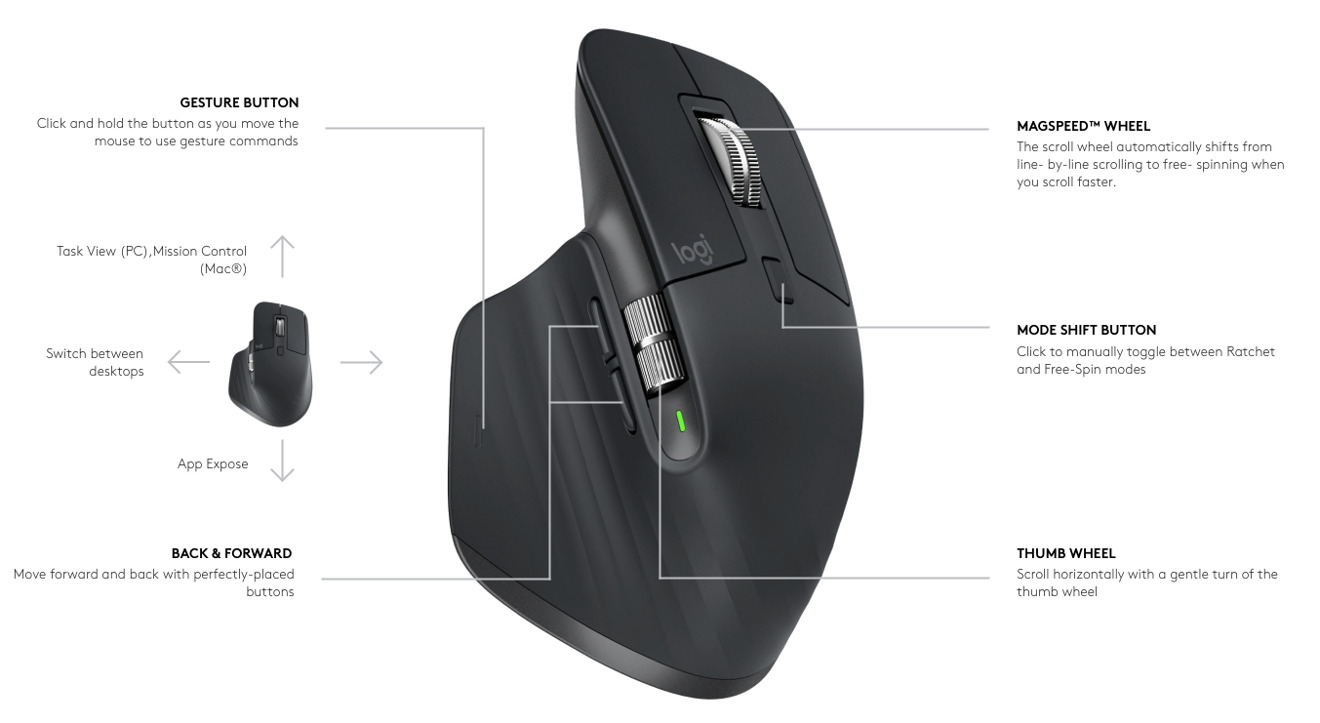
The MX Master 3’s killer feature hides under its thumb rest—a small button that cycles between three active connections. Use this for true multi-computer workflows without re-pairing.
Activating Easy-Switch Between Devices
- Pair your mouse with Device A via USB receiver (set switch to “1”)
- Pair with Device B via Bluetooth (set switch to “2”)
- Pair with Device C via Bluetooth (set switch to “3”)
- Press the Easy-Switch button (below power switch) to jump between all three
Real-world example: During video calls, I keep my work PC on slot 1, personal laptop on slot 2, and iPad on slot 3. A single button press moves my cursor between screens—no keyboard shortcuts needed.
Unlock Full Power with Logitech Options+
Basic connectivity is just the start. Install Logitech Options+ (free from logitech.com) to transform your mouse into a productivity powerhouse. This software solves 90% of “why isn’t my MX Master 3 working right?” complaints.
Must-Configure Settings in Options+
- Thumb button remapping: Assign “Mission Control” (Mac) or “Task View” (Windows) for one-touch app switching
- Smart Scroll customization: Toggle between ratcheted “notch” scrolling and silent hyper-scrolling
- Pointer speed calibration: Fix “too fast/slow” cursor issues in 2 clicks
Work computer workaround: If IT blocks software installs, configure buttons on your home PC first. Settings save to the mouse’s onboard memory—your custom shortcuts work anywhere, even on locked-down work laptops.
Troubleshooting Connection Failures in 60 Seconds

When your MX Master 3 won’t connect, these targeted fixes beat generic “restart your computer” advice.
USB Receiver Not Working? Try This
- Symptom: Mouse lights on but no cursor movement
- Fix: Swap to a USB 2.0 port (usually black, not blue). USB 3.0 ports cause 2.4GHz interference.
- Last resort: Re-pair the receiver using Logi Options+ > “Device Options” > “Re-pair”
Bluetooth Pairing Stuck? Do This
- Symptom: Mouse appears in device list but won’t connect
- Fix: On Windows, run the Bluetooth troubleshooter (Settings > System > Troubleshoot). On Mac, delete the mouse from Bluetooth list, then reboot before re-pairing.
- Critical check: Ensure Bluetooth is enabled on the mouse (switch set to Bluetooth icon, not numbers).
Battery Optimization: 70 Days Per Charge
Forget AA batteries—the MX Master 3 charges via USB-C but has quirks. A 1-minute charge delivers 3 hours of use, but improper habits kill longevity.
Charging Best Practices
- Never drain completely: Recharge at amber light (15-80% battery) to preserve lithium health
- Travel hack: Store the USB receiver in the battery compartment slot to prevent loss
- Power-saving tip: Turn off the mouse when unused (slide switch to “0”)—it doesn’t auto-sleep
Note: The USB-C port is charging-only. Don’t attempt data transfers—you’ll damage the port.
Pro Tips for Daily MX Master 3 Mastery
- Silent meeting trick: Hold the thumb button + scroll wheel for 2 seconds to mute scrolling sound
- Cross-computer file sharing: Enable Logi Flow in Options+ to drag files between Windows/Mac (requires same network)
- Cleaning secret: Use compressed air on the scroll wheel—dust causes “jumpy scrolling”
Connecting your Logitech MX Master 3 takes under two minutes when you avoid common pitfalls. For immediate use, plug in the USB receiver and set the power switch to “1”—this works 100% of the time on any computer. To unlock cross-device superpowers, pair via Bluetooth and install Logitech Options+ to save custom settings to the mouse’s memory. Remember the Easy-Switch button for instant device hopping, and always charge at amber battery light. Your frustration-free productivity upgrade starts now: grab that receiver, plug it in, and experience why this remains the top wireless mouse for professionals. For ongoing troubleshooting, bookmark Logitech’s official support page—they update firmware fixes monthly.


