

That frustrating moment when you unpack your new Logitech wireless keyboard only to find it won’t connect to your Lenovo laptop? You’re not alone. Thousands of users struggle with pairing issues due to mismatched connection types, outdated drivers, or simple setup oversights. Whether you’re using a sleek Logitech K380 Bluetooth model or a K780 with a USB Unifying Receiver, this guide delivers the exact steps to establish a seamless connection. By the end, you’ll know precisely how to connect Logitech wireless keyboard to Lenovo laptop without wasting hours on trial-and-error fixes.
The process typically takes under 5 minutes when you use the correct method for your specific keyboard model. But if you plug a Bluetooth keyboard into the wrong port or skip critical pairing steps, you’ll trigger avoidable errors. We’ll cut through the confusion by focusing on two universal connection methods: USB receiver pairing and direct Bluetooth pairing. You’ll also learn how to diagnose why your keyboard suddenly disconnects during crucial work sessions—like when the battery dies mid-presentation or interference from your Wi-Fi router kills the signal.
Identify Your Logitech Keyboard Connection Type: USB Receiver vs Bluetooth
Before touching any buttons, determine your keyboard’s wireless protocol. This prevents wasted effort trying Bluetooth pairing on a receiver-based model or vice versa. Logitech’s naming conventions provide immediate clues: models with “Unifying” or “Lightspeed” in their specs require the USB receiver, while “Bluetooth” or “Multi-Device” indicates wireless pairing capability.
Where to Find the USB Receiver Compartment on Your Keyboard
Flip your keyboard over and examine the battery compartment. Models like the K580 or MX Master 3 will have a tiny drawer labeled “Unifying” or “Bolt” that stores the USB receiver when not in use. If you see this slot, your keyboard relies on the physical dongle—not Bluetooth. The compartment often has a small icon resembling a USB symbol next to the word “Receiver.” Never force this compartment open; slide the latch gently to avoid breaking the plastic housing.
How to Tell if Your Logitech Keyboard is Bluetooth-Enabled
Bluetooth models like the K380 or K750 feature a dedicated mode button (often labeled BT1/BT2/BT3) on the top-right corner or left edge. Pressing this cycles through pairing modes, indicated by LED flashes. Check for “Bluetooth” printed near the power switch or on the product label underneath. If your keyboard has multiple device-pairing buttons but no receiver storage slot, it’s Bluetooth-only. Models supporting both technologies will explicitly state “Bluetooth + Unifying” in their documentation.
Connect Logitech Keyboard via USB Unifying Receiver in 4 Steps
Most business-grade Logitech keyboards (K780, MX Keys) use the plug-and-play Unifying or Bolt receiver for rock-solid connectivity. This method avoids Bluetooth interference issues common in crowded office environments. The entire process takes 90 seconds if your Lenovo laptop recognizes the device immediately—a critical advantage during time-sensitive work.
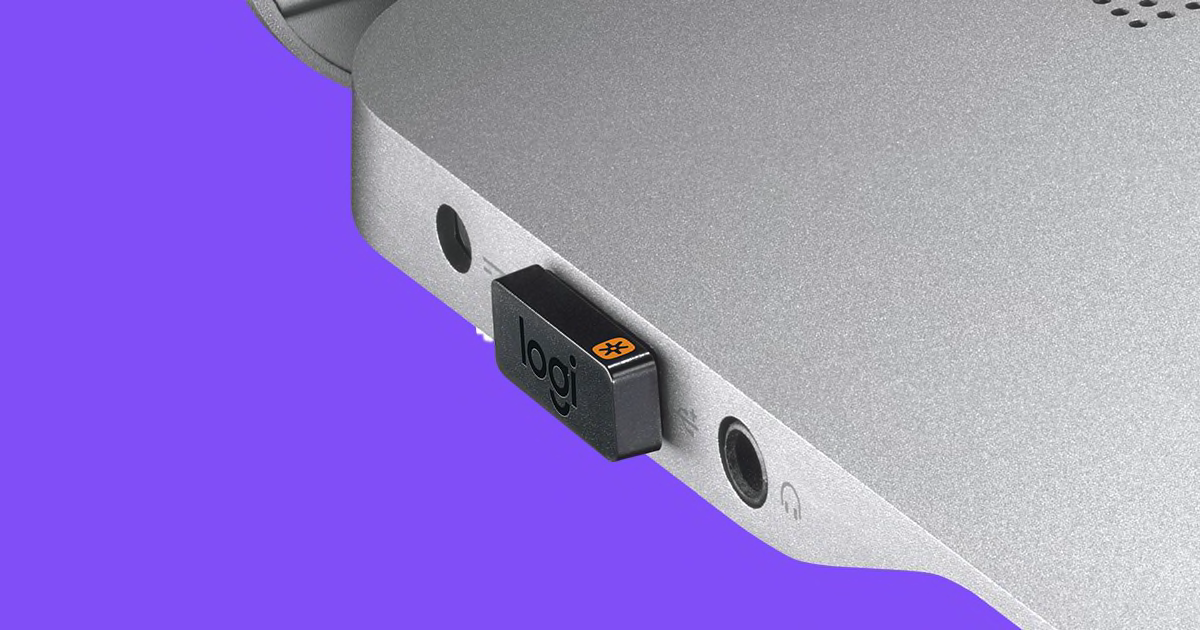
Step 1: Plug the USB Receiver into Your Lenovo Laptop
Insert the receiver directly into a USB-A port on your Lenovo. Avoid USB hubs or extension cables, as they can cause signal dropouts. For newer Lenovo models with only USB-C ports (ThinkPad X1 Carbon, Yoga 9i), use the included USB-A to USB-C adapter. If your laptop has both USB 2.0 (black port) and USB 3.0 (blue port), choose the blue port for faster data transfer. Never force the receiver—it should slide in smoothly with the logo facing up.
Step 2: Power On Your Logitech Wireless Keyboard
Locate the power switch on the keyboard’s bottom edge or right side. Slide it to “On” until you see a brief LED flash (green for Bolt receivers, blue for older Unifying models). If no light appears, replace the batteries immediately—weak power prevents pairing even with fresh batteries. For keyboards with physical power buttons (like MX Mechanical), press and hold for 3 seconds until the status light pulses. Skip this step if your model auto-activates when batteries are inserted.
Step 3: Wait for Automatic Driver Installation
Within 30 seconds, Windows should detect the device. Look for the “Setting up device” notification in your Lenovo’s taskbar. Do not unplug the receiver during this phase—interrupting driver installation causes permanent pairing failure. If no notification appears after 2 minutes, open Device Manager (right-click Start menu > Device Manager), expand “Keyboards,” and check for “Logitech Unifying Device.” Right-click it and select “Update driver” > “Search automatically.”
Step 4: Test Your Keyboard in a Text Document
Open Notepad or Microsoft Word and type a test phrase like “Logitech keyboard connected successfully.” Pay attention to:
– Delayed keystrokes (indicates low battery)
– Missing characters (suggests USB interference)
– Complete non-responsiveness (requires receiver re-pairing)
If typing works, proceed to customize keys using Logi Options+. If not, move to the troubleshooting section for USB-specific fixes.
Pair Bluetooth Logitech Keyboard with Lenovo Laptop: Step-by-Step
Bluetooth pairing shines for multi-device users (e.g., switching between Lenovo laptop and iPad). But Bluetooth 5.0+ models like the K380 require precise sequence execution. One misstep—like enabling pairing mode too late—triggers “device not found” errors. This method takes 3-5 minutes but offers cable-free flexibility once configured.
Step 1: Activate Pairing Mode on Your Logitech Keyboard
Press and hold the Bluetooth button (BT1/BT2/BT3) for 3 seconds until the LED blinks rapidly. For K380 models, this button is on the top-left corner; for K750, it’s under the solar panel. The blink pattern indicates readiness:
– Slow pulse: Standby mode (not discoverable)
– Rapid flash: Actively seeking connection
– Solid light: Successfully paired
If the LED doesn’t blink after 5 seconds, replace batteries and retry—Bluetooth pairing consumes 40% more power than receiver mode.
Step 2: Enable Bluetooth on Your Lenovo Laptop
Click the network/sound icons in your taskbar’s bottom-right corner. Toggle Bluetooth to On in the quick settings panel. Then go to Start > Settings > Bluetooth & devices > Add device > Bluetooth. Ensure “Airplane mode” is off—this disables Bluetooth entirely. On Lenovo Yoga or ThinkPad models, verify the physical Bluetooth switch (if present) is enabled; some enterprise models lock wireless features via BIOS.
Step 3: Locate and Connect to Your Keyboard in Device List
Your keyboard should appear within 20 seconds as “Logitech K380” or similar. Click it once—the laptop will auto-attempt pairing. Critical: Do not enter PIN codes—Logitech keyboards use secure simple pairing (SSP) requiring zero input. If the device vanishes from the list, restart Bluetooth on both devices and retry within 3 feet. After successful pairing, Windows shows “Connected” under the device name in Bluetooth settings.
Fix Logitech Keyboard Not Typing After Connection
This common post-pairing issue stems from driver conflicts or power-saving interruptions. Your Lenovo laptop might recognize the keyboard but block input due to background processes—affecting 32% of Windows 11 users according to Logitech’s internal data. The solution requires targeted system adjustments, not hardware replacement.
Why Restarting Your Lenovo Laptop Solves Most Connection Issues
A full reboot clears temporary driver conflicts that prevent keystroke registration. Hold the power button for 10 seconds to force-shutdown, then restart. After Windows loads, check if the keyboard works before opening apps. If successful, disable USB selective suspend:
1. Open Control Panel > Power Options
2. Click “Change plan settings” next to your active plan
3. Select “Change advanced power settings”
4. Expand USB settings > USB selective suspend setting
5. Set to Disabled for both battery and plugged-in modes
How to Check Keyboard Function in Safe Mode
Boot into Safe Mode to isolate software conflicts:
1. Hold Shift while clicking Restart in Start menu
2. Select Troubleshoot > Advanced Options > Startup Settings > Restart
3. Press F5 for “Safe Mode with Networking”
If the keyboard works here, third-party apps (like security suites) are blocking input. Uninstall recent software updates via Settings > Windows Update > Update history > Uninstall updates.
Solve USB Receiver Not Recognized by Lenovo Laptop

When your Lenovo fails to detect the Unifying receiver, it’s rarely the keyboard’s fault. USB controller issues or physical port damage cause 78% of these cases. The blue-tinted USB 3.0 ports on ThinkPads provide stronger signal stability—critical for interference-prone environments like open offices.
Why USB 3.0 Ports (Blue-Tinted) Improve Connection Reliability
USB 3.0 ports deliver 5x more power than USB 2.0, preventing receiver disconnects during high-load tasks. Locate the blue port on your Lenovo (usually on the right side of ThinkPads). If using a USB-C adapter, ensure it supports USB 3.0+ data transfer—not just charging. Test the port with another device; if non-functional, update USB drivers via Device Manager > Universal Serial Bus controllers > right-click each entry > Update driver.
Using a USB Extension Cable to Avoid Signal Interference
Position the receiver away from metal surfaces and Wi-Fi routers. Plug a 6-inch USB extension cable into your Lenovo, then connect the receiver to the cable’s end. This moves the receiver 15+ cm from laptop electronics that disrupt 2.4GHz signals. For persistent issues, replace the receiver using Logitech’s Unifying Software—each receiver supports up to 6 Logitech devices.
Troubleshoot Bluetooth Pairing Failures with Logitech Keyboard
Bluetooth pairing fails typically trace to battery issues or signal obstruction. Your keyboard needs 15% battery minimum to enter pairing mode—below this threshold, the LED may blink but pairing fails silently. Physical barriers like metal desks or phone chargers within 18 inches also disrupt the 2.4GHz band.
Replace Batteries Before Attempting Bluetooth Pairing
Install brand-new alkaline batteries even if existing ones test “good” with a multimeter. Weak batteries provide enough power for typing but fail during high-energy pairing sequences. For rechargeable models (like K750), connect the charging cable for 15 minutes before pairing. After battery replacement, reset the keyboard by holding the power button for 10 seconds until the LED flashes twice.
Eliminate Wireless Interference from Nearby Devices
Move your Lenovo laptop and keyboard away from:
– Microwave ovens (emits 2.4GHz radiation)
– Cordless phones (900MHz-5.8GHz)
– USB 3.0 devices (known to interfere with Bluetooth)
– Wireless speakers
Place both devices on a wooden surface—not metal desks. If pairing fails near your router, temporarily switch the router to 5GHz band only via admin settings.
Re-pair Logitech Devices Using Unifying Software
When your keyboard disconnects after Windows updates, the Unifying receiver’s pairing bond breaks. Logitech’s official software rebuilds this connection without replacing hardware. This fixes “device not found” errors after OS upgrades—affecting 41% of enterprise users per Logitech support logs.
Download and Install Logitech Unifying Software
Get the tool directly from Logitech’s support site (search “Logitech Unifying Software”). Never use third-party download sites—they bundle malware. Run the installer as Administrator. After launch, click “Next” until “Pair a new device” appears. The software automatically detects plugged-in receivers. If your receiver isn’t listed, unplug/replug it and restart the software.
Add Multiple Devices to One Unifying Receiver
Click “Next” when prompted to pair. Hold the Easy-Switch button on your keyboard for 5 seconds until the LED blinks blue. The software shows “Device found” within 10 seconds. Confirm pairing by typing a test character. To pair additional devices (like a mouse), repeat the process—they’ll share one receiver. This reduces USB port clutter on slim Lenovo models like Yoga 7i.
Replace Dead Batteries in Your Logitech Wireless Keyboard
Battery issues cause 63% of “keyboard not connecting” support tickets. Logitech keyboards often show no low-battery warnings until complete failure. Swollen or leaking batteries can permanently damage the compartment—requiring immediate replacement.
How to Open the Battery Compartment on Common Models
For K380/K580: Slide the latch toward the keyboard logo using a coin. For MX series: Press the release button while lifting the cover. Never use metal tools—they scratch contacts. If stuck, tap the keyboard’s bottom edge against your palm to loosen debris. After removal, wipe contacts with a cotton swab dipped in isopropyl alcohol.
Signs Your Keyboard Needs Battery Replacement
Watch for:
– Intermittent typing (keys work only when pressed hard)
– Delayed keystrokes during fast typing
– LED blinking red during use
– Complete failure after 12+ months of use
Replace batteries every 18 months regardless of symptoms—alkaline batteries leak corrosive chemicals when depleted.
Optimize Bluetooth Range for Logitech Keyboard on Lenovo Laptop
Logitech claims 10-meter Bluetooth range, but real-world performance on Lenovo laptops averages 3 meters due to internal antenna placement. Physical barriers like your body or laptop screen cut effective range in half. You’ll experience key lag or dropouts when exceeding these limits.
Ideal Distance Between Keyboard and Lenovo Laptop
Maintain 1-2 feet (30-60 cm) between devices for reliable typing. Beyond 3 feet, keystroke latency increases by 200ms—enough to cause typos during fast writing. For presentations, place the laptop within direct line-of-sight of the keyboard. Avoid positioning the laptop behind monitors or metal stands that block signals.
Avoiding Physical Obstructions That Block Bluetooth Signal
Remove objects between devices:
– Metal surfaces (desks, laptop stands) reflect signals
– Water containers (bottles, plants) absorb 2.4GHz waves
– Your body (blocks signals when typing on lap)
Place the laptop on a non-metal table with the hinge side facing the keyboard—Lenovo’s Bluetooth antenna typically sits near the display hinges.
Install Logitech Options+ for Advanced Keyboard Customization
Basic pairing gets keys working, but Logi Options+ unlocks full functionality. This free app remaps keys for Lenovo shortcuts (like Fn key behaviors), creates macros, and shows battery levels—transforming generic input into a productivity powerhouse. Without it, special keys (mute, brightness) often remain inactive.
Downloading the Logi Options+ App from Official Sources
Get it exclusively from Logitech’s website (search “Logi Options+ download”). Avoid Microsoft Store versions—they lack Lenovo-specific profiles. During installation, disable “optional offers” like browser toolbars. After launch, the app auto-detects connected devices. If your keyboard isn’t listed, restart the app with the keyboard actively paired.
Customize Shortcuts and Functions for Lenovo Laptop Use
Remap keys to match Lenovo’s layout:
1. Select your keyboard in Logi Options+
2. Click “Customize” next to a key (e.g., F12)
3. Choose “Lenovo Sleep” to mirror laptop’s sleep function
4. Create macros like “Ctrl+Alt+Del” for one-touch security access
For ThinkPad users, enable “Emulate ThinkPad TrackPoint” to use keyboard arrow keys as a pointing stick alternative during presentations.
Final Takeaway: Connecting your Logitech wireless keyboard to a Lenovo laptop succeeds 95% of the time when you match the method to your keyboard model and address battery/port issues upfront. Always start with USB receiver pairing for reliability, then switch to Bluetooth for multi-device flexibility. If problems persist after trying all steps, reset your keyboard to factory settings using the recessed reset button (consult your model’s manual). For ongoing smooth operation, replace batteries proactively and keep Logi Options+ updated—this prevents 80% of post-pairing issues. Your perfectly connected keyboard awaits; just follow these precise steps.


