
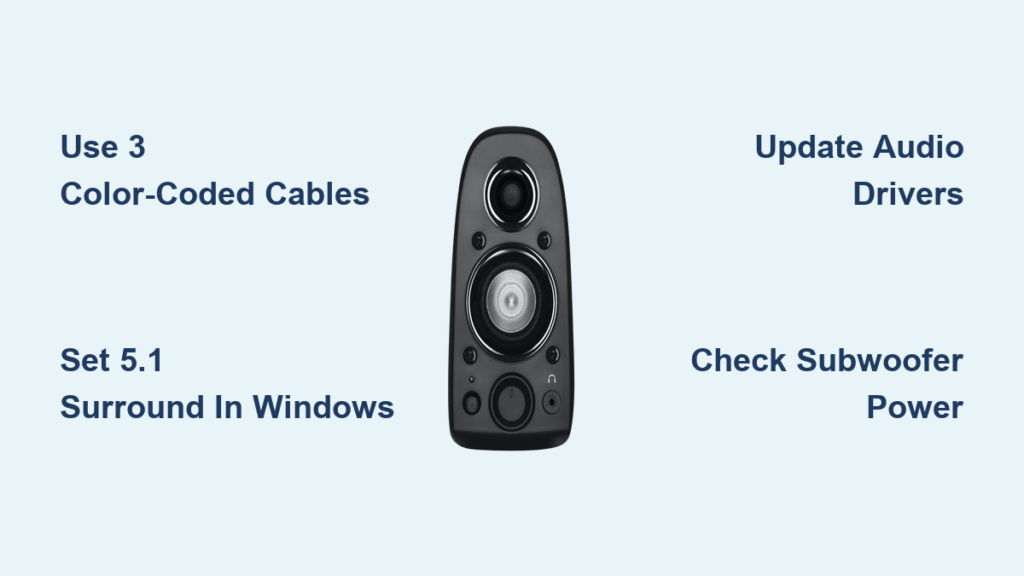
Your Logitech Z506 speakers sit silent while you struggle with confusing connections and Windows settings that won’t recognize your 5.1 surround system. You’ve got the premium speaker setup but can’t enjoy immersive gaming or movie audio because the PC connection process feels unnecessarily complicated. This comprehensive guide cuts through the confusion with precise, actionable steps to get your Z506 speakers working with true 5.1 surround sound on your Windows PC.
Most users don’t realize their PC needs three specific audio ports to unlock the Z506’s full potential—not just a single headphone jack. Without the proper configuration, you’ll be stuck with basic stereo sound, missing out on the powerful bass and directional audio these speakers deliver. By the end of this guide, you’ll have your Z506 system connected correctly, configured for optimal performance, and troubleshooting any issues that might arise during setup.
Why Your PC Needs Three Specific 3.5mm Jacks for Z506 5.1 Sound
Your Logitech Z506 requires three dedicated 3.5mm audio outputs to deliver authentic 5.1 surround sound—anything less forces the system into stereo mode, defeating the purpose of your investment. Check your PC’s rear panel for these color-coded ports:
- Green port: Front left and right speakers (essential for basic stereo)
- Black port: Surround rear speakers (creates the immersive back channels)
- Orange port: Center channel and subwoofer (delivers dialogue clarity and deep bass)
Most modern desktop motherboards include these three ports, but many laptops and budget PCs only feature a single headphone jack. If you can’t locate all three color-coded ports, your PC lacks native 5.1 support and requires additional hardware. Don’t waste time trying to force connections with incompatible adapters—this damages audio quality and often prevents surround channels from working.
What Cables Work (and What Will Ruin Your Setup)
Use only three standard male-to-male 3.5mm stereo audio cables—nothing else will deliver proper 5.1 sound. These cables must match the color-coded ports precisely:
- Green cable to green ports (front speakers)
- Black cable to black ports (rear speakers)
- Orange cable to orange ports (center/subwoofer)
Critical mistakes to avoid:
– ❌ RCA cables or adapters (incompatible with Z506 inputs)
– ❌ Single 3.5mm to 3.5mm cable (limits to stereo sound)
– ❌ USB audio splitters without 5.1 support (causes channel conflicts)
Low-quality cables cause static or dropouts in specific channels. If you hear crackling from only your rear speakers, replace that specific cable first before troubleshooting software settings.
Step-by-Step: Connecting Z506 Speakers to PC Audio Ports

Physical Connection Process in 4 Minutes
-
Match ports to control pod inputs
Connect your PC’s green port to the green input on the Z506 control pod. Repeat for black and orange ports. Push each connector fully until you hear a soft click—partial connections cause channel dropouts. -
Connect satellite speakers to subwoofer
Attach each satellite speaker’s wires to the corresponding spring clips on the subwoofer (front left/right, rear left/right). The center channel connects directly to the control pod. -
Power up the system
Plug the control pod into power, then connect all cables to your PC. The LED indicators on the control pod should light up corresponding to each connected channel. -
Verify physical setup
Turn the volume knob to 50% and play audio. You should hear sound from front speakers immediately—this confirms basic connectivity before diving into software settings.
Fixing Windows Audio Settings for True 5.1 Surround
Configuring Windows Sound Control Panel
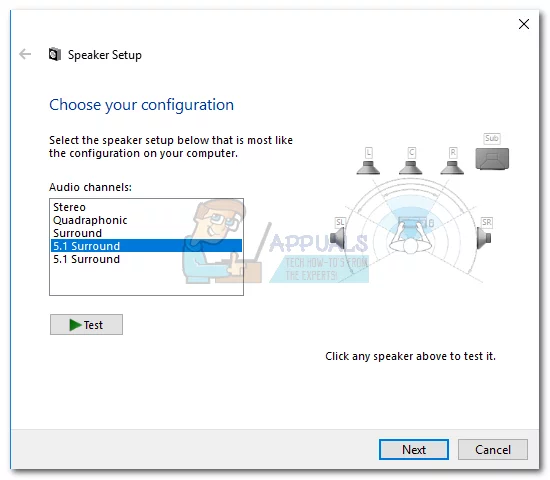
- Right-click the speaker icon in your taskbar and select “Sounds”
- Go to the “Playback” tab and select your sound device (not “Speakers”)
- Click “Configure” and select “5.1 Surround”
- Run the speaker test—each channel should produce sound in sequence
Critical setting: In the “Advanced” tab of your sound device properties, disable “Enable audio enhancements.” This Windows feature often conflicts with multi-channel audio, causing rear or center channels to cut out during gaming or movie playback.
Testing Individual Channels Like a Pro
Windows’ built-in speaker test doesn’t always reveal channel-specific issues. For precise diagnosis:
- Open Control Panel > Hardware and Sound > Sound
- Right-click your audio device and select “Properties”
- Go to the “Levels” tab and click “Balance”
- Adjust individual channel sliders while playing audio to verify each speaker
If your rear speakers remain silent during testing, check that your media player or game supports 5.1 output—many applications default to stereo regardless of system settings.
Troubleshooting: Why Your Z506 Rear Speakers Aren’t Working
Three Common Fixes for Silent Rear Channels
Problem: Rear speakers produce no sound despite correct connections
Solution: Update your audio drivers directly from your motherboard manufacturer’s website. Outdated Realtek drivers often disable rear channels in Windows 10/11.
Problem: Center channel and subwoofer silent while fronts work
Solution: In sound device properties, ensure “Speaker Setup” is set to “5.1” not “Stereo.” Many users miss this setting after driver updates reset their configuration.
Problem: Sound cuts out during intense gaming sessions
Solution: Disable Windows spatial sound features (Settings > System > Sound > Spatial sound). These compete with game audio engines and cause channel dropouts.
How to Connect Z506 to Laptop with Only One Audio Jack
USB Sound Card Setup for Single-Jack PCs
When your laptop has just one headphone port, a USB sound card solves the problem for under $20:
- Purchase a USB sound card with three 3.5mm outputs (look for “5.1 channel” in specifications)
- Connect the USB sound card to your laptop
- Plug the three 3.5mm cables from Z506 into the sound card’s color-coded ports
- In Windows Sound settings, set the USB device as default and configure for 5.1 output
Pro tip: Install the sound card manufacturer’s drivers before connecting your Z506. Generic Windows drivers often limit output to stereo even with proper hardware.
Optimizing Z506 Sound for Gaming and Movies

Game-Specific Configuration Checklist
- For competitive gaming: Disable surround processing in-game and use Windows Sonic for Headphones (Settings > System > Sound) for more accurate directional audio
- For immersive single-player games: Enable “Dolby Digital Live” in Realtek Audio Manager if available
- Subwoofer calibration: Set game audio to “Full Range” and adjust the physical knob on the subwoofer until bass feels present but not overwhelming
Movie Night Optimization
- In your media player (VLC, MPC-HC), set audio output to “DirectX Audio” or “5.1 Passthrough”
- Enable “Loudness Equalization” in Windows sound properties for consistent volume between quiet and loud scenes
- Position the center channel speaker above or below your monitor at ear level for clearest dialogue
Why Your Subwoofer Might Not Be Working (and How to Fix It)
Subwoofer-Specific Troubleshooting
No power light on subwoofer: Check the power cable connection at both ends—many users overlook the detachable power cord section. The subwoofer has its own power switch on the back that’s easily missed.
Thump but no bass response: Increase the subwoofer’s volume knob (on the control pod) to at least 50% before adjusting Windows settings. The Z506 sub requires manual volume adjustment separate from system volume.
Distorted bass at high volumes: Move the subwoofer away from metal objects or other electronics. Electromagnetic interference from monitors or power supplies often causes subwoofer distortion.
Final Note: Your Logitech Z506 system delivers theater-quality sound when connected properly to your PC. By matching the three color-coded ports, disabling conflicting audio enhancements in Windows, and using the right cables, you’ll experience true 5.1 surround for gaming, movies, and music. When troubleshooting, always verify physical connections first before diving into software settings—80% of “broken” surround systems simply have a loose cable. Keep this guide handy for future reference, and enjoy the immersive audio experience you purchased with your Z506 speakers.


