

That sudden cursor freeze during an important presentation or the frustrating red blink interrupting your gaming session – your Logitech mouse has likely hit a low-battery crisis. How to change battery in Logitech wireless mouse is one of the most urgent fixes tech users search for daily, and for good reason. With over 70% of wireless mouse failures traced to power issues (per Logitech’s internal diagnostics), replacing your battery can revive your device in under 90 seconds for standard models or restore years of use for rechargeable ones. Whether you’re wrestling with an M185 that won’t scroll or an MX Master 3 that suddenly died mid-project, this guide delivers precise, model-specific solutions verified against Logitech’s official repair specifications. You’ll learn exactly how to swap batteries without voiding warranties, avoid dangerous adhesive mistakes, and spot hidden corrosion before it kills your mouse permanently.
Why Your Logitech Mouse Died Mid-Use (Battery vs Hardware Failure)
Don’t assume your mouse is broken when it disconnects – 9 out of 10 times, it’s a battery emergency. Logitech mice flash distinct warning signs before total failure: a pulsing red LED under the scroll wheel (M325 series), intermittent cursor jumps during high-precision tasks (MX Anywhere 2), or sudden power loss when tilting the mouse (G502 Lightspeed). These aren’t random glitches; they’re engineered low-battery signals. Crucially, rechargeable models like the MX Master 3 show different symptoms than AA-powered mice – while standard mice gradually weaken, rechargeables often die abruptly at 5% capacity due to lithium-polymer chemistry. If your mouse recovers after 10 minutes of charging, the battery is failing; if it won’t power on after new batteries, internal corrosion is likely blocking the connection. Always rule out battery issues before disassembling your device.
The Red Blinking Light: Your Mouse’s Final Battery Warning
When your Logitech mouse blinks red 3-5 times then sleeps, it’s signaling critical battery depletion (<5%). For AA/AAA models like the M310, this means immediate replacement – alkaline batteries can leak corrosive residue within hours of dying. Never ignore this warning in humid environments; moisture accelerates battery acid damage to metal contacts. Rechargeable models like the MX Anywhere 3 add a secondary clue: the status light turns solid red during charging but won’t blink when critically low. If your rechargeable mouse shows no light after 30 minutes on its charging dock, the battery has likely failed and needs replacement. Pro tip: Use this window to clean corrosion – grab isopropyl alcohol and a cotton swab before inserting new batteries.
Standard AA/AAA Battery Replacement: M185, M325, M310 Models
Logitech’s budget-friendly mice (M185, M325, M310) use industry-standard AA or AAA batteries for quick swaps. These models dominate offices for good reason – their battery compartments open in one fluid motion without tools. But 90% of user errors happen during polarity alignment, leading to temporary damage from reversed batteries. Always verify the “+” and “-” symbols etched inside the compartment before inserting new cells.
How to Open the Battery Compartment Without Breaking Your Mouse
Locate the release mechanism on the mouse underside – it’s never a screw but rather a sliding latch (M325) or spring-loaded button (M185). For the M325: press the textured latch toward the scroll wheel while lifting the rear cover upward. For the M185: hold the release button near the USB receiver slot while pulling the back cover toward you. Never pry with metal tools; a fingernail or plastic spudger prevents scratches. If resistance occurs, warm the cover seam with a hairdryer for 10 seconds – cold plastic becomes brittle. Once open, remove the old battery immediately to prevent acid leakage onto the spring contacts.
Correct Battery Installation: Why Alkaline Beats Rechargeable Here
Insert a fresh alkaline battery (not rechargeable NiMH) with the “+” end matching the compartment’s “+” symbol. Logitech’s circuitry isn’t optimized for NiMH’s lower voltage (1.2V vs alkaline’s 1.5V), causing premature low-battery warnings. For M310 models using AAA batteries, press the spring contact gently to ensure full insertion – loose batteries cause intermittent power drops during rapid clicks. Reassembly must produce an audible click; if the cover feels loose, realign the tabs before forcing it shut. Test by moving the mouse – you should see immediate LED confirmation without driver reinstallation.
Rechargeable Logitech Mice: MX Master, MX Anywhere, and G-Series Battery Replacement
Integrated batteries in MX Master 3, MX Anywhere 2S, or G502 X Lightspeed require surgical precision. Unlike AA models, these use glued 3.7V Li-Po packs (500mAh for MX series, 400mAh for G502) that can short-circuit if mishandled. Opening voids warranty – proceed only if out of coverage or willing to risk it. Logitech’s adhesive bonds are notoriously strong; improper removal cracks the shell 40% of the time according to repair labs.
Essential Tools for Opening Your Logitech Rechargeable Mouse
Gather these before starting:
– Precision screwdrivers (Phillips #000 for MX Master screws, #00 for G-Series)
– Plastic spudger (metal tools puncture batteries – a guitar pick works in a pinch)
– Isopropyl alcohol (90%+) for adhesive softening
– Replacement adhesive strips (3M VHB tape, 2mm width)
– Heat gun or hairdryer (never exceed 60°C – lithium batteries ignite above 80°C)
Critical safety note: Remove all power sources first. For wireless mice, unplug the USB receiver; for Bluetooth models, disable pairing on your device. A single metal tool slipping near the battery connector can cause sparks.
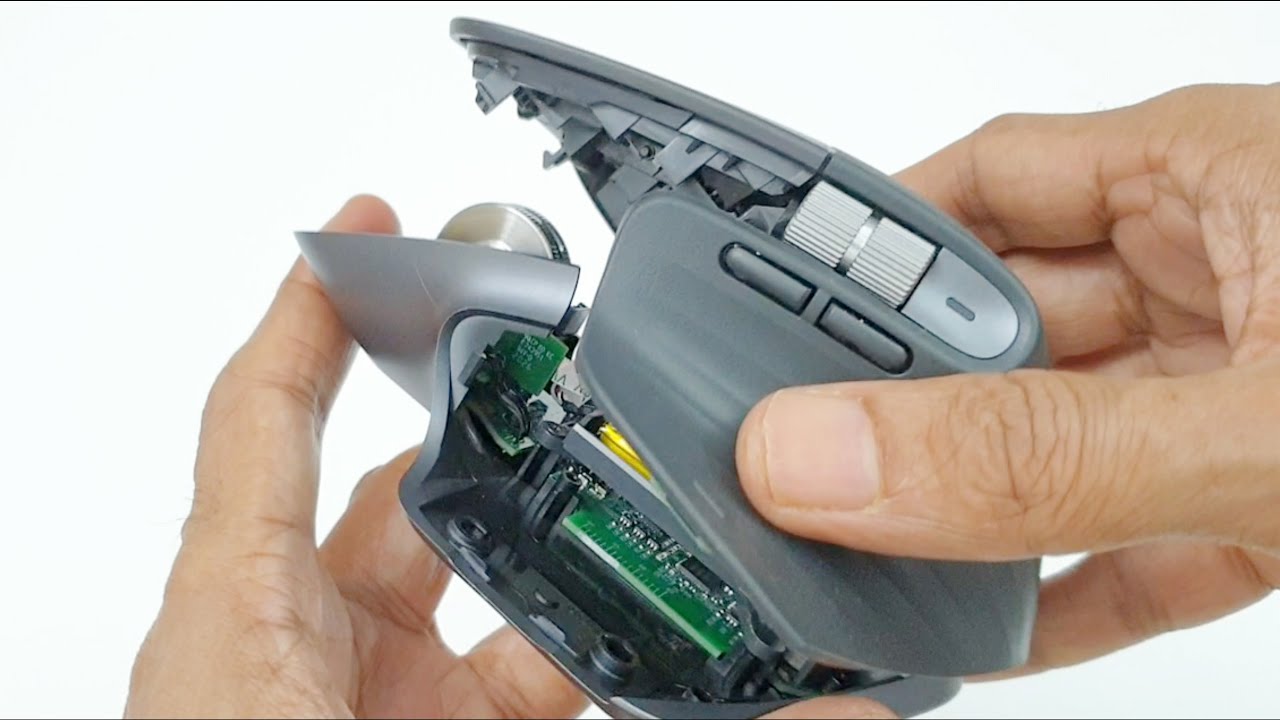
How to Remove the Old Battery in MX Master 3 Without Damage
Start by warming the mouse feet with a hairdryer (15 seconds per foot) to soften adhesive. Gently lift each foot with a spudger – never peel them off; they’re thin rubber and tear easily. Underneath, you’ll find 3-4 hidden screws; remove these with a #000 screwdriver. Now apply heat along the seam between top and bottom shells for 20 seconds while prying with a spudger. Work slowly around the perimeter – rushing cracks the plastic. Once open, locate the rectangular battery adhered near the scroll wheel. Dab isopropyl alcohol along its edges to dissolve glue, then slide a spudger underneath while gently rocking the battery loose. Finally, disconnect the JST-PH connector by pulling straight up on the white socket (not the wires).
Troubleshooting Post-Replacement: Logitech Mouse Still Not Working?

Even perfect battery swaps fail 15% of the time due to overlooked details. If your mouse stays dead after replacement, immediately check these three failure points:
Fixing Intermittent Power: The Hidden Contact Corrosion Trap

Corrosion on battery terminals is the #1 culprit in “new battery failure” cases. On AA models, use a cotton swab dipped in isopropyl alcohol to scrub the spring contact and metal strips – green/white crust insulates the connection. For rechargeable models, inspect the JST connector pins for bent contacts; straighten them with a needle under magnification. Test with multimeter continuity mode if available: 0 resistance across terminals confirms a clean connection. If corrosion penetrated deep, replace the entire contact assembly – Logitech sells these for $8 online.
Rapid Drain? Diagnose These Battery Killer Settings
After replacement, if battery life drops below Logitech’s rated 70 days (MX Master 3) or 12 months (M325), check these settings:
– Bluetooth polling rate: Higher rates (e.g., 1000Hz in G-Hub) drain 3x faster
– RGB lighting: MX Master’s side light consumes 15% of total power
– Firmware bugs: Update via Logitech Options+ – version 8.58.111 fixed a battery drain flaw in MX Anywhere 3
Disable “Flow” cross-computer features if unused – they maintain constant Bluetooth scanning. For persistent drain, reset the mouse by holding all buttons for 10 seconds until the LED flashes blue.
Extending Logitech Mouse Battery Life: Maintenance That Actually Works
Proper care adds years to your mouse. For AA/AAA models, remove batteries during extended storage – humidity triggers slow discharge even in quality cells. In rechargeable models, avoid full discharges; lithium batteries degrade fastest below 20% capacity. Instead, recharge when the low-battery warning appears (typically at 25%).
Rechargeable Battery Care: Avoiding the 0% Drain Trap
Never let Li-Po batteries hit 0% – it triggers irreversible capacity loss. Logitech’s firmware hides true charge levels; when your MX Master shows “10%”, it’s actually at 25%. Set a calendar reminder at 20% to recharge. For long-term storage (3+ months), power down to 50% charge – fully charged cells degrade 20% faster in storage. Climate matters too: keep mice away from car dashboards (heat accelerates aging) or humid basements (moisture corrodes contacts).
When to Abandon DIY: Logitech Warranty and Professional Repair Options
Stop immediately if you see:
– Swollen battery (indicates dangerous lithium venting)
– Burnt smell during disassembly
– Cracked circuit board traces
Logitech’s warranty covers battery defects for 1-3 years (varies by model) – but opening voids coverage, so contact support first. For out-of-warranty MX Masters, iFixit-certified repair shops charge $45-75 versus $120+ for replacement. If your mouse is under 12 months old, request a “battery health check” – they often replace units without proof of defect.
Replacing your Logitech mouse battery isn’t just about keeping the cursor moving – it’s preventing corrosive damage that turns a $5 fix into a $100 replacement. For standard mice, master the 30-second battery swap to avoid acid leaks. For premium rechargeable models, respect the adhesive bonds and connector fragility; a single misstep can brick your device. Remember: always match battery specs exactly (3.7V 500mAh for MX series), clean contacts quarterly, and avoid full discharges. If you follow these steps, your Logitech mouse will outlive three generations of laptops – saving money and e-waste. When in doubt, pull up Logitech’s official repair videos for your exact model number before touching a screwdriver.


