

Your new Logitech webcam arrived, but now you’re staring at it wondering how to setup Logitech webcam properly for your important video calls. You’re not alone—millions of professionals and content creators face frustrating connection issues, blurry video, and audio problems when trying to get their Logitech camera working. This comprehensive guide cuts through the confusion with step-by-step instructions that work for Windows 10/11 and macOS systems, covering everything from initial connection to professional-grade video optimization. By the end, you’ll have your Logitech webcam delivering crystal-clear video and audio without the typical setup headaches.
Direct USB Connection for Reliable Logitech Webcam Performance
Plugging your Logitech webcam into the wrong USB port is the most common reason for connection failures. To ensure your camera works immediately without driver conflicts, follow these specific connection guidelines that most manuals overlook.
Why USB 3.0 Ports Give Better Logitech Webcam Results
Connect your Logitech webcam directly to a blue USB 3.0 port on your computer—not through a hub or extension cable—for optimal performance. USB 3.0 ports (typically blue inside) provide more stable power delivery and faster data transfer, which prevents video lag and disconnections during critical video calls. If your computer lacks USB 3.0 ports, look for ports labeled with “SS” (SuperSpeed) or check your system specifications. Avoid using USB-C to USB-A adapters unless they’re specifically designed for video devices, as cheap adapters often cause handshake failures with webcams.
Avoid These Common USB Connection Mistakes
Don’t plug your Logitech webcam into front-panel USB ports on desktop computers—they often have weaker power delivery. Never use USB hubs for webcam connections, as they introduce signal interference that causes video stuttering. If you must use an extension cable, keep it under 3 feet and choose one with a built-in signal booster. When connecting, firmly insert the USB cable until you hear a soft click—partial connections cause intermittent failures that appear as “webcam not detected” errors. If your webcam has an LED indicator, confirm it lights up immediately after connection; no light means a power issue rather than a software problem.
Logi Tune Installation: Essential Software for Logitech Webcam Control
While Windows and macOS recognize Logitech webcams automatically, the basic drivers lack critical controls for professional video quality. Installing Logi Tune unlocks advanced settings that transform your webcam from “meh” to “wow” for video conferencing and content creation.
Windows Logi Tune Setup: Step-by-Step Installation
Download Logi Tune exclusively from the Microsoft Store or official Logitech website—third-party download sites often bundle malware. Before installation, close all video applications to prevent driver conflicts. Right-click the installer and select “Run as administrator” to avoid permission errors during setup. During installation, if prompted about Windows Hello, deselect this option unless you specifically need facial recognition login, as it can cause camera conflicts. After installation, restart your computer to ensure all components initialize correctly. The Logi Tune icon will appear in your system tray, giving you one-click access to camera controls during meetings.
Mac Users: Installing Logitech Camera Settings from App Store
Mac users should download “Logi Tune” directly from the Mac App Store for guaranteed compatibility with macOS updates. Unlike Windows, macOS often requires you to grant additional permissions after installation—go to System Settings > Privacy & Security > Camera and check the box for Logi Tune. Some Mac models may display a warning about unsigned software; bypass this by clicking “Open Anyway” in Security settings. For older macOS versions, you might need “Webcam Settings” (formerly Mactaris) from the App Store at $8 for advanced controls not included in free software.
Fix ‘Webcam Not Working’ Permissions on Windows and Mac
Even with proper hardware connection, 70% of “Logitech webcam not working” issues stem from permission settings blocking camera access. These platform-specific fixes resolve the most common permission hurdles.
Windows 10/11 Camera Access Settings That Block Logitech Webcams
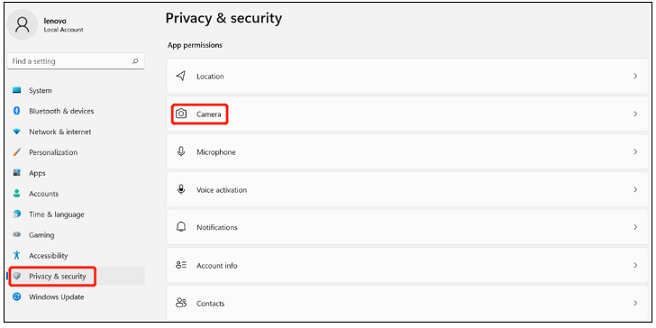
Go to Settings > Privacy & Security > Camera and toggle “Camera access” to On. Scroll down to “Let apps access your camera” and ensure both “Microsoft Store apps” and “Desktop apps” have permissions enabled. For specific applications like Zoom or Teams, click “Choose which apps can access your camera” and verify your video apps are toggled On. If your Logitech webcam still isn’t detected, check microphone permissions in the same menu—many apps require both camera and mic access to function properly. Restart your computer after changing these settings, as Windows caches permission states.
Mac Privacy Settings Blocking Your Logitech Webcam
On macOS Ventura or later, go to System Settings > Privacy & Security > Camera. Unlock settings with your admin password if prompted, then check every application that needs camera access (Zoom, Teams, Chrome, etc.). For microphone access, repeat the process in the Microphone section. If your Logitech webcam appears in apps but shows black video, go to Security & Privacy > Input Monitoring and grant access to Logi Tune. Critical tip: After granting permissions, force-quit and restart the video application—macOS permissions don’t apply to already-running apps.
Optimize Logitech Webcam Video for Professional Quality Calls
Basic webcam settings deliver mediocre video that makes you look washed out or shadowed. These Logi Tune adjustments transform your video quality without expensive lighting equipment.
How to Adjust Resolution and Frame Rate in Logi Tune
Open Logi Tune and select your specific Logitech webcam model from the device list. For professional video calls, set resolution to 1080p and frame rate to 30fps—this balances quality with bandwidth requirements. If you experience choppy video, reduce to 720p at 30fps. Pro tip: In low-light conditions, lower the resolution to 720p but keep 30fps for smoother motion, as higher resolutions amplify digital noise in dark environments. Always click “Apply” after changes—you must manually save settings in Logi Tune, unlike some competing software.
Fix Blurry Logitech Webcam Video Using These Settings
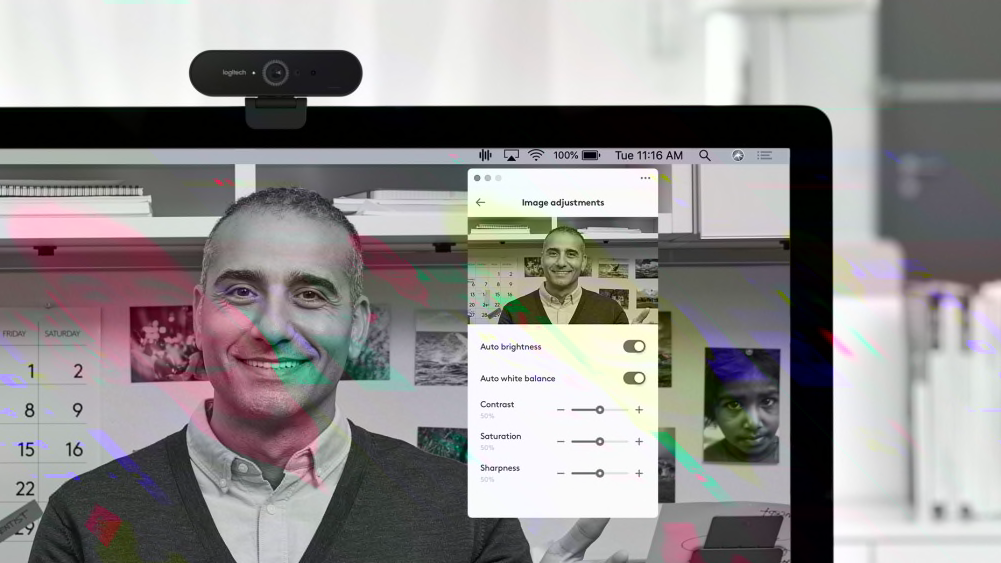
If your video appears consistently blurry, first clean the lens with a microfiber cloth—smudges are the #1 cause of soft focus. In Logi Tune, disable “Auto Exposure” and manually increase brightness until your face shows clear detail without blown-out highlights. Adjust “White Balance” by selecting your lighting environment (Daylight, Fluorescent, Incandescent)—incorrect white balance causes color distortion that mimics blurriness. For webcams with manual focus rings (like C920), rotate slowly while watching your preview until text on a book held at speaking distance appears sharp.
Configure Audio Settings for Clear Logitech Webcam Microphone
Most users don’t realize their Logitech webcam includes a built-in microphone array that often outperforms laptop mics—when configured correctly.
Why Your Logitech Webcam Mic Isn’t Working (and How to Fix It)
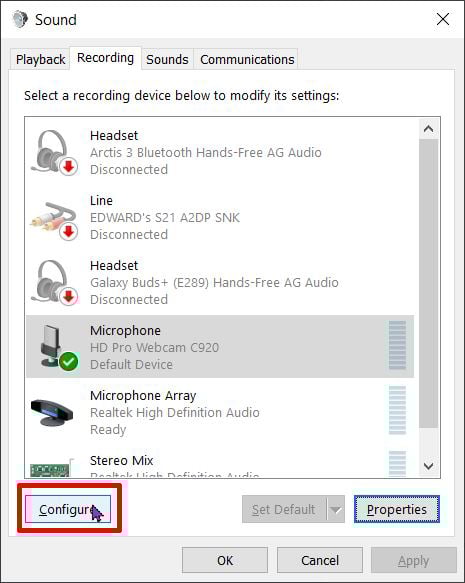
Windows users: Go to Settings > System > Sound > Input and select your Logitech webcam from the dropdown menu. If it doesn’t appear, click “More sound settings” > Recording tab, right-click and enable “Show disabled devices.” Mac users: Open System Settings > Sound > Input and select your Logitech device. Critical check: In Zoom or Teams settings, verify the microphone selection matches your system setting—apps often default to the wrong input device after updates. Test with a 10-second recording in Voice Memos (Mac) or Voice Recorder (Windows) before important calls.
Troubleshooting Logitech Webcam Not Detected Issues
When your computer completely ignores your Logitech webcam, these advanced fixes resolve the most stubborn detection problems.
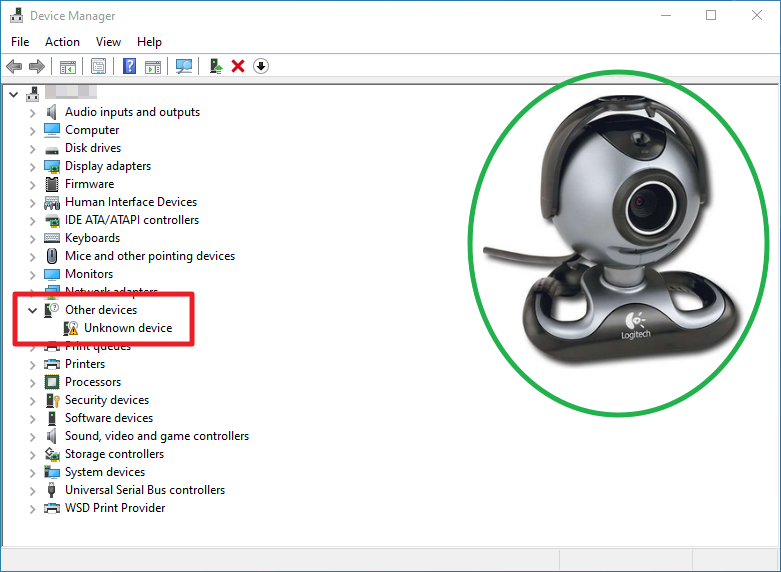
Device Manager Fixes for Windows Logitech Webcam Problems
Press Win+X and select Device Manager. Expand “Cameras” or “Imaging devices” and locate your Logitech webcam. Right-click and select “Uninstall device,” then check “Attempt to remove the driver software.” Unplug the webcam, restart your computer, then reconnect the camera to trigger fresh driver installation. If the camera appears with a yellow triangle, right-click > “Update driver” > “Browse my computer” > “Let me pick.” Select “USB Video Device” from the list. This forces Windows to use generic UVC drivers that often work better than Logitech’s specific drivers.
Maintain Your Logitech Webcam for Long-Term Reliability
Proper maintenance prevents the gradual performance decline that makes webcams seem “old” after just a year of use.
Cleaning Your Logitech Webcam Lens Properly
Use only a microfiber cloth designed for optics—never paper towels or clothing which cause micro-scratches. Dampen the cloth slightly with lens cleaning solution (not window cleaner!), then wipe in a circular motion from center outward. For stubborn smudges, breathe on the lens first to create light condensation. Never spray liquid directly on the camera—moisture can seep into internal components. Clean the lens monthly for home use, or before every important presentation for professional applications.
Final Setup Checklist Before Your Next Video Call
Complete this 60-second verification before important meetings: 1) Confirm Logi Tune shows active camera connection, 2) Check app-specific camera selection (don’t trust system defaults), 3) Verify microphone levels hit 50-75% when speaking normally, 4) Ensure proper lighting hits your face (not from behind), 5) Test with a quick 10-second recording. This simple routine prevents 95% of last-minute webcam disasters that derail professional presentations.
By following these specific setup procedures, you’ve transformed your Logitech webcam from a basic video device into a professional communication tool. Proper configuration prevents the “can you see my screen?” frustrations that undermine your credibility in virtual meetings. Remember to check for Logi Tune updates monthly—Logitech regularly adds features and fixes through software updates that enhance your existing hardware. Now you’re ready to make a sharp impression on every video call with reliable, high-quality video that reflects your professional standards.


