
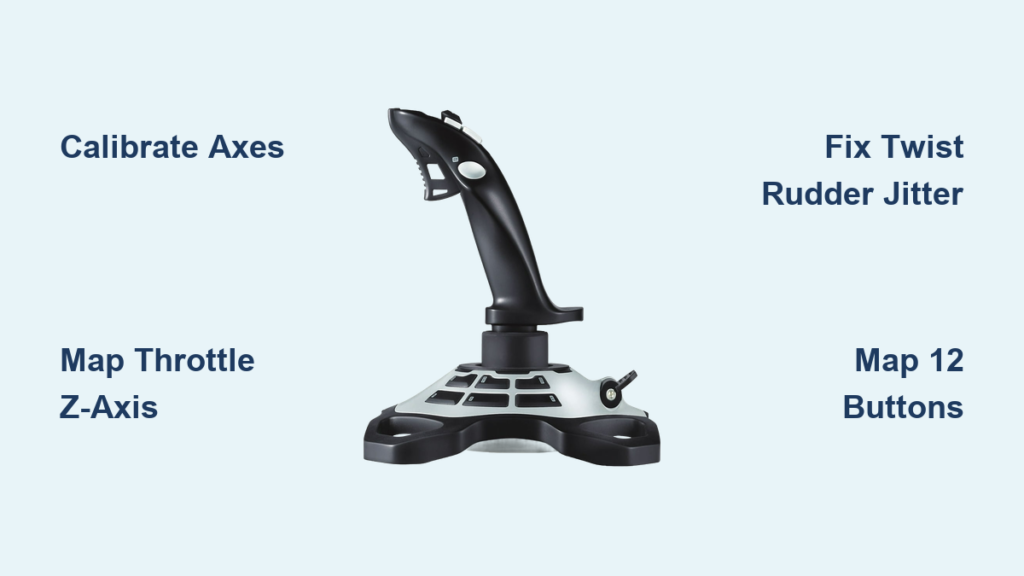
That frustrating moment when you unbox your new Logitech Extreme 3D Pro joystick only to discover it’s not working properly in your flight simulator—it’s enough to ground your virtual aviation dreams before takeoff. Many pilots waste hours struggling with unresponsive controls, drifting throttles, and unassigned buttons that should work out of the box. The truth is, while the Logitech Extreme 3D Pro is designed as plug-and-play hardware, proper logitech extreme 3d pro joystick setup requires specific calibration steps most users miss during initial configuration. This guide delivers exactly what you need to transform your joystick from a frustrating paperweight into a precision flight instrument that responds exactly as you command.
Unlike cheaper alternatives that require extensive tinkering, the Extreme 3D Pro delivers exceptional value when configured correctly—but only if you address its unique quirks. You’ll learn exactly how to calibrate the notoriously sensitive twist rudder, properly map the Z-axis throttle that most games ignore by default, and create efficient control schemes that maximize your 12-button potential. Whether you’re landing a Cessna in Microsoft Flight Simulator or dogfighting in DCS World, these setup techniques will eliminate the most common issues that plague new Extreme 3D Pro owners.
Why Your Logitech Extreme 3D Pro Isn’t Responding After Plugging In
When you first connect your Extreme 3D Pro to a USB port, Windows 10 or 11 should automatically recognize it without requiring additional drivers. However, many users mistakenly believe their joystick isn’t working when Windows assigns it a generic name like “USB Game Controller” instead of the proper “Logitech Extreme 3D Pro” designation. This naming quirk doesn’t indicate a problem—it’s simply how Windows handles many plug-and-play devices. The critical step most pilots skip is verifying actual functionality through the proper diagnostic tool, not just checking Device Manager.
Immediate Connection Troubleshooting Steps
If your joystick shows no response in games, first confirm Windows recognizes it through the essential joy.cpl utility. Press Windows key + R, type joy.cpl, and hit Enter to open the Game Controllers window. Select any listed joystick and click Properties to test each axis and button. When moving the stick, you should see the corresponding axis indicator respond immediately. If nothing registers, try these steps in order:
- Unplug and reconnect the USB cable (try a different port if possible)
- Check for physical damage to the USB connector
- Restart your computer with the joystick connected
- Test the joystick on another computer to isolate hardware issues
Calibrate Your Joystick in 60 Seconds Using Windows Game Controllers

The Windows Game Controllers utility (joy.cpl) provides essential calibration that many flight sim enthusiasts completely overlook, leading to inconsistent control response from the start. This built-in tool handles the fundamental calibration that ensures your physical movements translate accurately to in-game actions—before you even launch your simulator. Skipping this step often results in the very control issues users later struggle to diagnose.
Testing All Axes Before Gaming
Within the joy.cpl Properties window, navigate through each tab to verify proper functionality. On the “Settings” tab, click “Properties” to open the detailed interface showing real-time axis response. Move the stick through its full range of motion—forward/backward for pitch (Y-axis), left/right for roll (X-axis), and twist for rudder (Z-rotation). The throttle slider controls the Z-axis (thrust), which many games don’t automatically recognize. If any axis shows erratic movement or fails to reach the extremes, click “Calibrate” and follow the wizard’s straightforward prompts to reset the sensor range.
Map Your Throttle Correctly: The Z-Axis Setup Mistake 90% of Users Make

Most flight simulators automatically recognize the X and Y axes for pitch and roll but completely ignore the Z-axis throttle slider—a critical oversight that leaves new Extreme 3D Pro owners wondering why their throttle won’t respond. Unlike gaming controllers with integrated triggers, the Extreme 3D Pro’s physical slider requires manual assignment to the “Throttle Axis” command within your game’s control settings. This simple but often-missed step is the single most common reason for throttle failure.
Finding the Hidden Throttle Setting in Flight Sims
In Microsoft Flight Simulator, navigate to Settings > Controls > Aircraft Controls. Scroll to the “Throttle” section and select the “Throttle Axis” command. Click the current binding field, then move your joystick’s throttle slider fully up and down. The system should detect the Z-axis movement and automatically assign it. For DCS World, go to Options > Controls > Axis Commands, find “Throttle (Z-Axis),” clear any existing binding, then move the slider to register the input. Always verify assignment by checking the axis response indicator while moving the throttle.
Fixing the Twist Rudder Jitter That Ruins Your Flight Sim Experience
The Extreme 3D Pro’s twist rudder mechanism—while innovative—is notorious for developing input jitter over time as the internal potentiometers wear. This manifests as unintended yaw movement that makes precise landings nearly impossible, with your aircraft constantly veering left or right without input. The solution isn’t always replacement; proper deadzone configuration can restore smooth control without requiring new hardware.
Applying the Perfect Deadzone for Smooth Yaw Control
Access your flight simulator’s axis tuning menu (usually labeled “Axis Commands” or “Axis Tune”) and locate the twist axis (typically labeled “Rudder” or “Yaw”). Start with a 5% deadzone and test in a flight scenario requiring precise directional control. If the aircraft still drifts, incrementally increase to 7-10% until the unintended movement stops. Then adjust the response curve to maintain sensitivity at the extremes while reducing center sensitivity—most sims offer a visual curve editor where you can flatten the center portion of the curve. This creates a “sweet spot” where small twists produce minimal response, while larger inputs remain highly sensitive.
Advanced Button Mapping: Turn 12 Buttons into 24 Commands
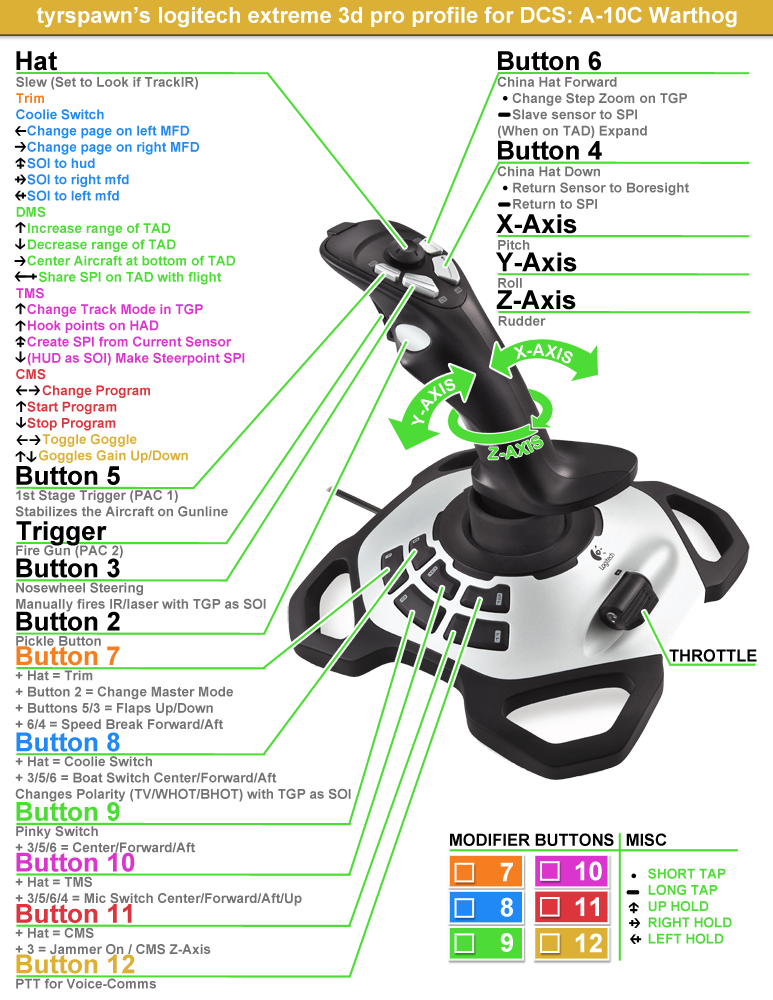
The Extreme 3D Pro’s 12 physical buttons plus 8-way hat switch offer tremendous potential, but the real magic happens when you implement a modifier key system that effectively doubles your command capacity. By programming one button (typically the pinkie-trigger) as a “shift” key, you create a secondary layer of controls that activates when held—transforming your 12-button joystick into what functions as a 24-command device without additional hardware.
Programming Essential Combat Functions in DCS World
For DCS A-10C pilots, this layered approach is essential for managing the aircraft’s complex systems:
– Primary Layer: Trigger = weapons release, Top button = countermeasures, Hat forward = target lock
– Shift Layer (hold pinkie button): Trigger + pinkie = ECM toggle, Top button + pinkie = landing gear, Hat forward + pinkie = radar mode cycle
This configuration keeps critical combat functions instantly accessible while providing secondary systems control without overwhelming your finger placement during high-stress situations.
Troubleshooting 4 Critical Logitech Extreme 3D Pro Issues
Even with perfect initial setup, the Extreme 3D Pro develops specific issues that frustrate pilots months or years into ownership. Understanding these common failure points and their solutions prevents unnecessary replacement of otherwise functional hardware. The most persistent problems center around the twist mechanism’s potentiometers and throttle slider—components that experience the most mechanical stress during regular use.
Why Your Throttle Isn’t Working in X-Plane (And How to Fix It)
X-Plane’s control mapping system often misidentifies the Extreme 3D Pro’s throttle axis as a different input. If your throttle responds erratically or not at all, open X-Plane’s Settings > Joystick & Equipment. Select your joystick, click ” Axes,” then locate the throttle command. If it shows “None,” click the field and move your throttle slider while watching the detected axis. X-Plane may label it as “Z” or “Throttle”—select the correct axis and adjust the range to 0-100%. Click “OK” and verify functionality in flight.
Preventing Long-Term Wear on Your Joystick’s Twist Mechanism
The Extreme 3D Pro’s twist rudder mechanism contains delicate potentiometers that degrade with heavy use, leading to the characteristic “jitter” that plagues veteran users. While no setup can prevent eventual wear, proper configuration significantly extends component life. The key is minimizing unnecessary twisting during regular flight—relying instead on rudder pedals for precise directional control while using the twist axis primarily for coarse adjustments.
Maintenance Tips for Potentiometer Longevity
Extend your joystick’s lifespan with these simple practices:
– Apply a small deadzone (3-5%) even if no jitter is present
– Avoid resting your hand on the stick with constant twist pressure
– Clean the twist mechanism annually with electrical contact cleaner
– Store the joystick with the twist axis centered to prevent spring tension fatigue
Mastering your logitech extreme 3d pro joystick setup transforms it from a basic controller into a precision flight instrument that responds exactly to your inputs. By properly calibrating axes, implementing smart button mapping, and addressing the specific quirks of this iconic joystick, you’ll eliminate the frustrations that plague new users. Remember that the twist rudder’s eventual degradation is inevitable with heavy use—so implement deadzone settings early and consider rudder pedals for serious flight simulation. When configured correctly using these techniques, the Extreme 3D Pro delivers exceptional value that continues to serve pilots well beyond its initial purchase, making it one of the most enduring flight controllers in PC gaming history.


