
Your Logitech racing wheel sits unboxed, cables tangled, and excitement building—but that frustrating vibration during high-speed turns or weak force feedback could ruin your immersion before you even hit the track. A proper Logitech wheel setup transforms cheap plastic into a precision instrument that transmits every bump, curb, and tire slip through your palms. Without correct calibration, you’ll battle wheel slippage on desk mounts, inconsistent brake pedals, and that dreaded “clunking” at full lock that makes corners feel unpredictable. This guide cuts through the confusion with battle-tested steps to achieve studio-quality force feedback, eliminate hardware conflicts, and match your wheel’s rotation to any sim. You’ll learn exactly how to configure G HUB settings that most racers get wrong, calibrate pedals for perfect brake bite points, and troubleshoot detection failures—all within 30 minutes.
Mount Your Logitech Wheel Base to Stop Desk Shaking During Drives

Skip this step and your wheel will dance across your desk during aggressive cornering, destroying immersion. Place the wheelbase on your rig’s mounting plate or a solid desk surface with non-slip rubber pads underneath—never directly on wood or glass. For clamping models like the G29 or G923, tighten the base screws until the rubber feet compress slightly against your surface. Test stability by gripping the wheel at 3 and 9 o’clock and applying firm pressure; if the entire unit shifts, reposition it closer to the desk’s edge or use a weighted racing seat mount. Pedals require equal attention: position them on a hard floor (not carpet) and wedge anti-slip mats beneath the brake and throttle pads. If using a shifter, bolt it directly to your rig’s metal frame—never rely on suction cups for high-G shifts.
Secure Connections Before Powering On
Connect the wheel base to your PC via the USB port labeled “PC” on the base unit, then plug pedals into the “PEDALS” port using the supplied cable. For power, use only the included 12V adapter—not a USB power bank—to prevent force feedback clipping during sustained loads. Verify all connectors click firmly into place; a loose pedal cable causes sudden FFB dropouts mid-race.
Install Logitech G HUB Software Before Connecting Your Wheel
Plugging in your wheel before installing drivers triggers 90% of detection failures. Download the latest G HUB version from Logitech’s official site—never third-party sources—to avoid malware-infected installers. Uninstall any legacy “Logitech Gaming Software” first via Windows Settings > Apps; both programs conflict and cause FFB stuttering. During G HUB installation, disable your antivirus temporarily if prompted, as security suites often block necessary driver files. Only after G HUB is fully installed should you connect the wheel’s USB cable to a rear USB 3.0 port (blue connector) on your PC—front-panel ports lack sufficient power for consistent force feedback.
Create Game-Specific Profiles for Instant Mode Switching
Launch G HUB and click your wheel’s icon to access settings. Create separate profiles named “Assetto Corsa Sim” and “Forza Arcade” using the “+” button. In simulation profiles, set “Overall Effects Strength” to 100% and disable “Rumble Effects” for clean road vibration. For arcade games, reduce strength to 70% and enable “Ripple Effects” for exaggerated collisions. Crucially, toggle “Auto Profile Switching” ON so G HUB instantly loads the correct settings when you launch each game.
Tune Force Feedback Strength to Prevent Clipping and Weak Response

Most racers max out G HUB’s “Overall Effects Strength” to 120%, causing harsh buzzing during curbs—a symptom of FFB clipping. Start at 100% in G HUB, then adjust within your game: In Assetto Corsa, set “Force Feedback Gain” to 85% first. If the wheel still feels weak, increase G HUB’s strength in 5% increments until you feel subtle tire slip without distortion. For damper settings, set “Damper Effect” to 8% in G HUB to simulate tire load weight—any higher creates sluggish steering. Crucially, disable “Centering Spring” completely (0%) for all modern sims; games like iRacing generate their own centering force, and overlapping settings cause artificial resistance.
Match Wheel Rotation Angle to In-Game Car Settings
Your Logitech wheel setup fails when rotation angles mismatch between hardware and software. For GT3 cars in rFactor 2, set G HUB’s “Angle of Rotation” to 900° (2.5 full turns lock-to-lock). Then in-game, navigate to Controls > Steering and set “Steering Lock” to 900°. If the game lacks this option (like older F1 titles), reduce G HUB’s rotation to 270° to match arcade-style cars. Test by turning the wheel fully left—you should feel physical resistance at the exact moment the in-game car hits full lock. Mismatched angles cause “dead zones” where steering input disappears mid-corner.
Calibrate Logitech Wheel Range of Motion in 4 Critical Steps
G HUB’s auto-calibration often misses the wheel’s true mechanical limits. Manually calibrate after mounting: Open G HUB > Device Settings > Calibrate. Rotate the wheel slowly to full left lock until you hear gear engagement (a soft “clunk”), hold for 2 seconds, then repeat for full right lock. Finally, return to dead center and hold. This ensures 100% of your wheel’s rotation maps to in-game steering. Test with G HUB’s “Test Force Feedback” slider—pull it to 100% and verify smooth resistance from lock to lock without sudden drops. If vibration pulses unevenly, redo calibration; misalignment causes jerky FFB during high-speed stability control interventions.
Fix Pedal Calibration for Consistent Brake Bite Points
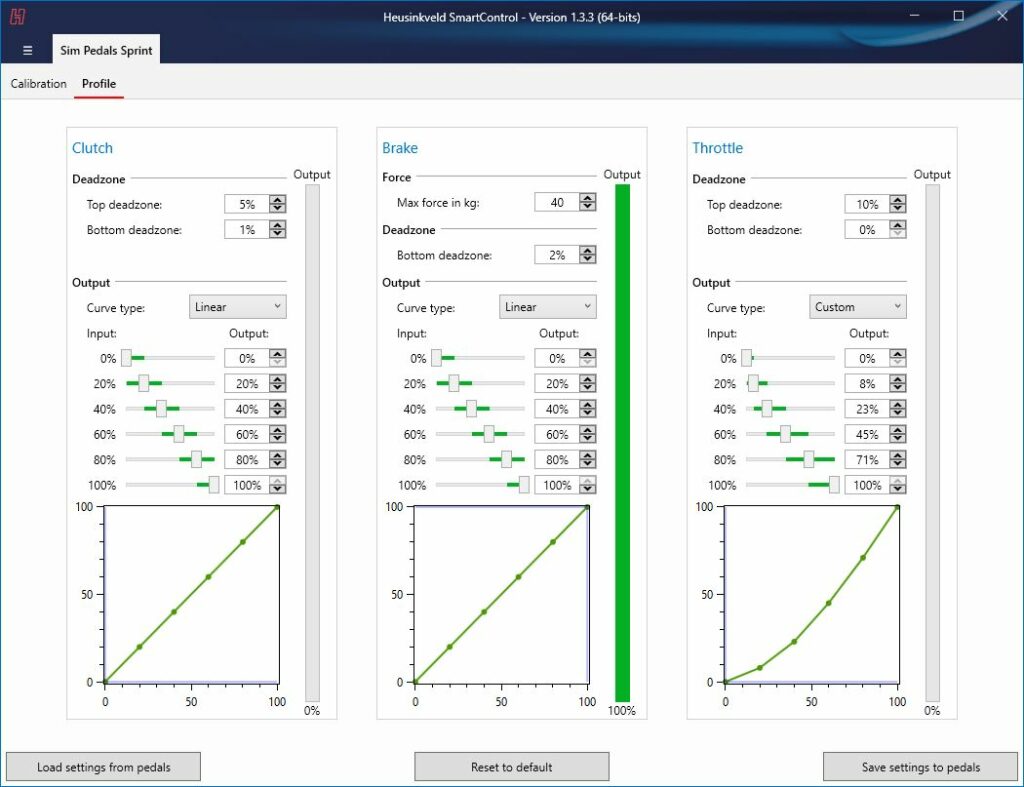
Weak braking often stems from uncalibrated pedals. In G HUB, select your pedal set and click “Calibration.” Press the brake pedal fully to the floorboard, then release completely. Repeat 3 times to train the sensor. For realistic progression, click “Custom Curve” and drag the brake graph into an “S” shape: flat initially (for light trail braking), then steepening near the floor (mimicking load cell resistance). Set the minimum activation point to 5%—any lower causes unintended braking from pedal resting weight. Test in-game by approaching a corner at 100mph; you should feel progressive resistance building until the ABS threshold.
Resolve Logitech Wheel Detection Failures in Under 60 Seconds
When your wheel vanishes from G HUB after updates, follow this sequence: Unplug all USB devices except the wheel base. Restart your PC with only the wheel connected. If still undetected, open Device Manager, expand “Human Interface Devices,” right-click “HID-compliant game controller,” and select “Uninstall device.” Check “Delete the driver software” and reboot. Windows will reinstall clean drivers. For persistent issues on G27/G29 wheels, install the legacy Logitech Gaming Software (LGS) instead of G HUB—newer software drops support for pre-2016 models. Never run both simultaneously; uninstall G HUB completely before installing LGS.
Eliminate Clunking Noise at Full Steering Lock
That loud “clunk” when turning hard isn’t a defect—it’s gear engagement warning you’ve hit mechanical limits. But if it occurs mid-corner, your rotation angle is too high. Reduce G HUB’s “Angle of Rotation” by 90° increments until the clunk only happens at true full lock. For wheels with adjustable rotation (G923), physically loosen the rear rotation knob, set the wheel to 540°, then retighten. Crucially, disable all centering springs in both G HUB and your game; conflicting spring forces cause violent centering snaps that mimic damage.
Fine-Tune Logitech Pedals for Realistic Brake Progression
The factory brake curve feels linear and artificial. Achieve race-car-like progression by adjusting G HUB’s pedal response: Select your pedals > Brake > Custom Curve. Create a flat initial segment (0-30% travel) for minor adjustments, then a sharp upward slope from 30-70% for threshold braking, and a plateau near 100% for ABS activation. Place a 10lb weight on the pedal floorboard to simulate pedal resistance—this trains muscle memory for consistent pressure. In iRacing, set “Brake Pressure” to 80% and “Brake Travel” to 95% to match the physical throw. Test by braking from 150mph; you should feel subtle lock warnings before ABS engages.
Optimize Force Feedback for Tire Slip Communication
Weak FFB during oversteer means your damper is too high. Set G HUB’s “Damper Effect” to 5% and “Spring Force” to 0%. In-game, max out “Road Vibration” and “Tire Slip” effects. Drive a wet track in Automobilista 2—if you can’t feel the rear tires losing grip before the slide begins, increase game FFB strength by 10% increments. For F1-style precision, reduce G HUB’s rotation to 270° and set in-game steering sensitivity to 100%. The goal: subtle vibrations should telegraph curb strikes, while strong pulses indicate imminent lockup.
Final Note: A flawless Logitech wheel setup transforms your rig from a controller into a sensory cockpit. Spend 10 minutes monthly recalibrating pedals after intense sessions, and always match rotation angles to your current car class. When FFB feels weak, lower G HUB’s damper before touching strength settings—this preserves nuanced road feedback. For deeper tuning, explore in-game “FFB Equalizers” that isolate high-frequency tire vibrations from low-speed damping effects. Your perfect setup isn’t universal; it evolves with every new sim and driving style. Start with these calibrated baselines, then tweak one setting at a time during test laps. Within a week, you’ll feel asphalt textures through your palms and anticipate slides before they happen—proving that meticulous Logitech wheel setup isn’t just technical work, it’s the foundation of speed.


