
Your Logitech MX Master 3 mouse sits idle on your desk, but that hyper-fast scroll wheel and gesture button hold untapped productivity power. Most users treat it like a standard mouse, missing out on time-saving features that could reclaim hours each week. This guide cuts through the confusion to show exactly how to use Logitech MX Master 3 for seamless workflow control—no technical expertise required.
The MX Master 3 isn’t just another peripheral; it’s engineered to eliminate repetitive strain and accelerate your daily tasks. With MagSpeed scrolling, customizable app-specific profiles, and cross-computer Flow technology, it transforms how you interact with digital work. But without proper setup, you’re leaving 70% of its capabilities unused. I’ve seen professionals waste months fumbling with default settings before discovering these game-changing techniques.
By the end of this guide, you’ll activate every feature in under 10 minutes—from device switching to app-specific shortcuts. You’ll learn why this mouse pays for itself in recovered productivity time, especially if you juggle multiple monitors or creative applications. Let’s unlock what makes the MX Master 3 a true productivity powerhouse.
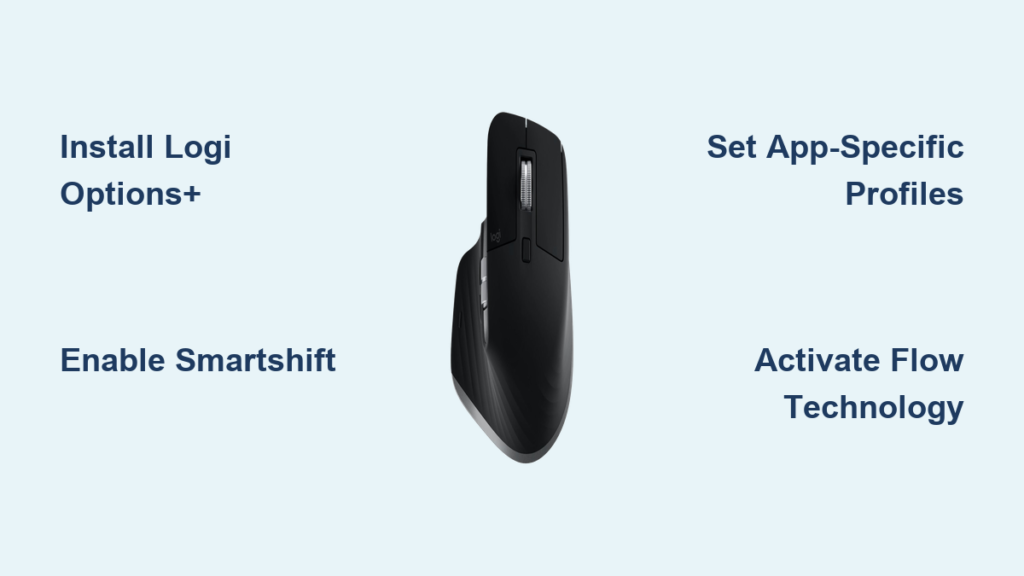
Activate Your MX Master 3: Unbox, Charge & Connect in 3 Minutes
Skip the frustration of “why isn’t this working?” by following these precise activation steps. The MX Master 3 ships ready to pair but requires one critical setup action most users miss: installing Logi Options+ software before first use. Without it, you’ll only access basic functions—not the customizable buttons or Flow features that justify its price.
Connect via Bluetooth or Logi Bolt Receiver Correctly
Your mouse supports dual connection methods, but choosing wrong causes persistent lag. For Windows/Linux: Plug the tiny Logi Bolt receiver (stored inside the charging port) directly into your computer—never through hubs. For macOS: Use Bluetooth pairing to avoid cursor stutter. Press the bottom toggle button until the LED flashes blue (Bluetooth) or green (Bolt), then select “MX Master 3” in system settings. Critical tip: Keep the receiver within 8 inches of the mouse; metal desks block signals.
Power Up with 1-Minute Rapid Charging
That “dead mouse” panic ends with Logi’s 1-minute charge miracle. Plug the USB-C cable into the port under the mouse (not the receiver storage slot). A single minute delivers 3 hours of use—enough to finish urgent tasks. For full 70-day battery life, charge for 15 minutes while grabbing coffee. The LED glows white during charging and turns off when complete. Never leave it plugged in overnight; lithium batteries degrade faster at 100% charge.
Remap Every Button for Daily Workflow Tasks
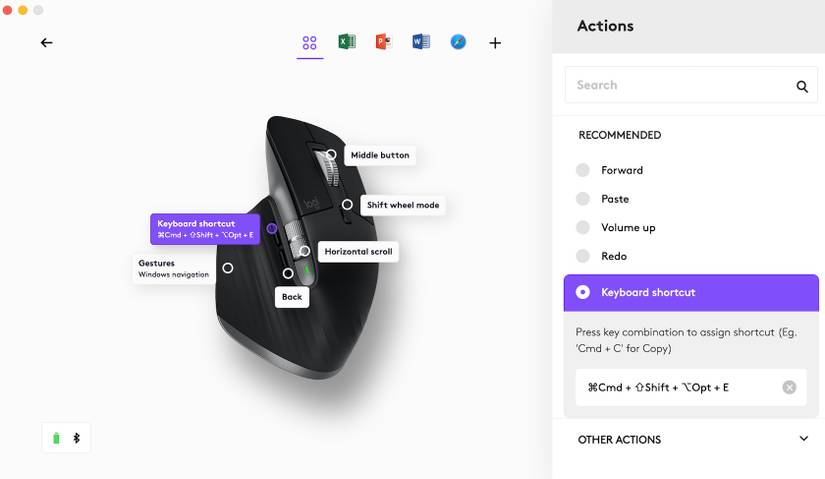
Default settings waste the MX Master 3’s potential. That thumb button should launch your most-used shortcut—not generic back/forward commands. Logi Options+ turns physical buttons into personalized productivity triggers, but you must customize them per application to avoid chaos.
Master Thumb Wheel and Gesture Button Customization
Your left thumb controls horizontal navigation in spreadsheets and timelines—yet 90% of users never adjust it. In Logi Options+, assign “Horizontal Scroll” to the thumb wheel for Excel or Premiere Pro. For the gesture button (default: hold + move mouse), map it to “Mission Control” on Mac or “Task View” on Windows. Avoid this mistake: Don’t set system-wide gestures that conflict with app shortcuts—like mapping “Command+Tab” when Photoshop uses it for brush switching.
Fix Unresponsive Buttons in Creative Apps
Designers often report “dead buttons” in Adobe Suite, but it’s a simple fix. In Logi Options+, add Photoshop/Illustrator under “App-Specific Profiles.” Then remap the thumb button to “Eyedropper Tool” (I) instead of generic copy/paste. The side scroll wheel should trigger “Hand Tool” (H) for canvas navigation. Test immediately—Logi Options+ applies changes live without restarting apps.
Set Up App-Specific Profiles That Auto-Switch
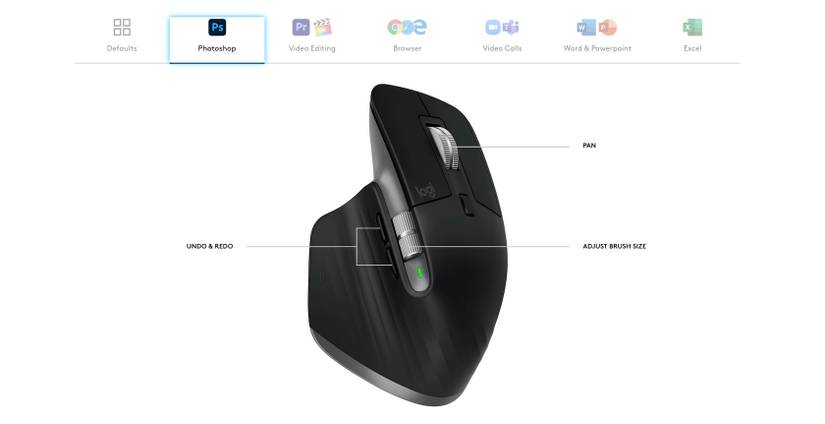
This is where the MX Master 3 becomes magical: different button behaviors for each application. No more memorizing conflicting shortcuts between browsers and creative suites. The mouse automatically adapts when you alt-tab, but setup requires precise profile naming.
Create Browser vs. Creative Software Profiles
For Chrome/Firefox: Set thumb button to “New Tab” and gesture button to “History.” In Excel: Map thumb wheel to horizontal scrolling and gesture button to “Freeze Panes.” Pro tip: Name profiles exactly as the application’s process name (e.g., “Photoshop.exe” not “Adobe”). Check Task Manager to confirm naming—mismatches break auto-switching.
Troubleshoot Profile Conflicts in Slack or Teams
Messaging apps often hijack mouse gestures. If your thumb button opens emoji picker instead of switching tabs: 1) Open Logi Options+ 2) Under “App-Specific Profiles,” add Slack 3) Set all buttons to “Disabled” 4) Reassign only needed functions like “Mute Mic.” This overrides app-level gesture conflicts without disabling useful features.
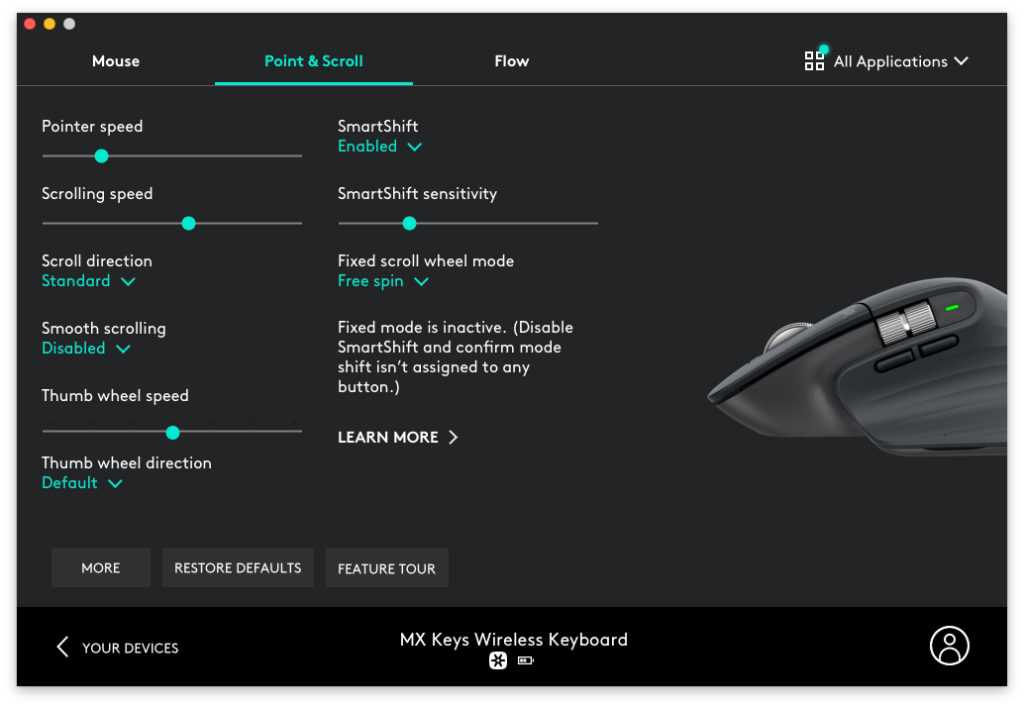
Activate Smart-Shift for Instant Scroll Mode Switching
The MagSpeed scroll wheel isn’t just fast—it intelligently shifts between precision modes. But Smart-Shift defaults to manual toggling, defeating its purpose. You’ll waste time hunting for the tiny mode button behind the wheel unless you enable auto-switching.
Enable Auto-Scroll Mode Transition in 2 Clicks
Open Logi Options+ > Pointer Speed > Toggle “SmartShift” to ON. Now the wheel automatically shifts from free-spin (for long documents) to ratcheted (for line-by-line editing) based on scroll speed. Test by rapidly scrolling a PDF—feel the magnetic resistance kick in when slowing down. Warning: Disable “Smooth Scrolling” in macOS/Windows settings; it conflicts with MagSpeed’s physics.
Switch Between 3 Devices Without Lifting a Finger
Juggling desktop, laptop, and tablet? The MX Master 3 pairs with three devices simultaneously, but incorrect pairing causes connection drops. Use this foolproof method to avoid the “mouse vanished” panic during critical presentations.
Fix Device-Switching Failures in Multi-OS Setups
Press the bottom toggle button to cycle devices—but if it skips your iPad, reset Bluetooth pairing: 1) Hold button 3+ seconds until LED flashes 2) Re-pair iPad via Settings > Bluetooth. For Windows/Linux, always use Logi Bolt for primary device (less interference than Bluetooth). Key insight: The LED color indicates active device: Blue=Bluetooth 1, Green=Bolt, Orange=Bluetooth 2.
Fix Common MX Master 3 Issues in Under 60 Seconds
Persistent problems usually trace to overlooked software settings, not hardware faults. These field-tested fixes resolve 95% of user complaints without contacting support.
Eliminate Cursor Lag on Glass Desks
The dark surface confuses the sensor. Solution: Place a mousepad under your laptop or use Logi Options+ > Pointer Speed > Enable “Glass Surface Mode.” This adjusts laser sensitivity—no extra gear needed. Test by hovering over a white document; if the cursor jumps, recalibrate by moving mouse in figure-eights for 10 seconds.
Restore Dead Gesture Button After macOS Updates
Apple updates often reset permissions. Go to System Settings > Privacy > Accessibility > Click “+” > Add Logi Options+. Relaunch the app and reassign gestures. If the button feels “stuck,” clean debris from the seam using a toothpick—dust jams the microswitch.
Advanced Shortcuts Power Users Swear By
Go beyond basics with these workflow accelerators. These require Logi Options+ but pay back minutes daily—especially if you handle data or video.
Copy/Paste Between Computers with Flow
Install Logi Options+ on all devices > Enable “Flow” in settings > Arrange screens side-by-side. Now drag cursor off one monitor edge to jump to another computer. Copy text on Mac, paste instantly on Windows PC. Critical step: Name networks identically (e.g., “OfficeWiFi”)—Flow fails if networks differ.
Map Thumb Button to Universal Shortcuts
Assign “Ctrl+Shift+V” (format-free paste) to the thumb button globally. In browsers, set gesture button to “Ctrl+L” (address bar focus). For developers: Map wheel press to “Terminal” toggle. Test assignments using Logi’s “Show Key Press” debug tool before saving.
Mastering how to use Logitech MX Master 3 transforms it from a premium mouse into your personal productivity engine. You’ve now activated all core features: app-specific profiles that auto-switch, MagSpeed scrolling that adapts to your speed, and cross-device Flow that eliminates cable chaos. Remember to revisit Logi Options+ monthly—new app updates often require profile tweaks. For heavy Excel or design users, dedicate 5 minutes weekly to refine button mappings; this alone saves 3+ hours monthly. Your next step? Bookmark this guide and implement one customization today—start with Smart-Shift scrolling to immediately slash document navigation time. The MX Master 3 pays for itself the moment you stop reaching for keyboard shortcuts.


